-
Notifications
You must be signed in to change notification settings - Fork 9
HOWTO: Setup provider: Your own render farm (local) for Windows users
This page is for the Windows users, who wants to easily setup the Local render farm using BlendNet. It is quite verbose and should be useful for the one who never touched console commands, so read it carefully and follow the steps precisely to make sure it will work.
Ok, let's imagine you have a simple setup:
- Client Computer - you regular notebook with installed Windows for example
- Worker Computer - some big workstation or just another available Windows machine
Those machines are in the same network (router WiFi) and you know their IP addresses (if you don't know - check "how to find computer IP address in Windows").
So you will find something like (the numbers could be different for your setup):
- Client Computer: 192.168.0.7
- Worker Computer: 192.168.0.8
If you know that your machines have some specified names (domain names) - you can use them instead if IP addresses. It really depends on your router configuration, but in general names should work fine.
First of all, check How BlendNet is working - this will help you to understand the execution processes and give you a big picture about what's happening under the hood.
Ok, let's go into the setup process itself: we will prepare a common folder to run Manager or Agent to just copy/paste it on the target computer and run a simple script to setup it.
This example will use the Client Computer both as BlendNet Addon & BlendNet Manager and the Worker Computer as the BlendNet Agent one. But overall you can run those components on a different machines.
First of all - let's download the distributives we need to run the Manager or Agent:
-
Blender - choose the version (better to use the same version as you planning to use on the Client) and make sure you downloading the "Portable (.zip)" distributive. This version will be used to execute render and composition.
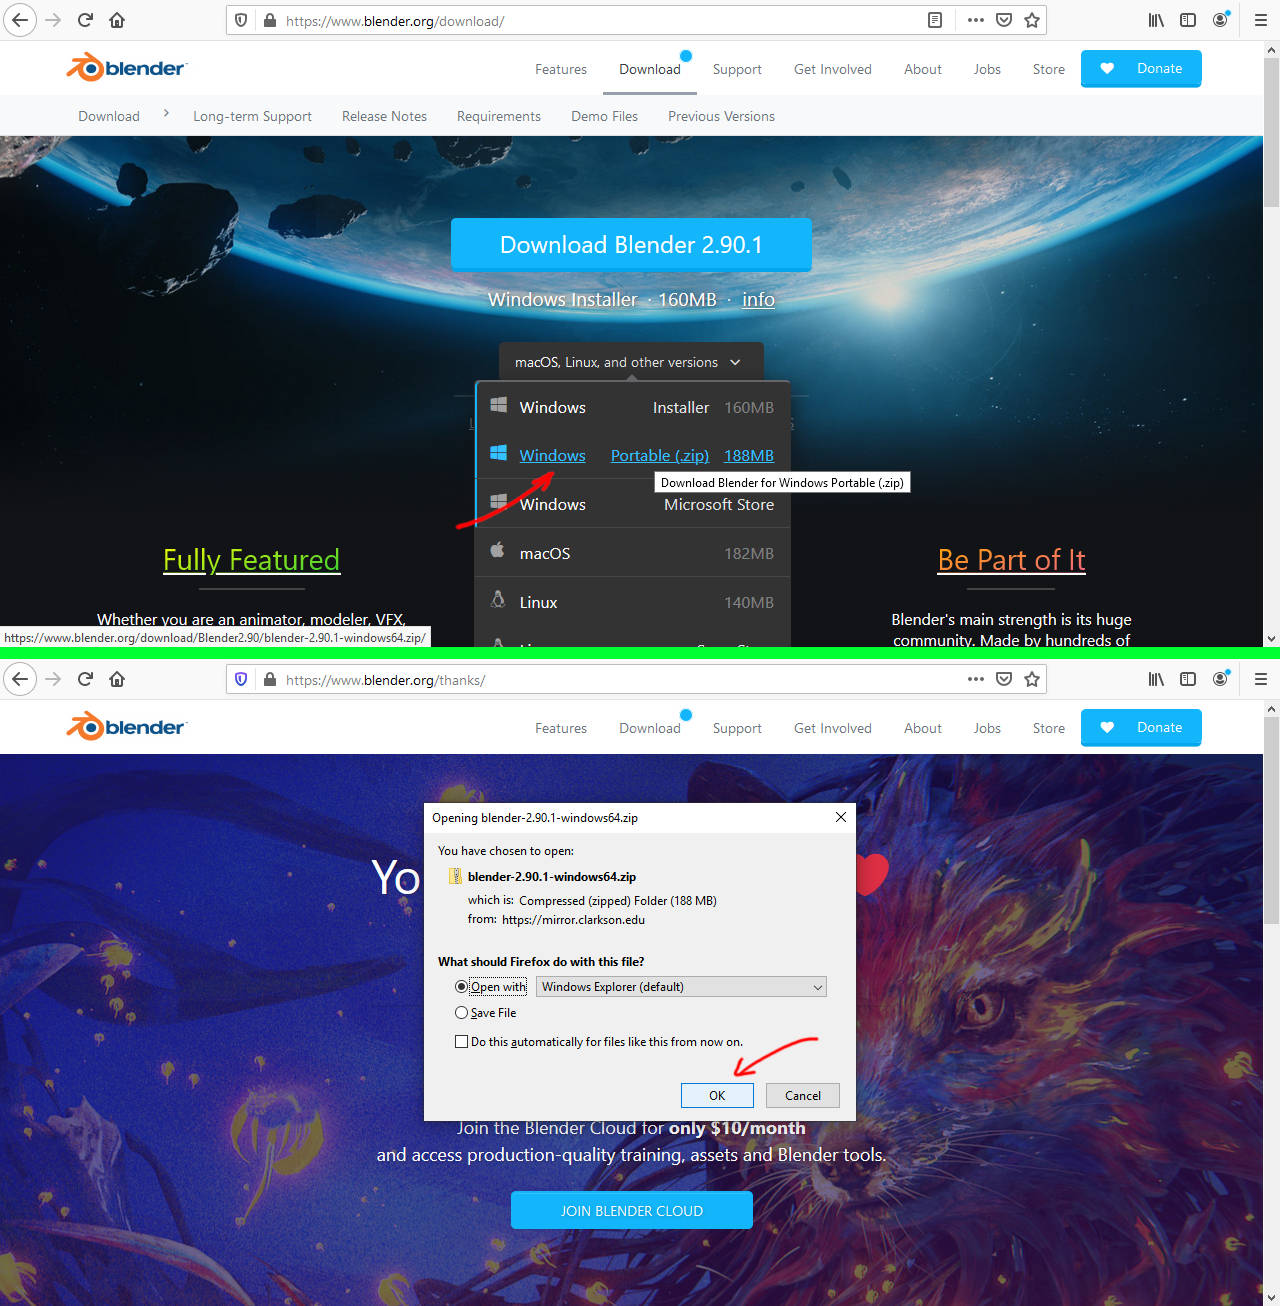
-
BlendNet - just download the latest ".zip" distributive and you will be good.
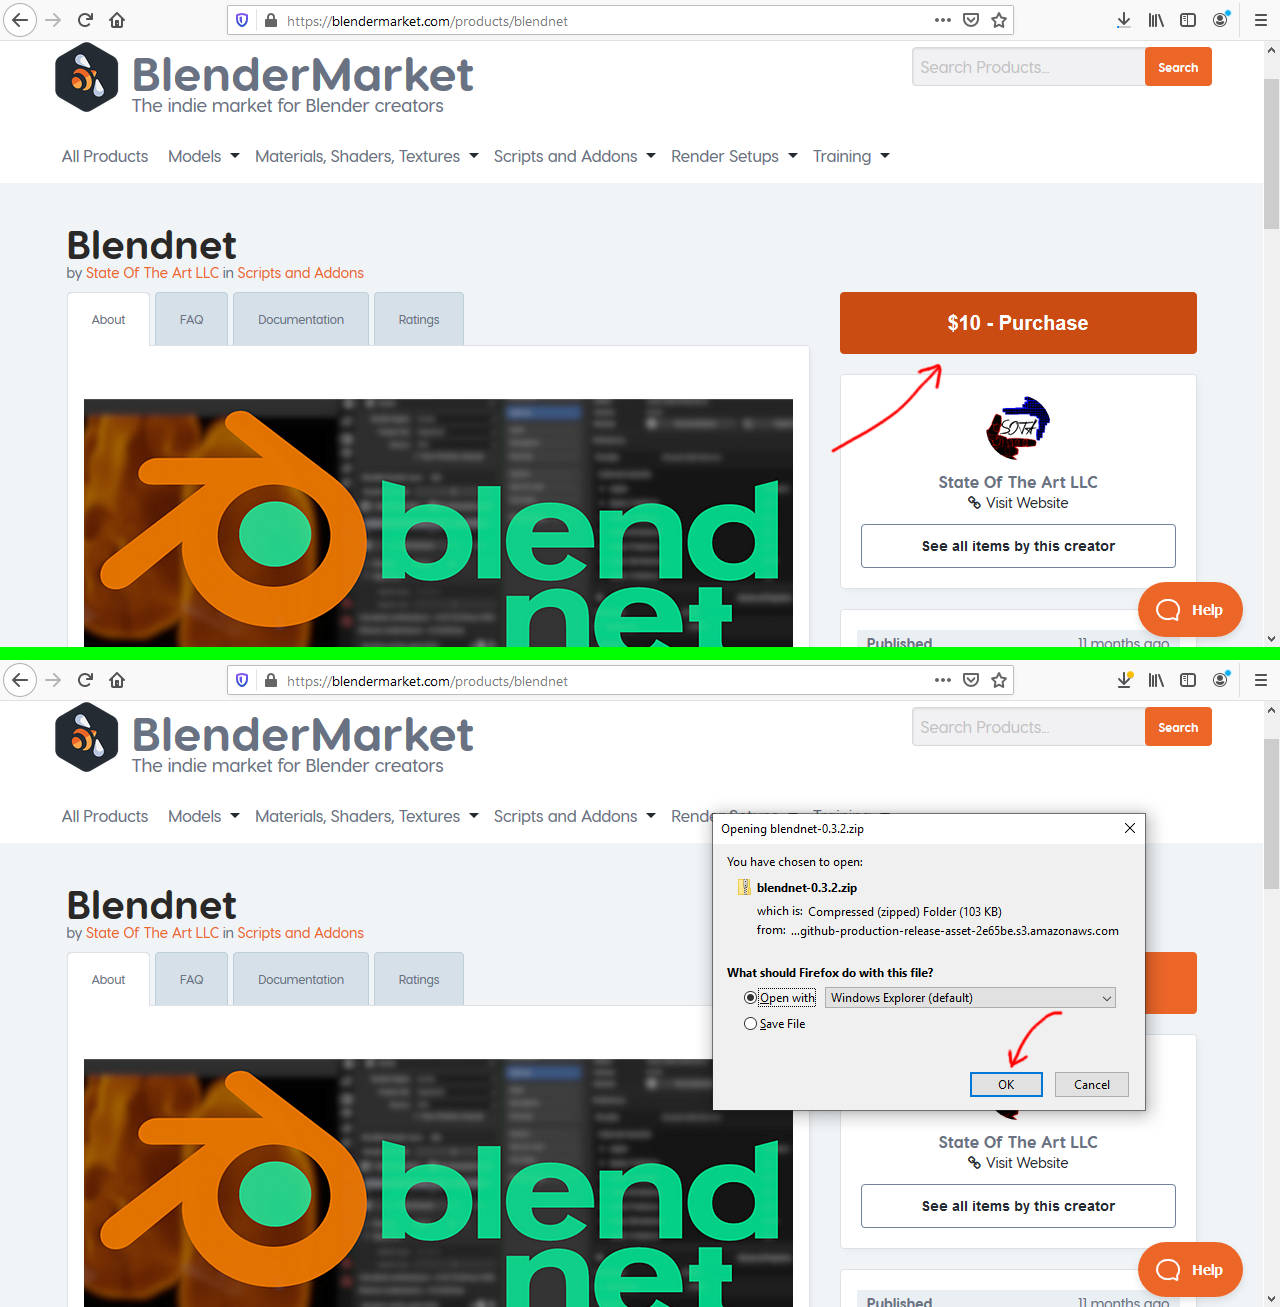
In addition you will need to setup the TLS certificates to ensure your data will be safe, so download openssl distributive to generate those certificates:
-
OpenSSL (or check the official openssl page: https://wiki.openssl.org/index.php/Binaries) - this software will generate the proper certificates for us.
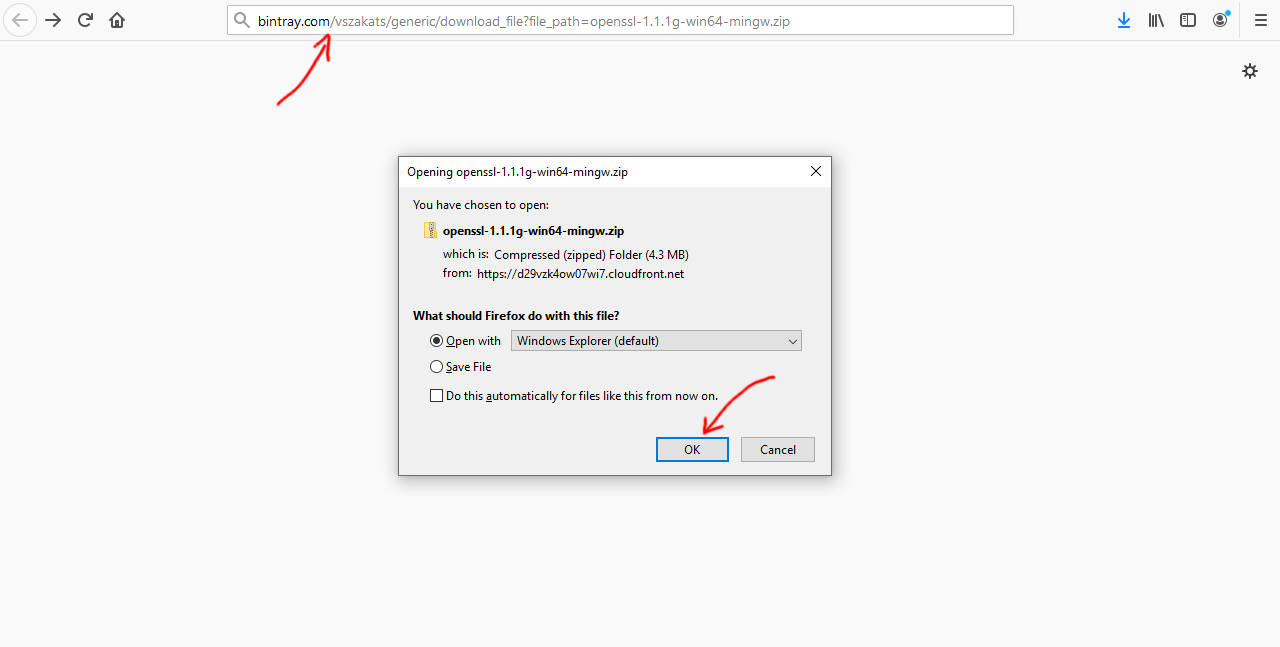
Now let's prepare the folder structure of our setup.
-
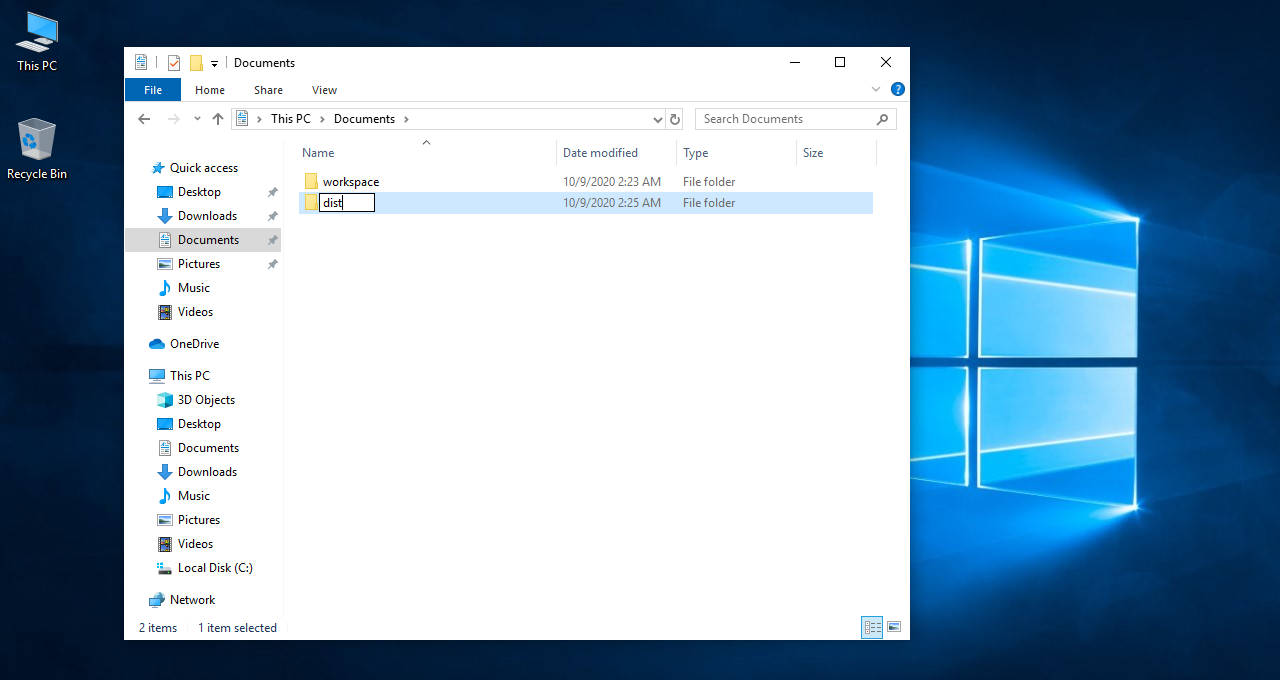
Create the basic folder - it will contain everything we need to run the Manager or Agent, in my case I just use "Documents" folder since it's empty and easy to access. If you will choose other folder, please be ready to solve the file access/permission issues.
-
Create the "workspace" directory in the base folder - it will be used as current working directory for Manager or Agent, because those components stores some work data (like cache) in the dir where they was started.
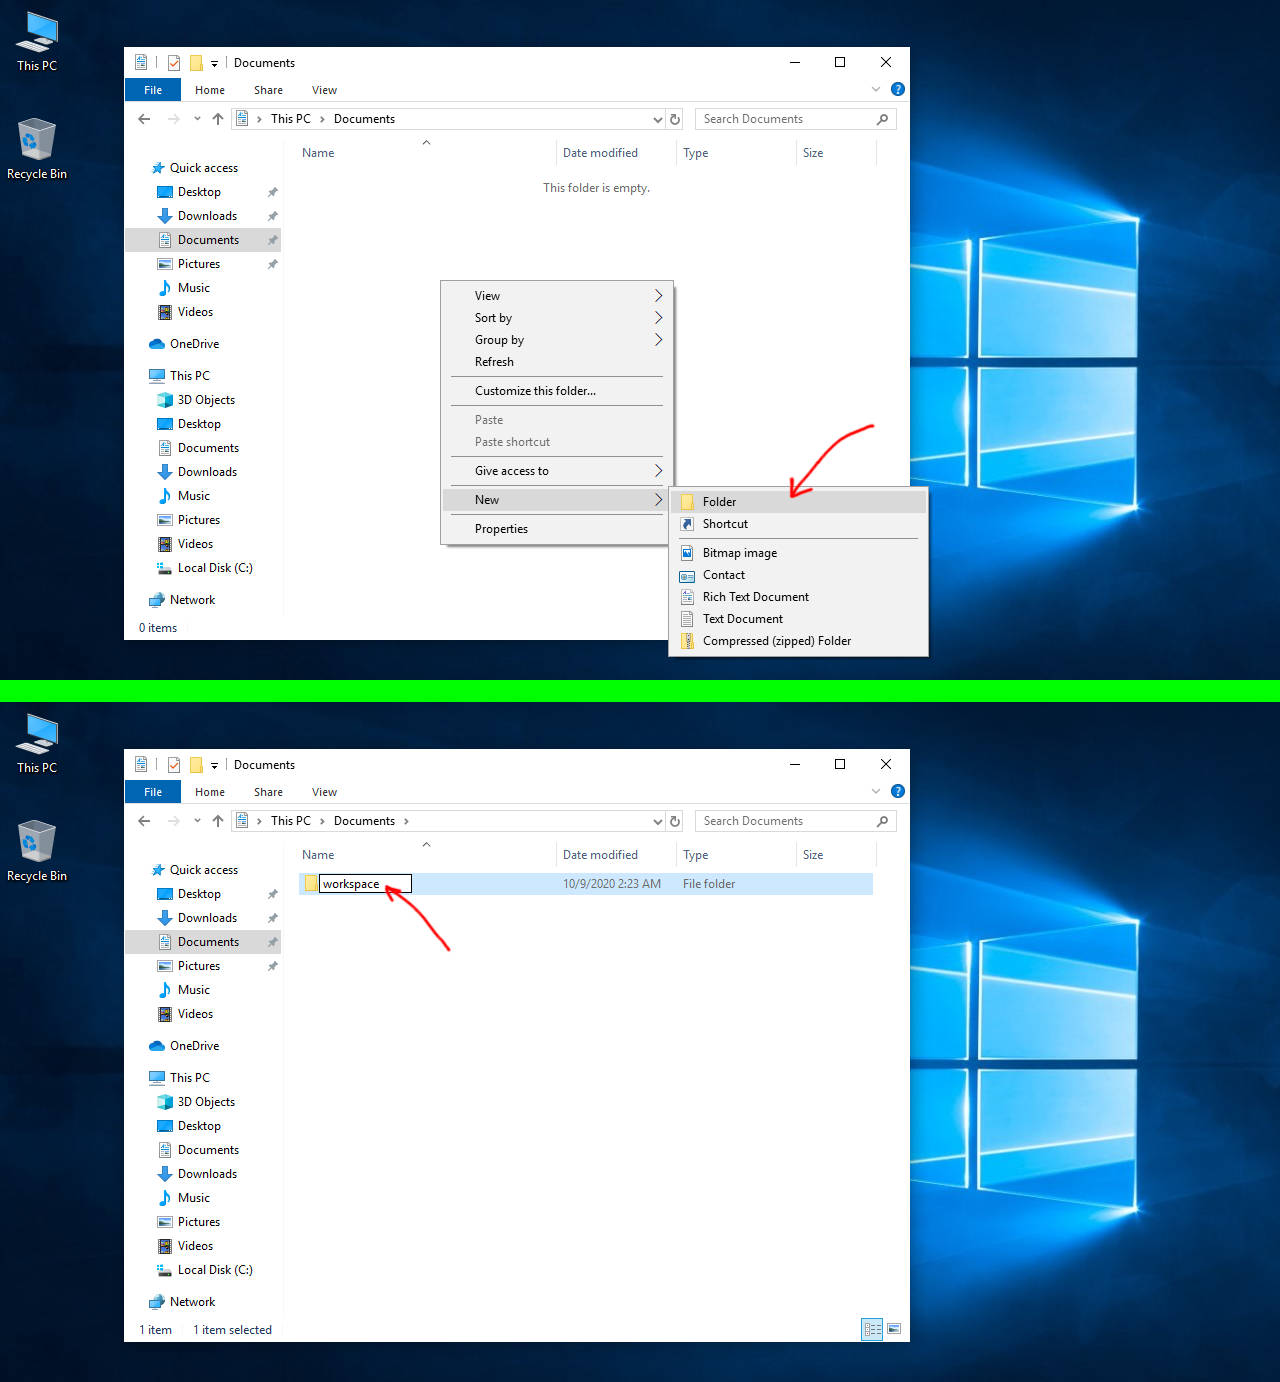
-
Create the "dist" directory - it will contain the unpacked distributives.
-
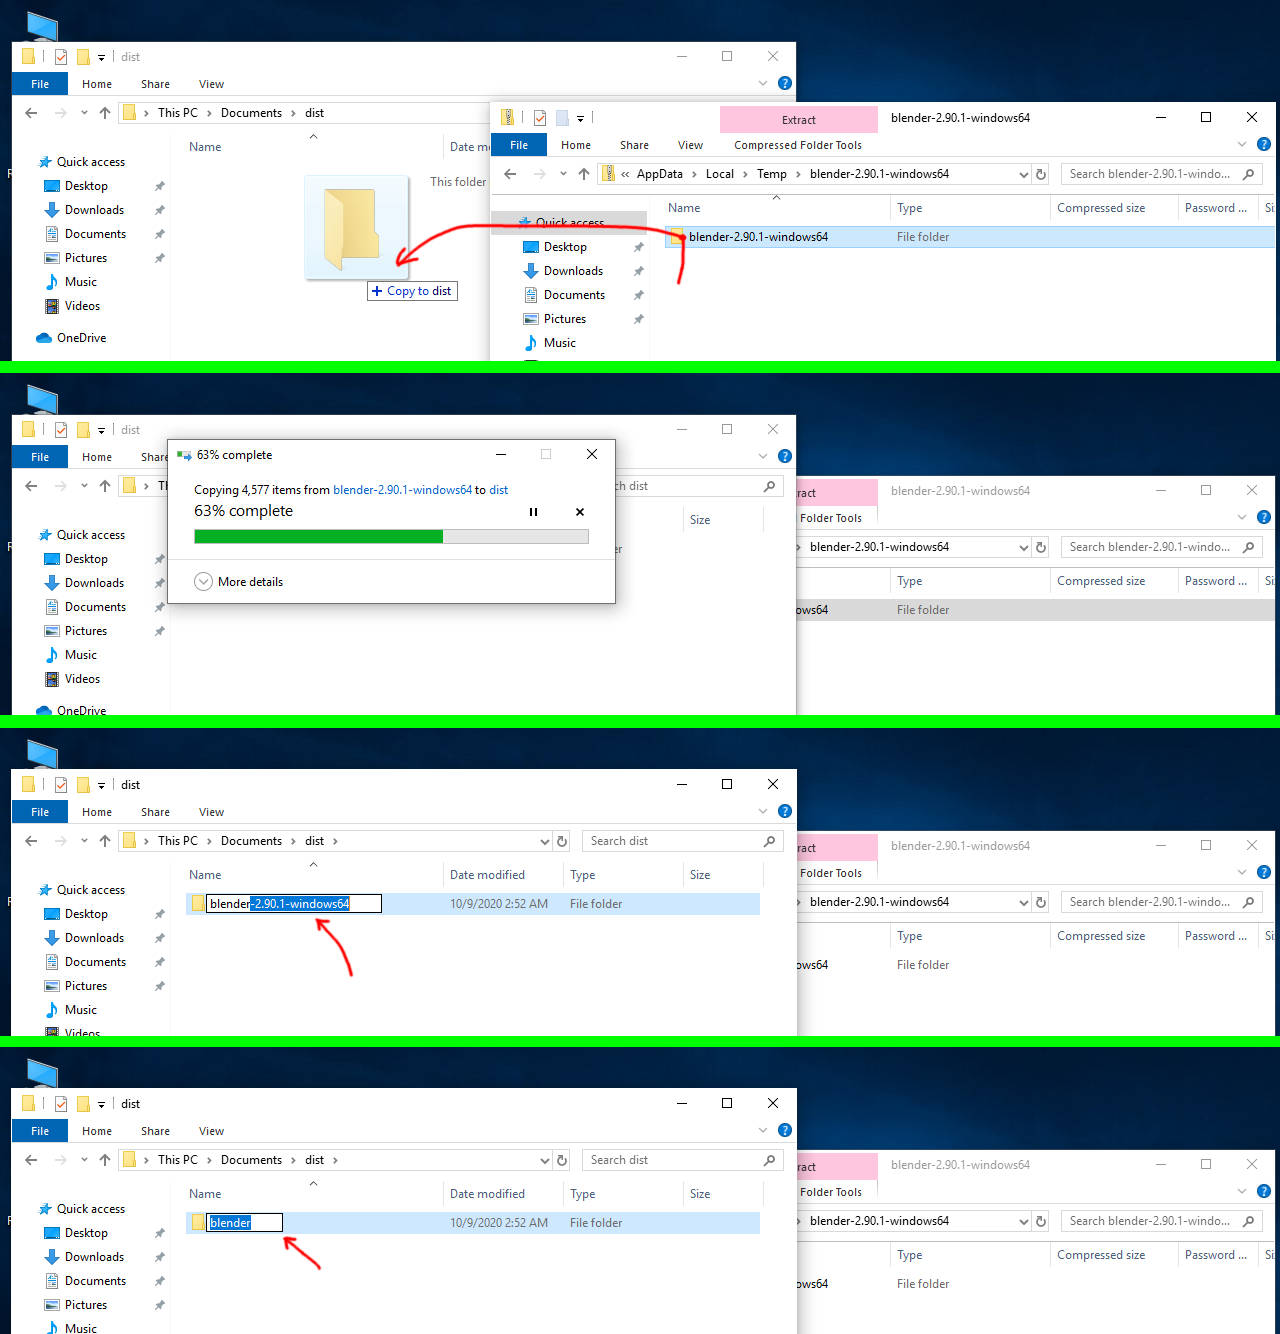
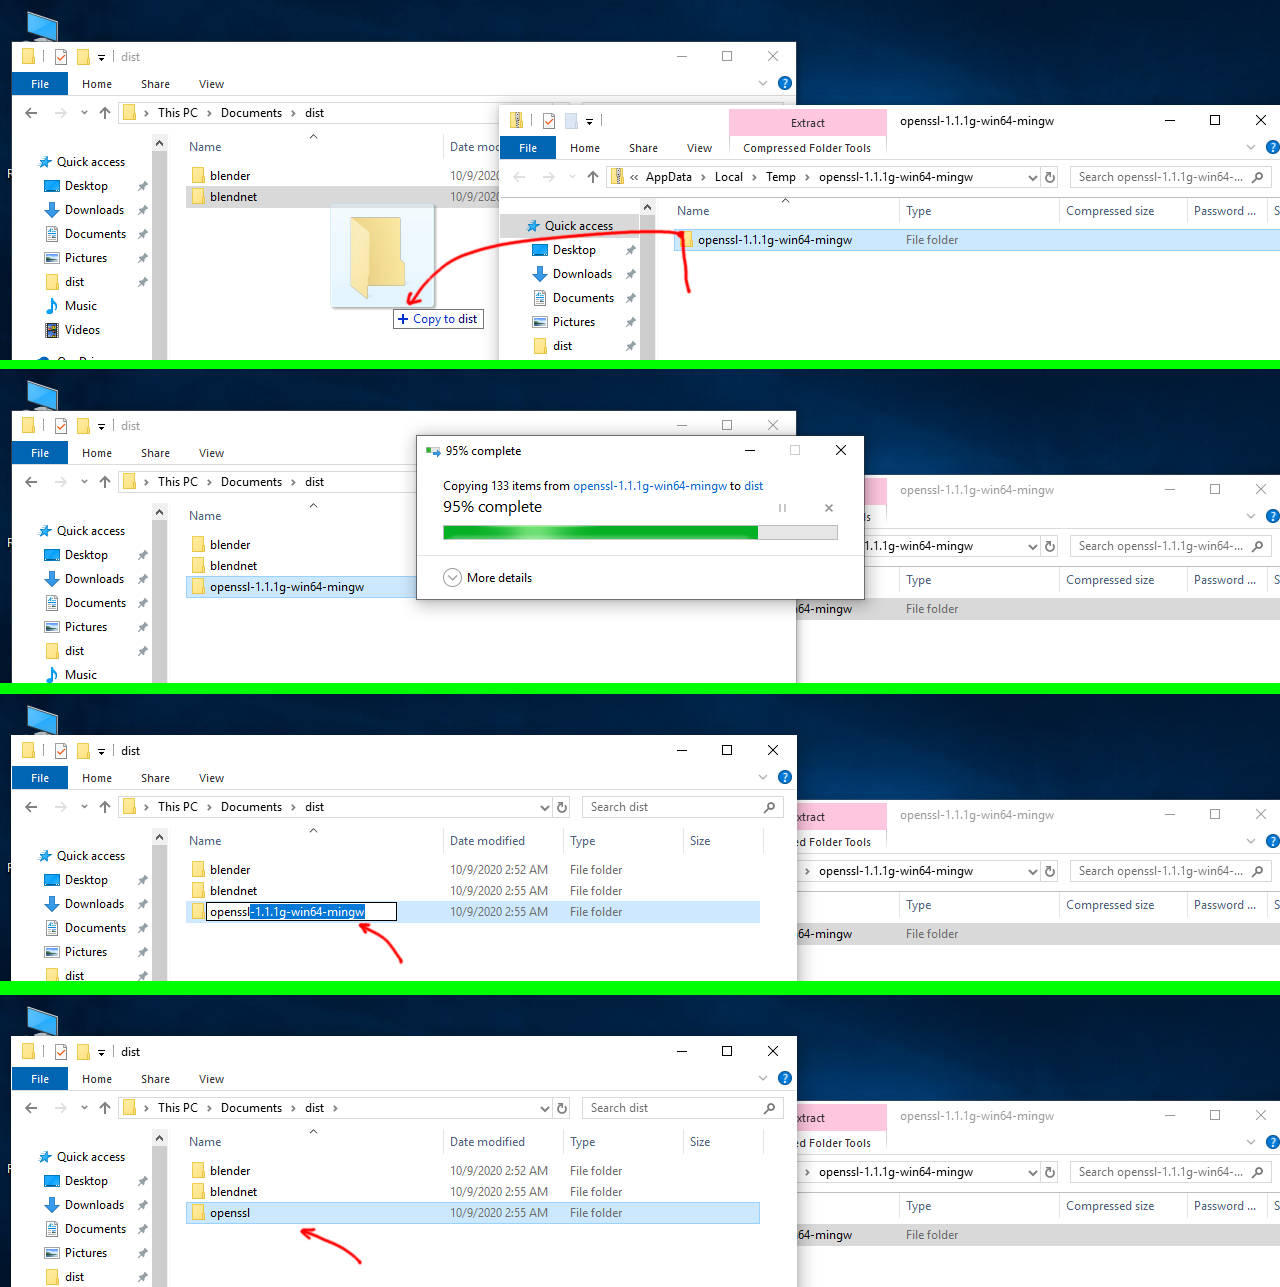
Unpack the distributives we downloaded to the "dist" directory:
-
Blender - unpack & rename:
-
BlendNet - unpack:

-
OpenSSL - unpack & rename:
-
TLS channel encryption is the fastest way to properly secure the data transfer, and it's not hard to establish it - so BlendNet has no other way but to use this protection, because the modern world demand it as a minimum - not encrypted communications are dead already.
To generate the required key & certificate just execute the next steps:
-
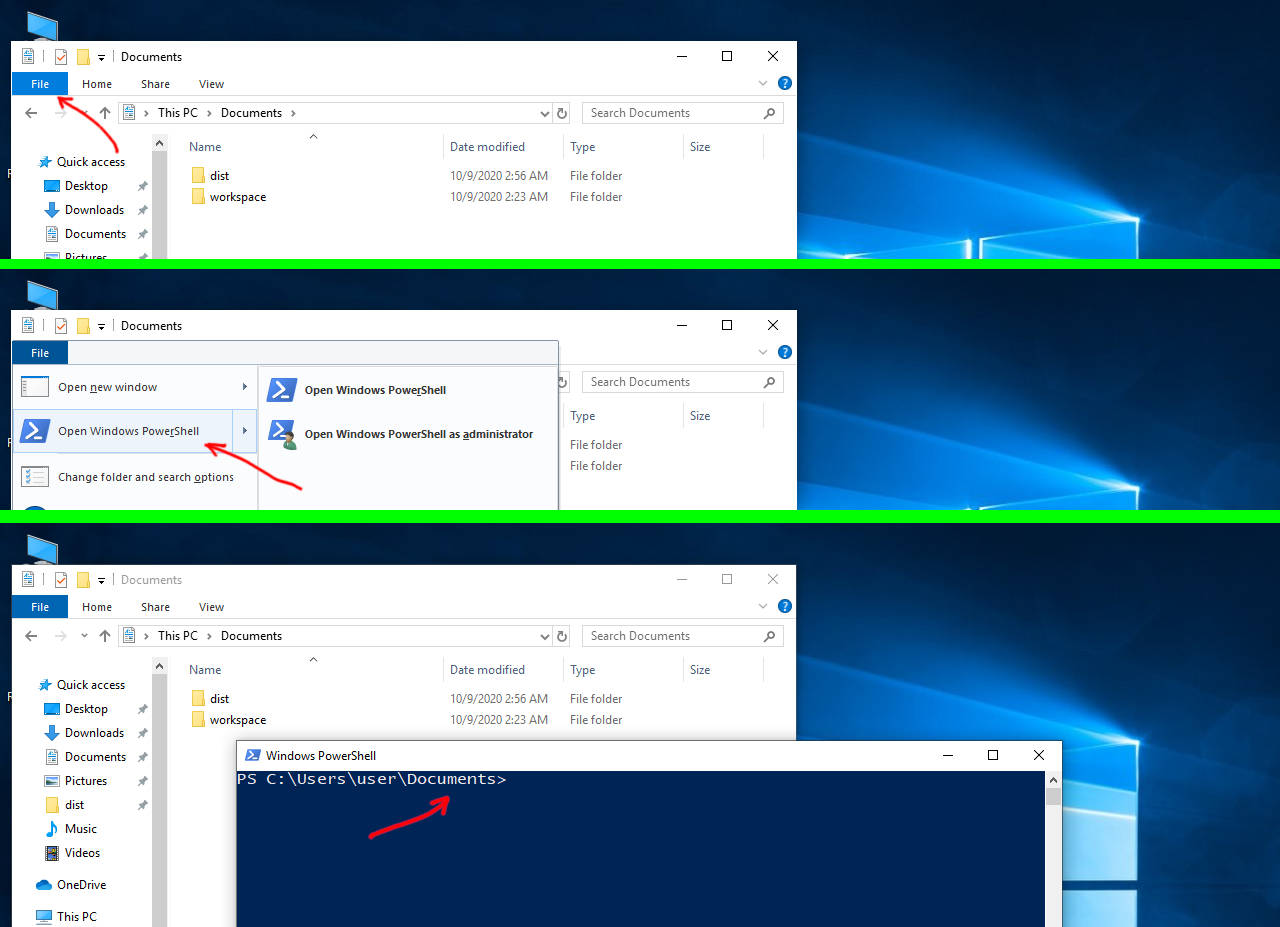
Open the Power Shell in the base directory - it allow to run the non-gui commands, which requires some params.
-
Copy and paste the command to the PowerShell input and press "Enter" keyboard key - and you will see how OpenSSL command executes and creates the certs in the "workspace" directory:
.\dist\openssl\openssl.exe req -x509 -nodes -newkey rsa:4096 -keyout .\workspace\server.key -out .\workspace\server.crt -days 3650 -subj "/C=US/ST=N/L=N/O=N/OU=N/CN=blendet-service" -config .\dist\openssl\openssl.cnf
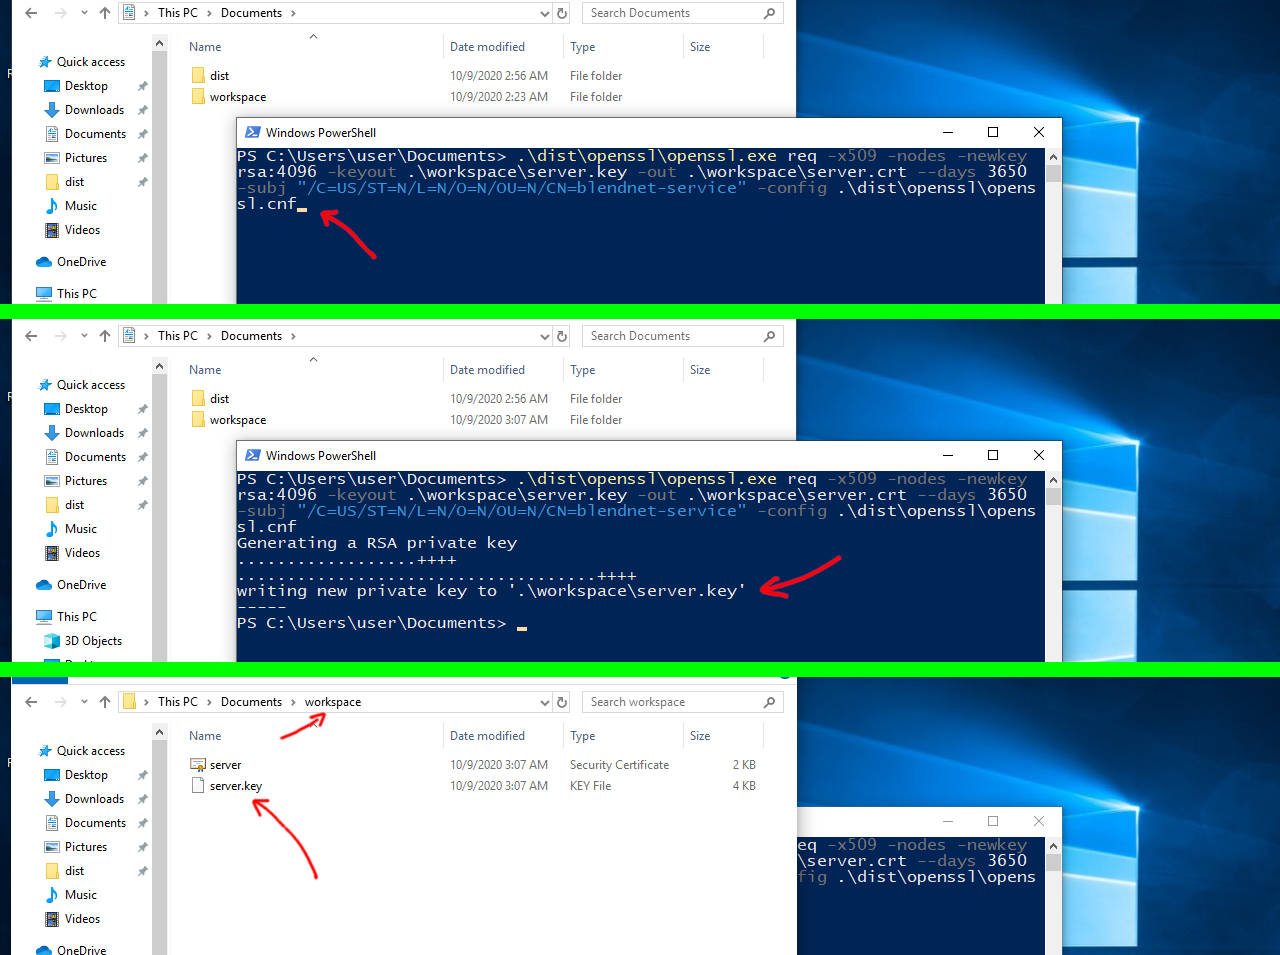
-
Copy the "server.crt" to "ca.crt" by copy-paste the command to PowerShell and press "Enter" - we will use the same cert as the certification authority (CA) to validate the endpoints on Addon & Manager side.
cp .\workspace\server.crt .\workspace\ca.crt
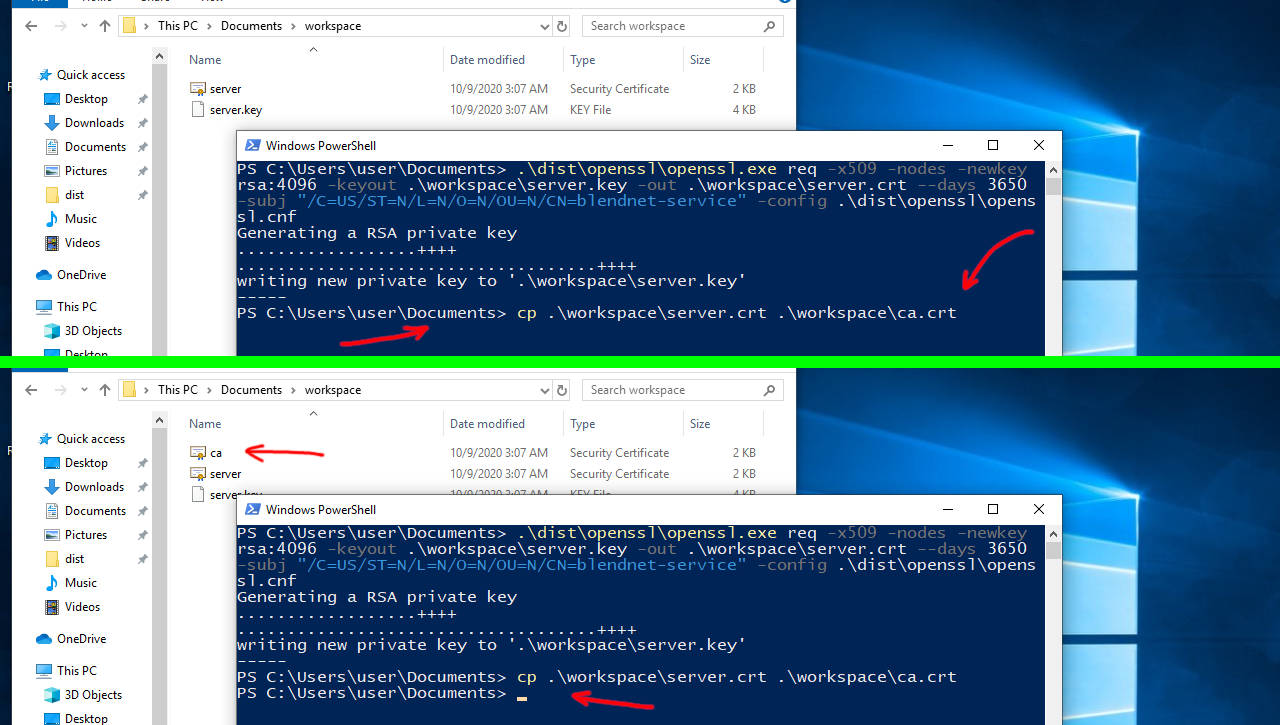
And if it's your first time of using the console - my congratulations! That's the way any automation works till today, GUI is almost just a wrapper that makes your day-to-day life harder :)
That was a simple setup, the certificates infrastructure could be much more complex and secure, but if you new to this things you just need to know - that these key and certificate we just created should be kept in secret. Just make sure they are not going somewhere else, but to your controlled machines, otherwise the data you sending could be intercepted.
Ok, now to simplify our life we will create 2 small scripts to easy run the Manager or Agent.
-
Create "manager-run.cmd" script - it will allow you to run Manager by double click on the script file:
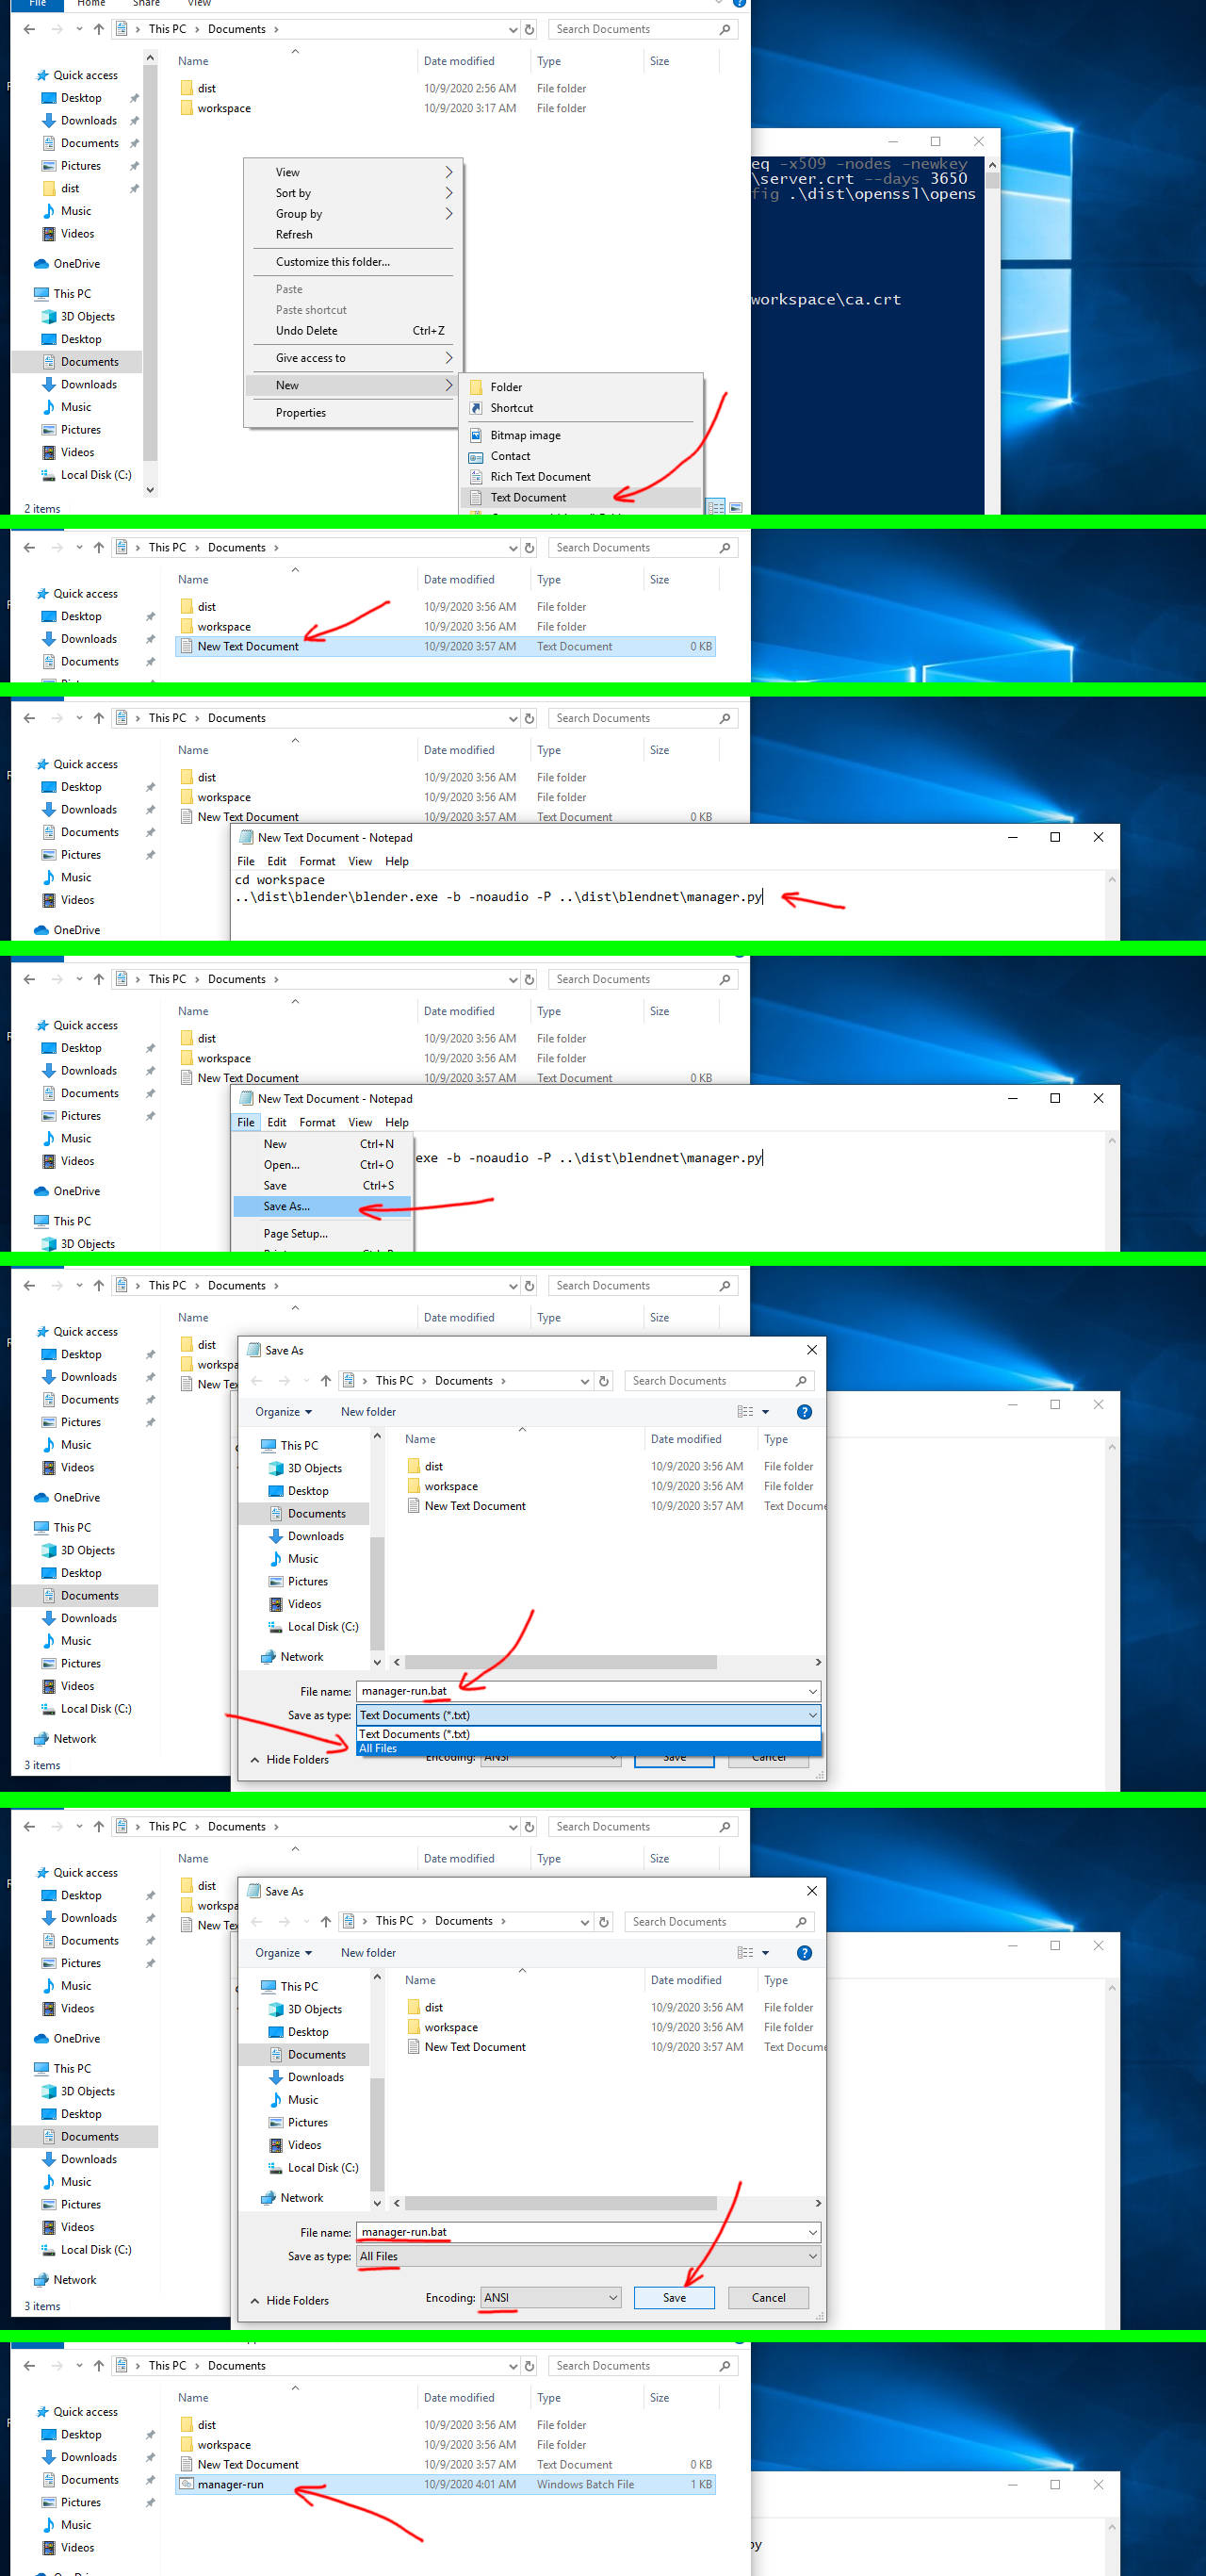
-
Create "agent-run.cmd" script - it will allow you to run Agent by double click on the script file:
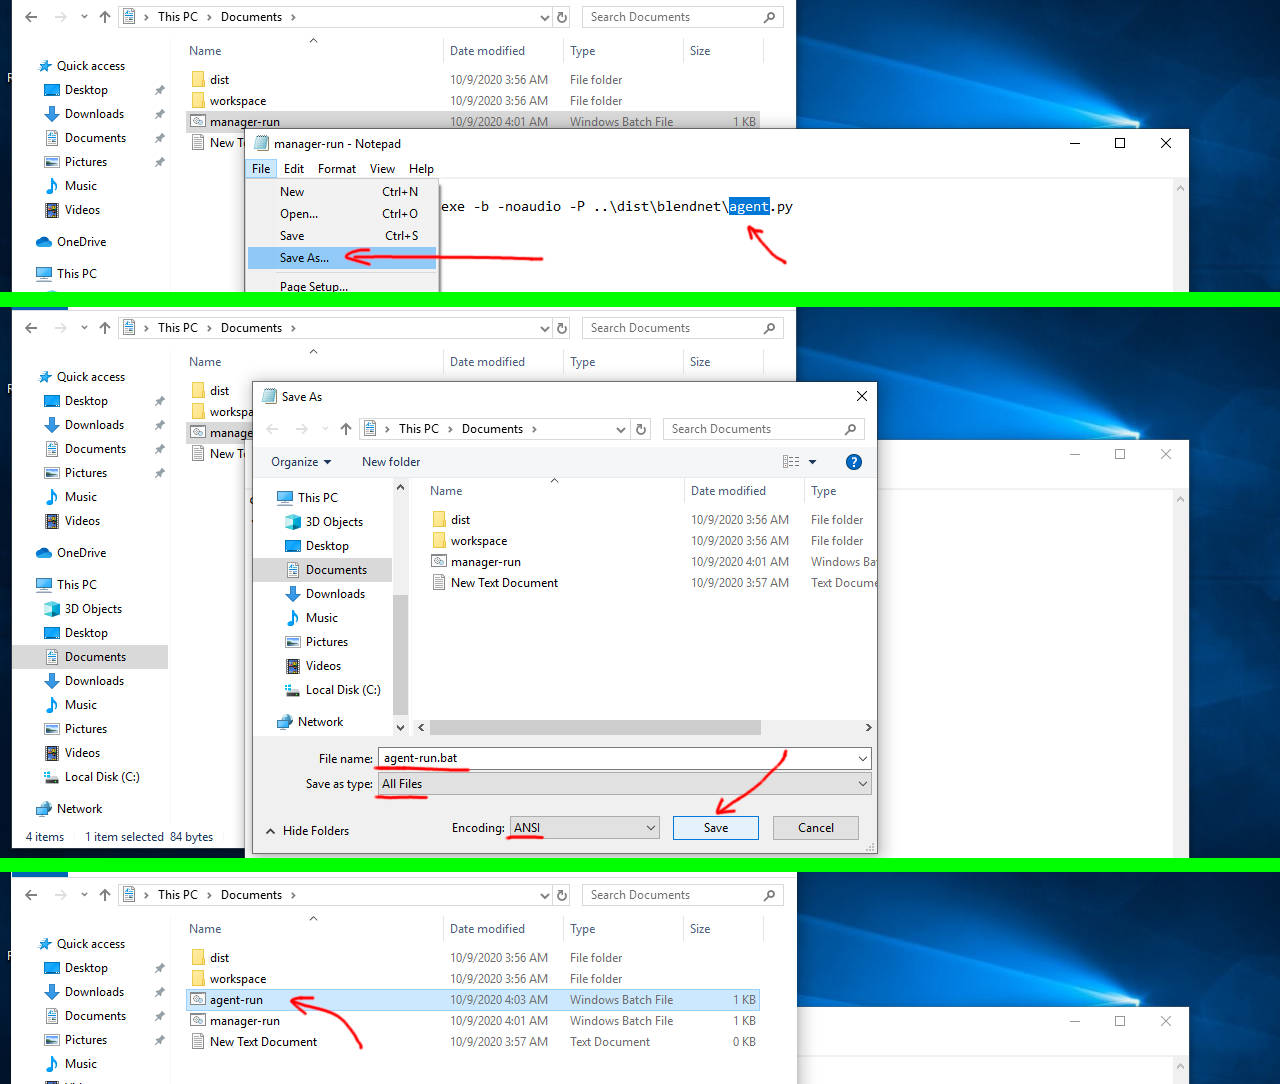
-
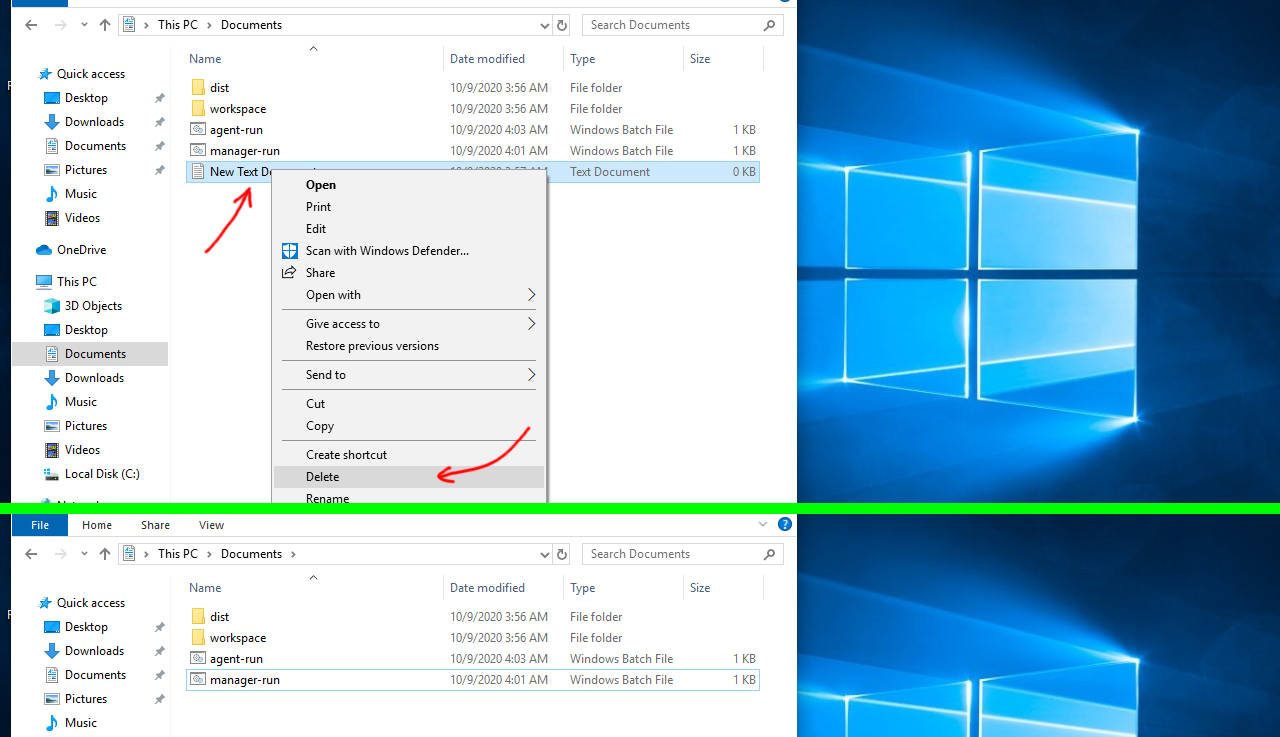
Remove the not needed text file - our bat scripts are ready and we no longer need it:
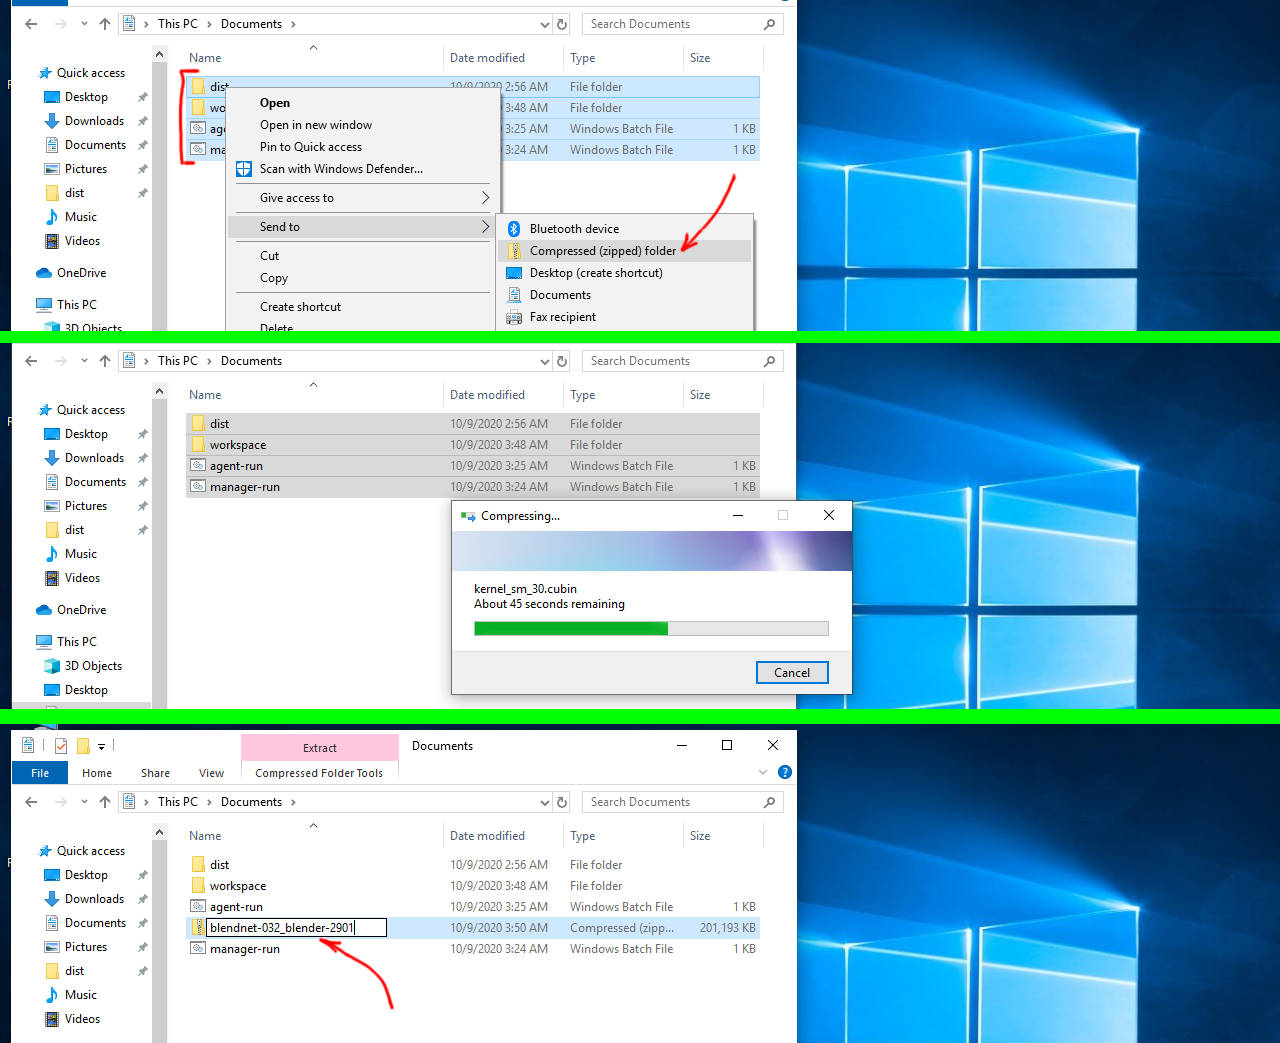
To make a golden archive - let's pack it and that will be easy to just transfer and unpack to have the ready-to-run Manager or Agent. We will use it later to start-up the Agent Computer.
BlendNet Manager needs to be running to listen for requests. Since we're using the same Client Computer machine for both Client and Manager - you can just double-click on the "manager-run" script and you will see that CMD was started. If you running it the first time - Windows firewall will ask you to allow blender to listen on and the Manager is initializaing:
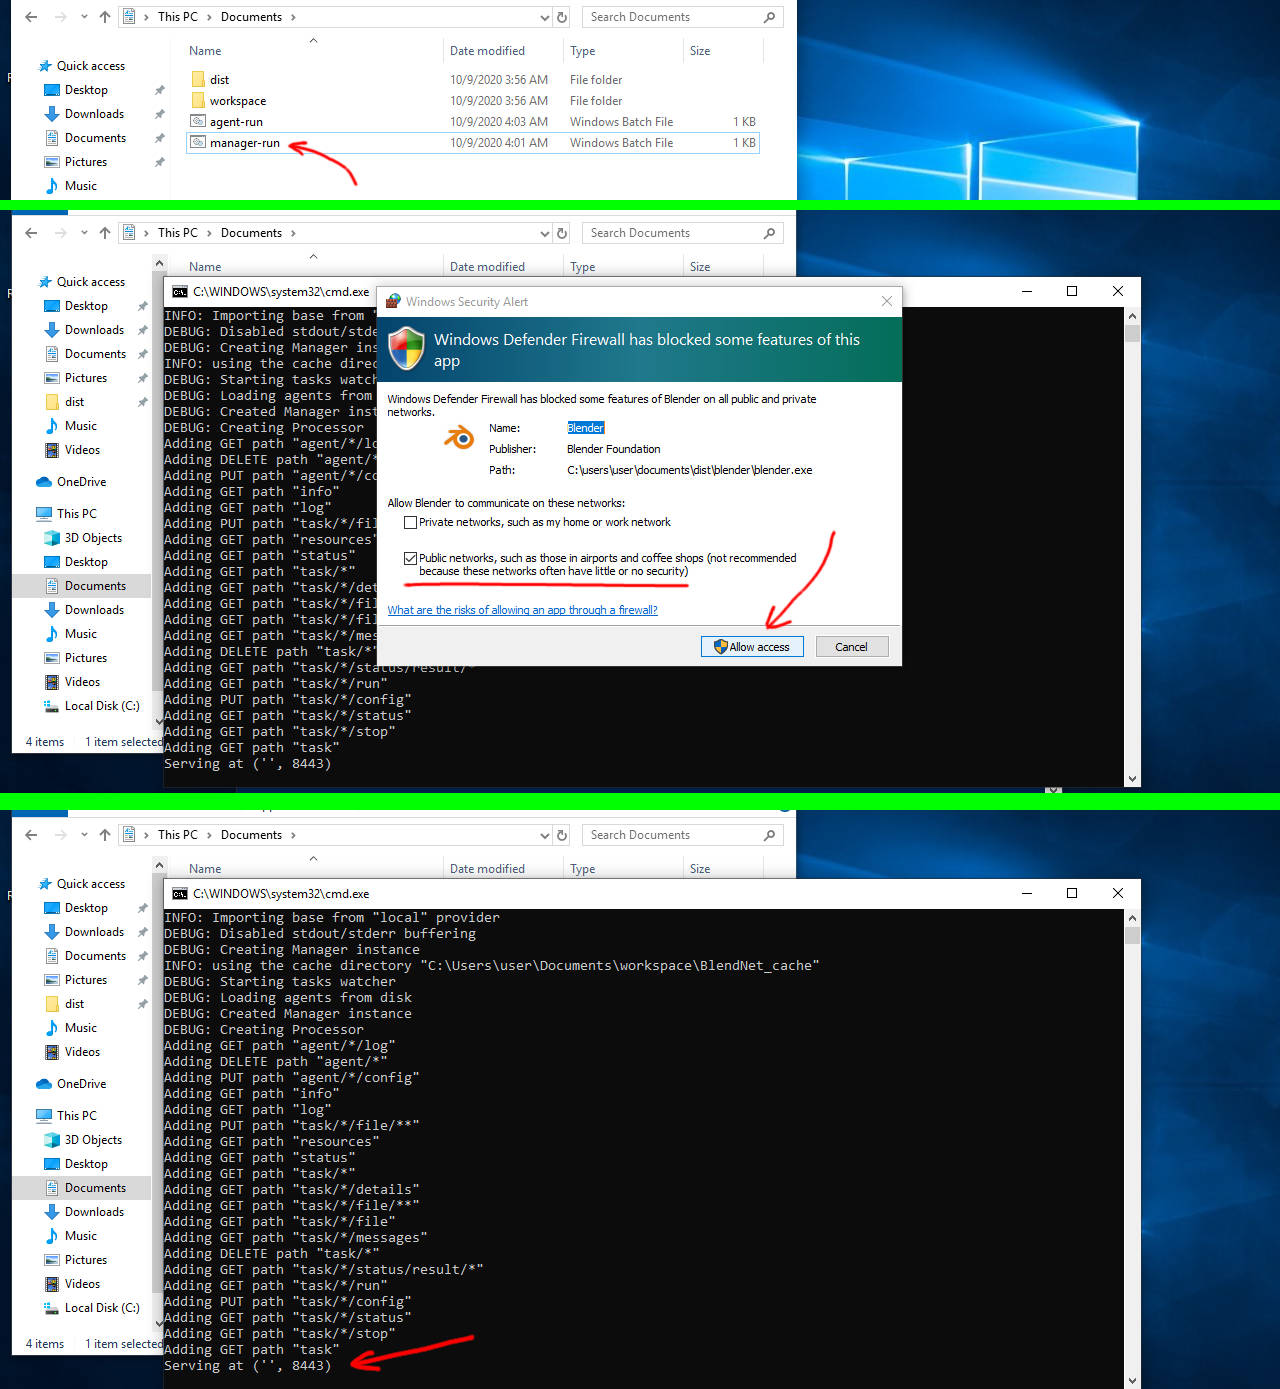
Don't close this CMD window until you want to stop the Manager. If it is here - the Manager is running and you don't need to execute any other blender instance. CMD shows the Manager activity and printing logs to help you understand what's happening on the Manager.
You can test it by opening this link in your favorite browser (it's Firefox, right? ;):
https://192.168.0.7:8443/api/v1/info
Just change the IP address to your machine one where the Manager is running. You will see that the browser will scream about "potential security risk", but we should not worry about that - because in this case browser just don't recognize our certificate we just generated and it's fine. So find "continue" button and you will see the Manager response:
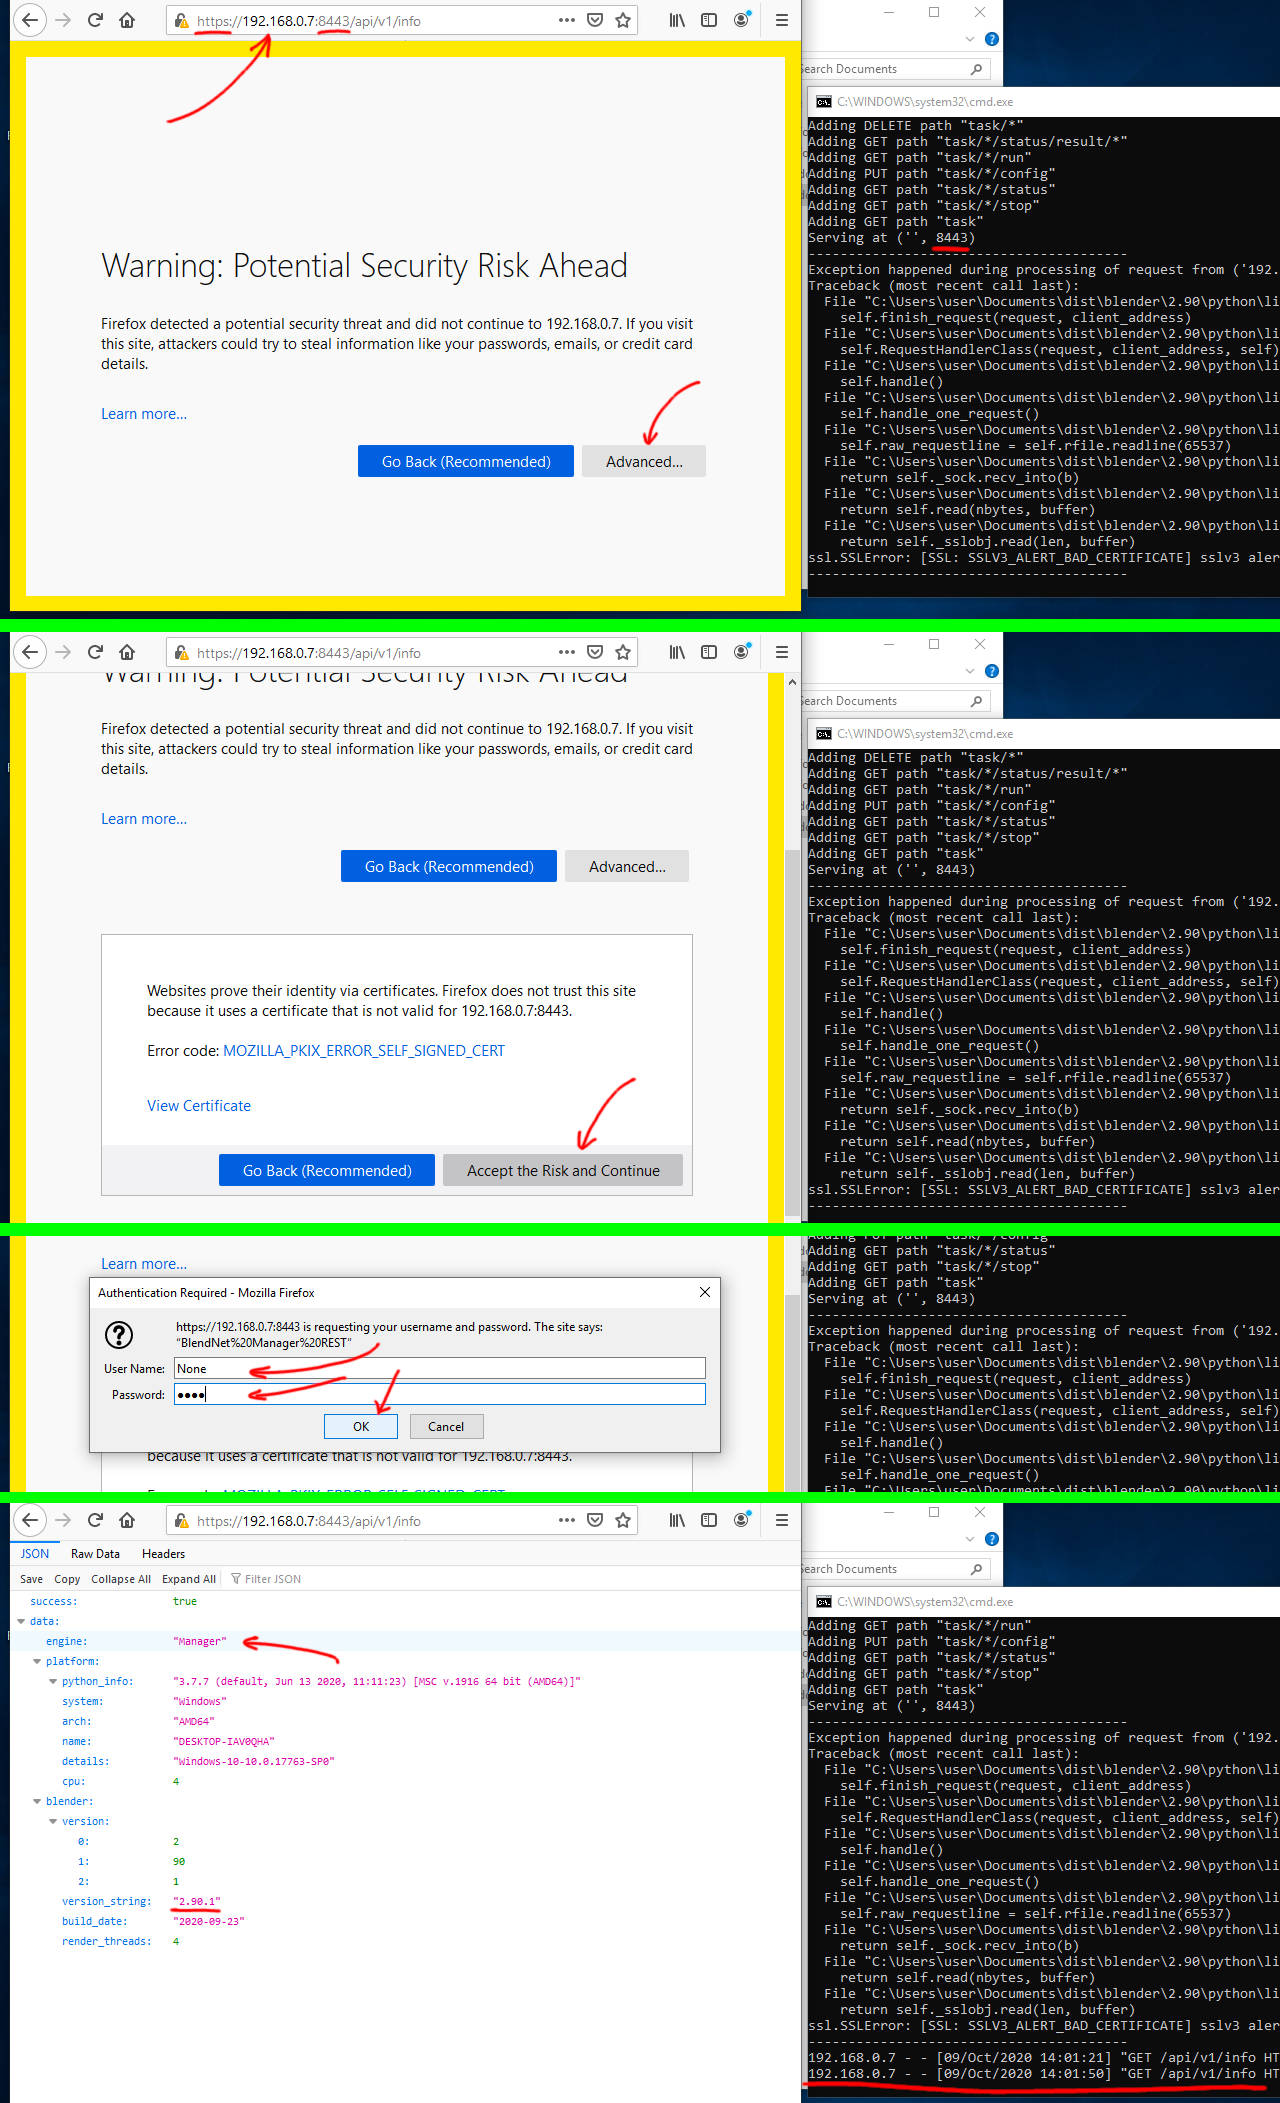
The Manager will ask for Login and Password - and they are "None" and "None" by default for both Manager and Agent - not really secure, but if you're gping to the production setup - they could be configured via json files in the workspace directory, read about that here:
If you see quite the same response from the Manager - you're good. Just check the "engine" field contains "Manager" and "version_string" of blender contains the required version.
In case you don't see this info in your browser or have some other issues with testing - probably you will need to check that the network or firewall on your machine is working correctly.
WARNING: You need to take seriously any security risk - this case it's false-positive, but the other ones could be really bad and you should avoid such sites.
To run the Agent on Worker Computer you need to transfer the golden archive we prepared before from the Client Computer via flash drive or over the network. Anyway copy the archive and unpack it to some folder:
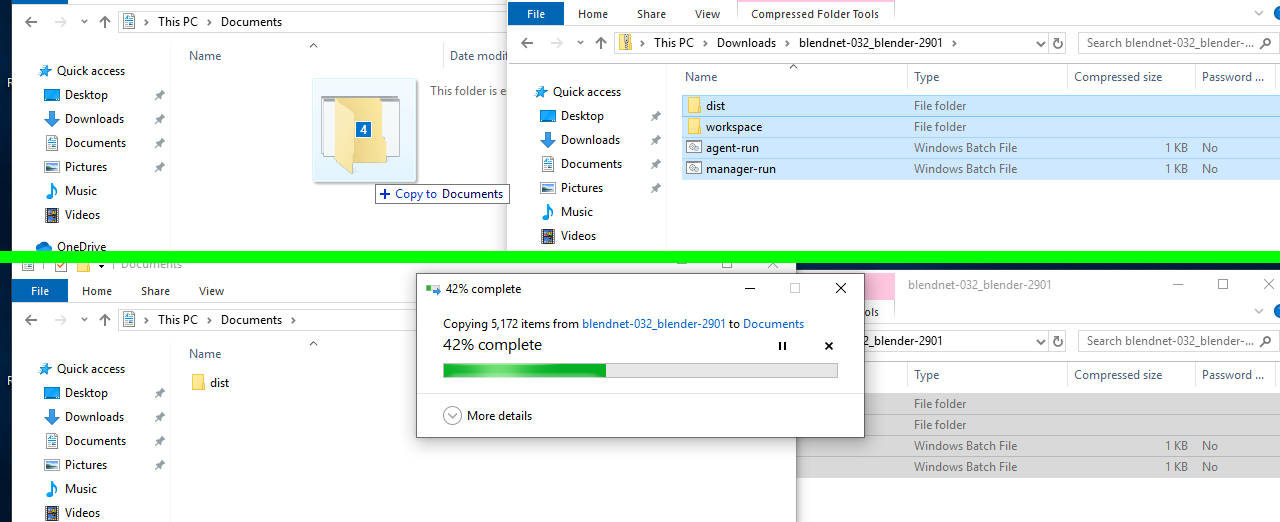
Next you need just to double-click on the "agent-run" script and the Agent will run quite the same as Manager (but instead of 8443 it uses 9443 port by default):
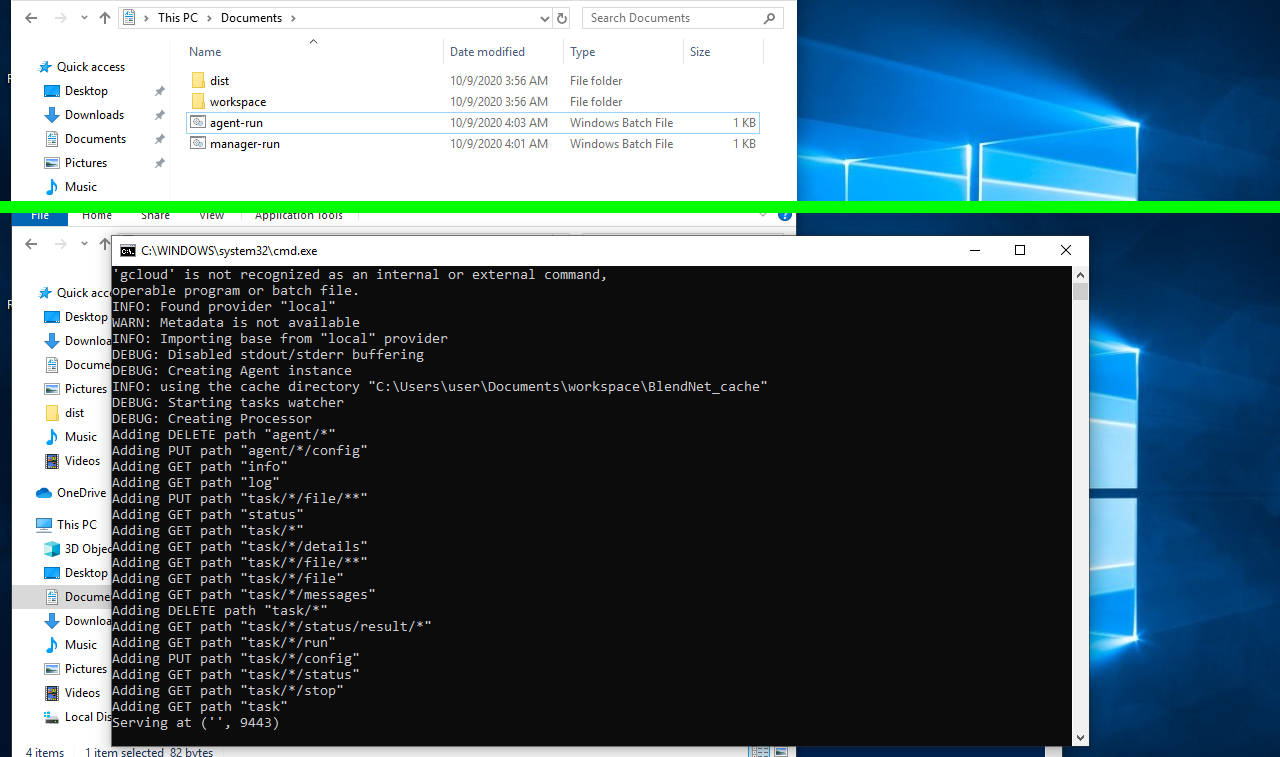
Don't close this CMD window, until you want to stop the Agent. If it is here - the Agent is running and you don't need to execute any other blender instance. CMD shows the Agent activity and printing logs to help you understand what's happening on the Agent.
You can test the Agent the same way as Manager - just use Worker Computer IP and 9443 port.
https://192.168.0.8:9443/api/v1/info
Check that the "engine" field contains "Agent" value and the required version of blender is ok.
In case you need to render on Client Computer - you can run Agent on it too (just make sure it will use the different workspace to not interfere with the Manager) and connect it later in the next step.
Now we need to tell the Manager about the started Agent to register and use it. But prior to that BlendNet Addon should be setup properly. I'm expecting you already setup Blender to run BlendNet Addon, if not - check the documentation here.
This actions need to be executed only on the Client Computer which will be used to send the tasks to the Manager, Agents or Manager nodes don't need such configuration.
-
First of all you need to go to Blender
Preferencesand chooseAdd-onstab. After that findblendnetin the list of addons, open it and choose the Local provider: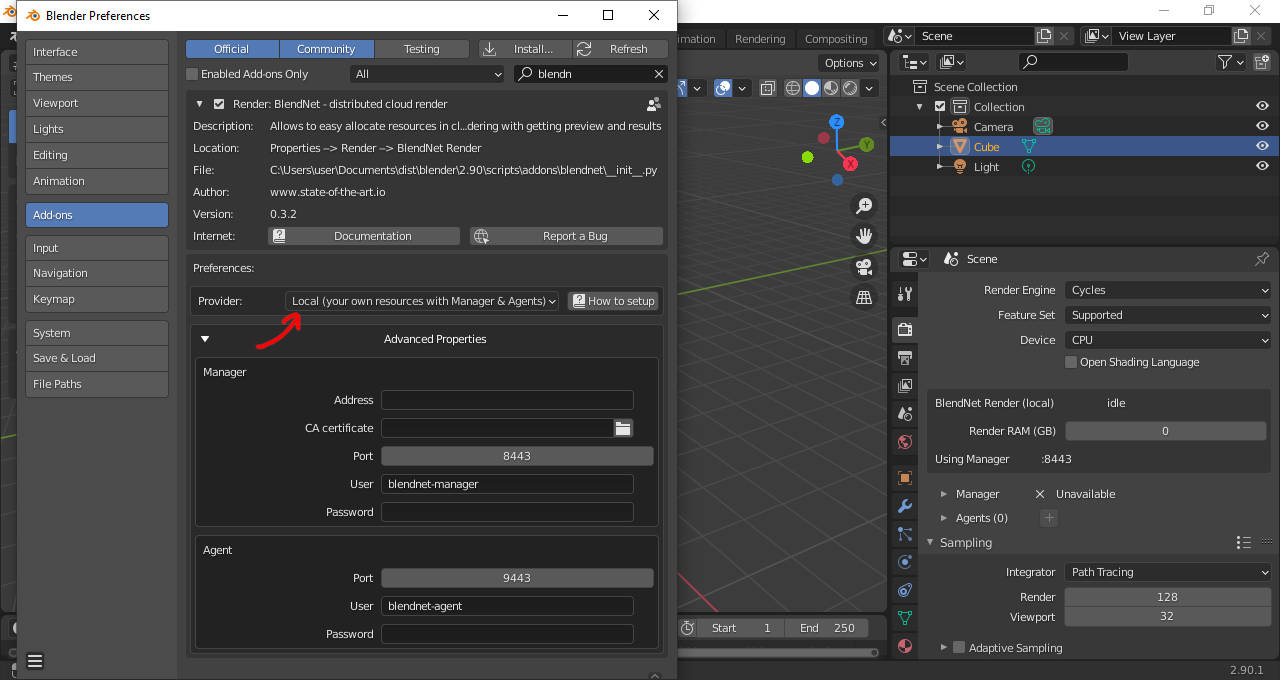
-
Set the Manager configuration as described above:
-
Address- IP or DN of the Manager, in our case it's "192.168.0.7"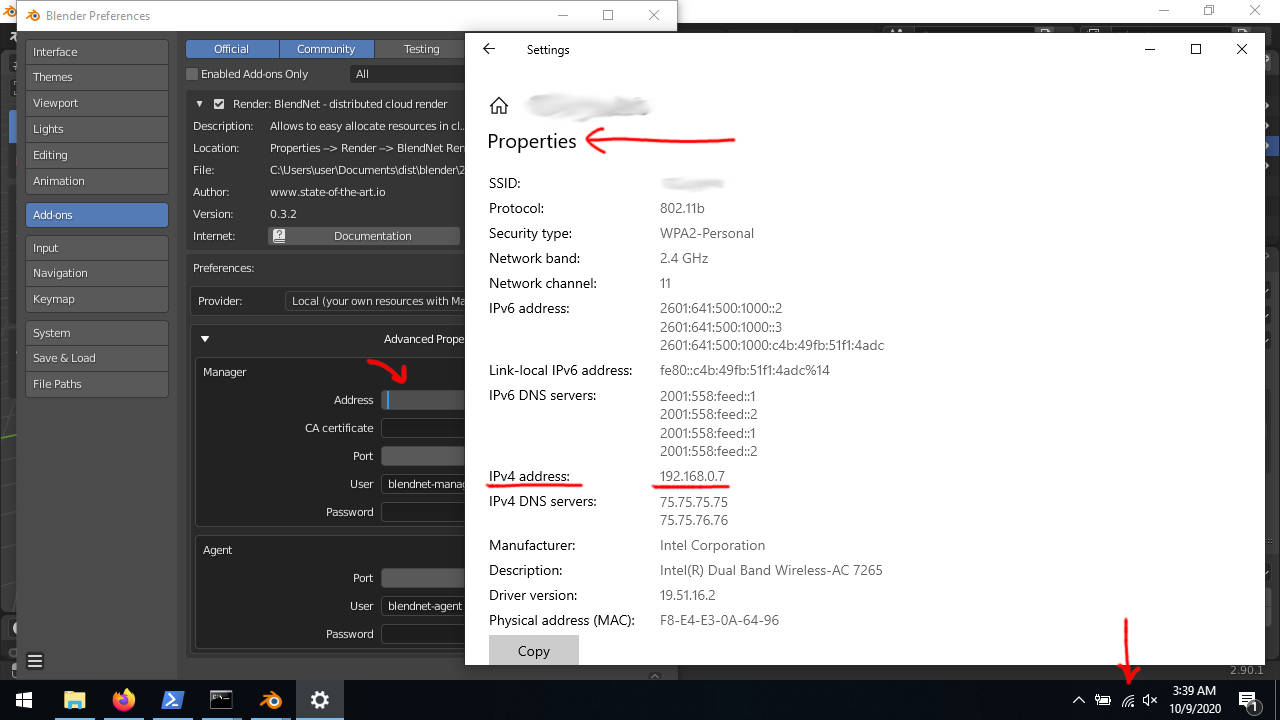
-
CA certificate- we using simple self-signed certificate, so choose it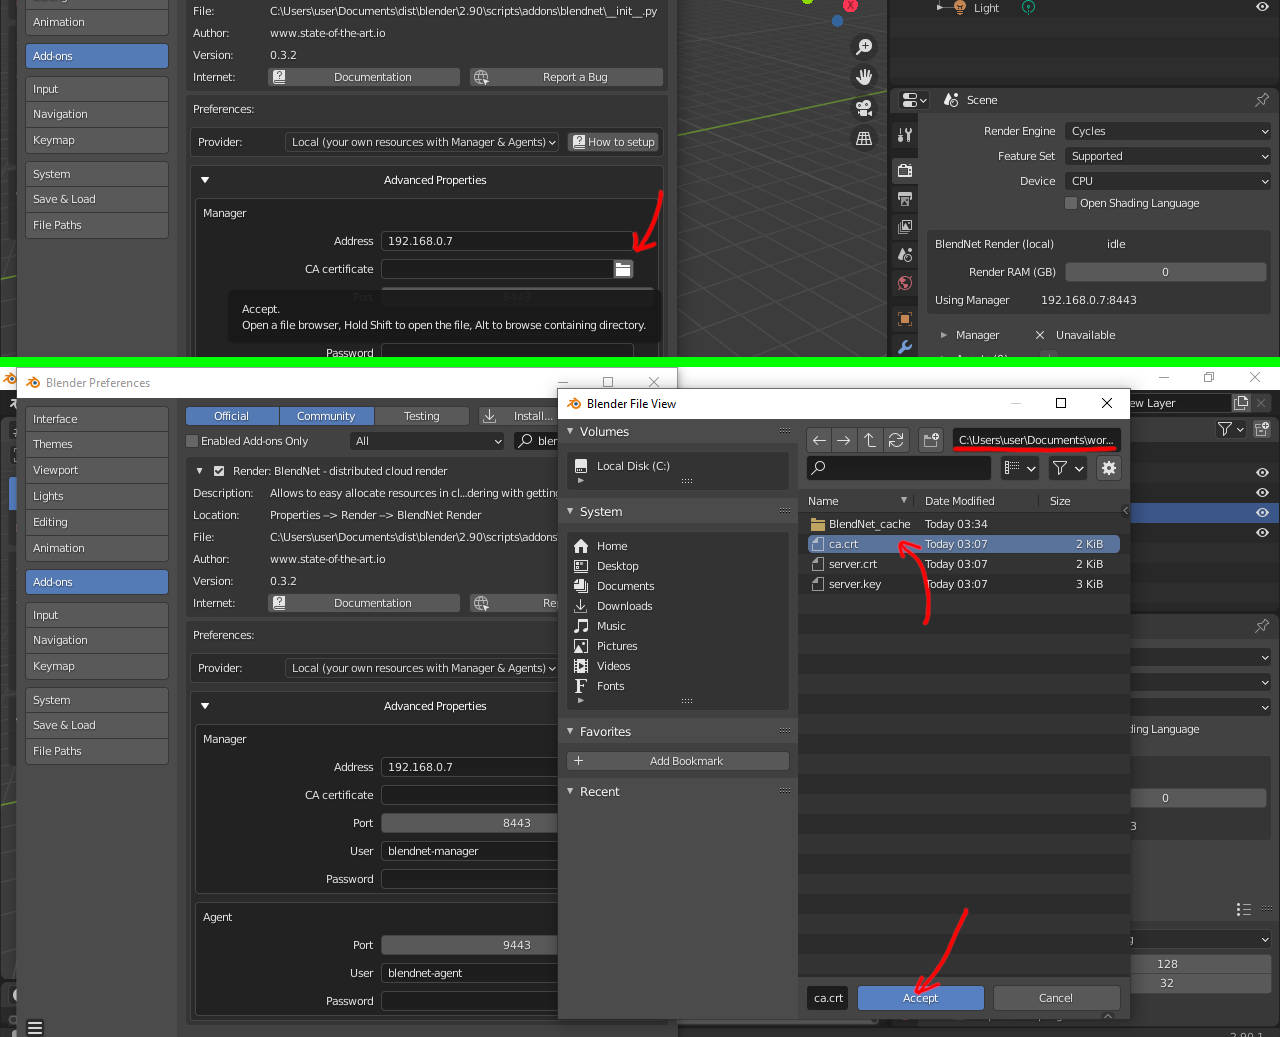
-
Port- will be used to establish the connection, default "8443" is fine in our case -
UserandPassword- in our case it's Manager default "None" and "None" - if it's go fine, you will see that it will connect to the manager in a couple of seconds: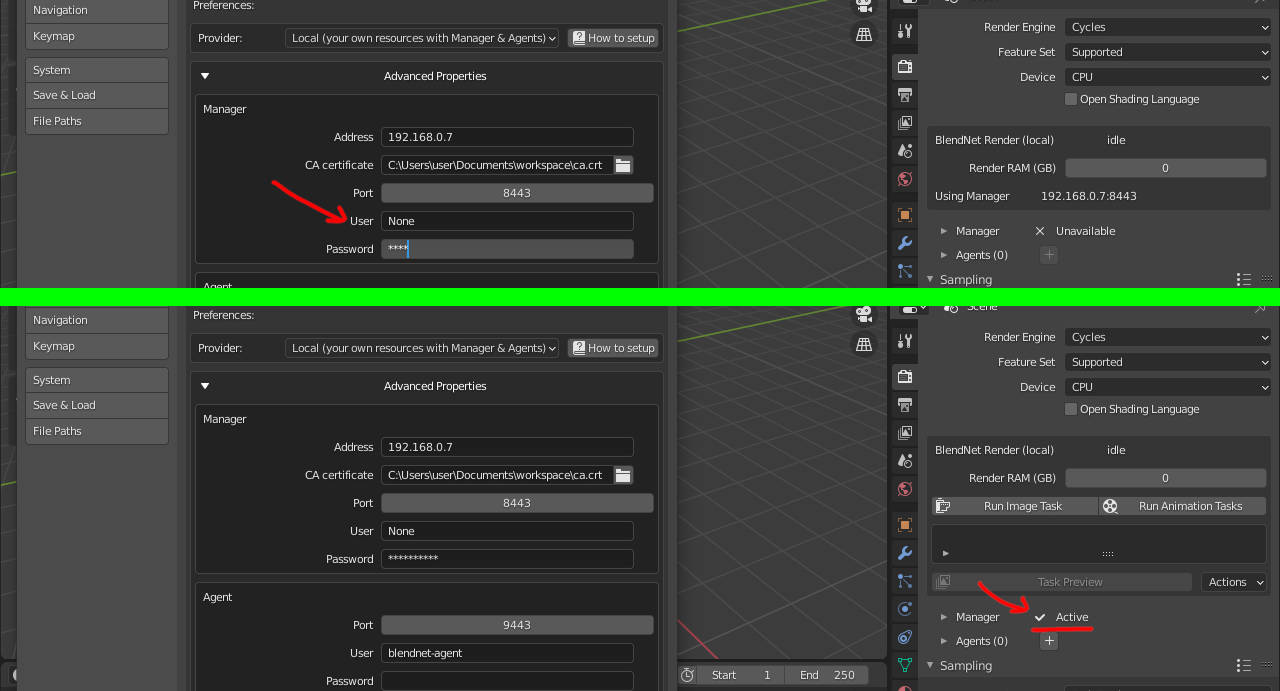
-
-
Set the Agent configurations - it will be used by default in the popup later:
-
Port- we used Agent defaults, so "9443" will be fine for us -
UserandPassword- defaults for Agent is "None" and "None", so use them.
-
-
Close the preferences.
-
Now it's just an empty Manager, but we need the connected Agent, so scroll down and find
Agents (0)panel with+button: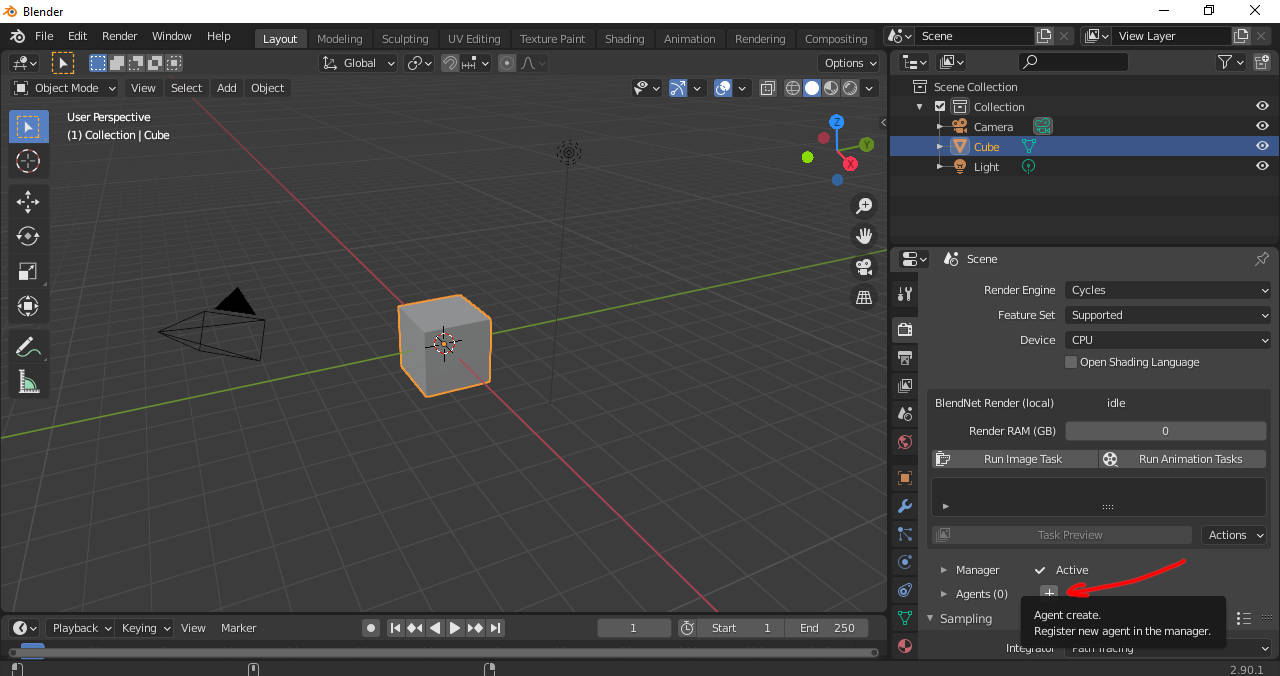
-
Right now there is no agents, so click to
+button and put the required params into the popup: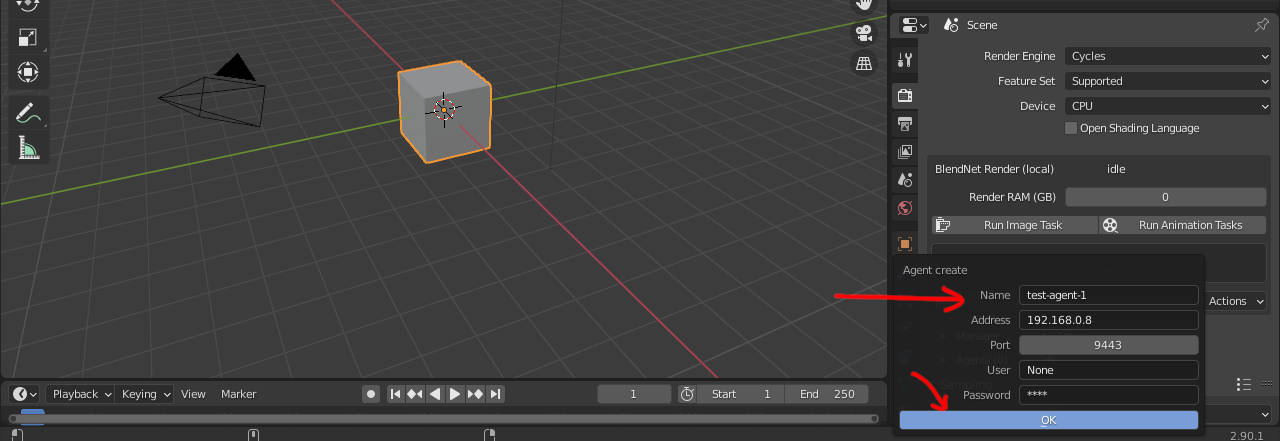
-
Click
Okbutton and shortly you will see that the agent was added to the list. The same way you can add another Agent to the Manager.
Now, if everything was setup correctly - you can open your project and click Run Image Task to
get the results of your hard work (please check the general practices on the First steps page
to get how to do that).
- If it's works fine for you - you can setup autostart for the required Addon or Manager scripts:
just put link to the script to
Autostartuser directory and it will be automatically started on user login. - Also it's possible to create Windows services which will run without login, but it's quite complicated operation and it's better to google about it like "Create windows service for bat script" or something like that.