Tutorial page 3
<<< Previous Page (Tutorial page 2) Next Page >> (Tutorial temp end)
When you first time define a value in Chisel (i.e. during the val declaration), we use the = operator in order to tell Chisel to allocate the value for the first time. On every subsequent reassignment to the value, we must use a := when reassigning the value.
Since we are constructing a digital circuit, the notion of reassignment does not make much sense since connections between circuit nodes only need to be specified once (at least for structural description of modules, i.e. decomposition of modules into submodules). However, there are some cases when we will need to perform reassignment to a value in Chisel since it is compiled sequentially unlike Verilog. Thus it may be necessary to perform reassignment when a value or connection is not known until later in the Chisel source. In addition to that, reassignment is useful in behavioral description of circuits (e.g. synchronous always blocks in Verilog and processes in VHDL).
A simple example of when reassignment is necessary is in the construction of the top level I/O for your module; the values of the output are not immediately known at the time of declaration.
Consider the simple FullAdder circuit from previous tutorial that determines the sum sum and carry out cout given two values a and b, and a carry in cin.
class FullAdder extends Module {
  val io = IO(new Bundle {
    val a    = Input(UInt(1.W))
    val b    = Input(UInt(1.W))
    val cin  = Input(UInt(1.W))
    val sum  = Output(UInt(1.W))
    val cout = Output(UInt(1.W))
  })

  // Generate the sum
  val a_xor_b = io.a ^ io.b
  // Reassignment to io.sum so use :=
  io.sum := a_xor_b ^ io.cin
  // Generate the carry
  val a_and_b = io.a & io.b
  val b_and_cin = io.b & io.cin
  val a_and_cin = io.a & io.cin
  // reassignment to io.cout so use :=
  io.cout := a_and_b | b_and_cin | a_and_cin
}
In this example we make sure to use the := reassignment for the io.sum and io.cout output values because we only know what they’re values are later in the code and not at the time of construction of the io instance of Bundle. All other values in this example use the = assignment operator since they need to be created.
In general, the rule of thumb is to use the reassignment operator := if the value already has been assigned by the = operator, otherwise the = operator should be used. Note that if you do not use the = or := operators correctly you will get an error when you try and compile your design.
In the previous examples we have been using the UInt type which is an unsigned integer as the type for all of our values. For many of the basic computations in Chisel the UInt class is sufficient. The following example shows some of the commonly used UInt operations in the context of a simple ALU2 :
class BasicALU extends Module {
  val io = new Bundle {
    val a      = Input(UInt(4.W))
    val b      = Input(UInt(4.W))
    val opcode = Input(UInt(4.W))
    val output = Output(UInt(4.W))
  }
  io.output := 0.U
  when (io.opcode === 0.U) {
    io.output := io.a                   // pass A
  } .elsewhen (io.opcode === 1.U)) {
    io.output := io.b                   // pass B
  } .elsewhen (io.opcode === 2.U) {
    io.output := io.a + 1.U         // inc A by 1
  } .elsewhen (io.opcode === 3.U) {
    io.output := io.a - 1.U         // dec A by 1
  } .elsewhen (io.opcode === 4.U) {
    io.output := io.a + 4.U         // inc A by 4
  } .elsewhen (io.opcode === 5.U) {
    io.output := io.a - 4.U         // dec A by 4
  } .elsewhen (io.opcode === 6.U) {
    io.output := io.a + io.b            // add A and B
  } .elsewhen (io.opcode === 7.U) {
    io.output := io.a - io.b            // sub B from A
  } .elsewhen (io.opcode === 8.U) {
    io.output := (io.a < io.b)          // set on A < B
  } .otherwise {
    io.output := (io.a === io.b)        // set on A == B
  }
}
First thing to note, is that we snuck in a quick one on you :-) The way that the io bundle is defined is different -- this is because this is Chisel 2 code. Rocket Chip was written in Chisel 2, and much of it remains in Chisel 2. However, all new development is now in Chisel 3. The syntax differences are minor, like this. More about Chisel 2 on Chisel-Versions page. Safe to ignore, but just be aware that if syntax looks slightly different, it's probably due to Chisel 2 vs Chisel 3 difference.
In particular, if you see at the top of the .scala page this import:
import Chisel._ then that means that the code on the page can be either Chisel 2 or Chisel 3. Now, you can mix Chisel 2 syntax with Chisel 3 syntax on the same page.
You will notice that there are multiple reassignments to io.output inside a when block which indicates that the value of io.output can take many different values depending on the io.opcode in this example. Also notice that in order to specify constants to add to our operands, we must also specify them as a UInt type as UInt operations on different type operands is not allowed. Chisel does not automatically convert data types, so you must do the conversions explicitly.
// Specify that 1 is a UInt type
io.output := io.a + 1.U
A list of commonly used UInt operations is given in the table below:
| Operand | Operation | Output Type |
|---|---|---|
| + | Add | UInt |
| - | Subtract | UInt |
| * | Multiply | UInt |
| / | UInt Divide | UInt |
| ˜ | Bitwise Negation | UInt |
| ˆ | Bitwise XOR | UInt |
| & | Bitwise AND | UInt |
| | | Bitwise OR | Bool |
| === | Equal | Bool |
| != | Not Equal | Bool |
| > | Greater | Bool |
| < | Less | Bool |
| >= | Greater or Equal | Bool |
| <= | Less or Equal | Bool |
The UInt class allows you to extract bits based on their index of their representation. Given an n bit wide value value we can extract the bits x through y (n > x > y >= 0) by simply doing the following:
// extracts the x through y bits of value
val x_to_y = value(x, y)
Note that the higher index is specified first in the argument list when extraction the bits. Also notice that the bits in the UInt are zero indexed so the highest bit that can be extracted from an n bit wide value is n-1.
If you just want to extract a single bit from the value, let's say a bit x, then we simply need to specify a single index instead, as follows:
// extract the x-th bit from value
val x_of_value = value(x)
A more concrete example of bit extraction in action is shown below. In this example, based on the value of the offset, we would like to select a byte from a word which is a common operation when loading a byte from word addressed memories:
class ByteSelector extends Module {
  val io = IO(new Bundle {
    val in     = Input(UInt(32.W))
    val offset = Input(UInt(2.W))
    val out    = Output(UInt(8.W))
  })
  io.out := 0.U(8.W)
  when (io.offset === 0.U(2.W)) {
    io.out := io.in(7,0) // pull out the lowest byte
  } .elsewhen (io.offset === 1.U) {
    io.out := io.in(15,8) // pull out second byte
  } .elsewhen (io.offset === 2.U) {
    io.out := io.in(23,16) // pull out third byte
  } .otherwise {
    io.out := io.in(31,24) // pull out the highest byte
  }
}Chisel also allows you to easily concatenate bits together using Cat. Since Cat is implemented in the utility package, external to Chisel core, to make it available to the source code, it is require to instruct the Scala compiler to import its definition:
import chisel3.util.Cator, to import all the utility definitions:
import chisel3.util._Once enabled, suppose you have a data bus that you would like to drive with two separate words A and B. In order to concatenate these two values together we simply say:
import chisel3.util.Cat

val A = Wire(UInt(32.W))
val B = Wire(UInt(32.W))
val bus = Cat(A, B) // concatenate A and B
Note that the values A and B are declared as Wire during the value declaration. Type-only vals (no associated data) must be wrapped in a Wire() if they will be the destination of a wiring operation (":=" or " < >"). The wrapping of UInt into Wire is required from Chisel 3. The val bus does not need to use the Wire word because the bus is not reassigned with :=. In other words, the values that are only declared but not yet defined need to use Wire. The values that are already defined during declaration do not need to use Wire.
The first argument to Cat will be placed in the high part while the second argument gets the low part of bus. Thus for this example bits 0 to 31 of bus correspond to B, while bits 32 to 63 correspond to A.
In this assignment, write the LFSR16 circuit by filling in the following module:
// Problem:
//
// Implement a 16-bit Fibonacci Linear-feedback shift register
// with polynomial x^16 + x^14 + x^13 + x^11 + 1
// State change is allowed only when 'inc' is asserted
//
class LFSR16 extends Module {
  val io = IO(new Bundle {
    val inc = Input(Bool())
    val out = Output(UInt(16.W))
  })

  // Implement below ----------

  io.out := 0.U

  // Implement above ----------
}
found in $LJHOME/src/main/scala/problems/LFSR16.scala. Make sure to define and initialize an internal register to one and update it when inc is asserted. Use bit concatenation and bit extraction in conjunction with the xor operator ^. Run:
test:run-main problems.Launcher LFSR16until your circuit passes the tests.
Note that for some operations such as addition and multiplication, that number of resulting bits of the computation can be greater than the number of bits for the operands.
Consider the following example where we multiply two 16 bit numbers A and B together. Note that the product of two 16 bit numbers is, at worst, 32 bits wide.
//A 16*16-bit multiplier with separate high and low product outputs
class HiLoMultiplier() extends Module {
  val io = IO(new Bundle {
    val A  = Input(UInt(16.W))
    val B  = Input(UInt(16.W))
    val Hi = Output(UInt(16.W))
    val Lo = Output(UInt(16.W))
  })
  val mult = io.A * io.B
  io.Lo := mult(15, 0)
  io.Hi := mult(31, 16)
}
Notice that we never specify the width of the value mult anywhere in the Chisel source. Normally if we performed this in Verilog we would have had to specify the width beforehand. But a look at the generated Verilog for this example shows that Chisel correctly inferred the mult value to be 32 bits wide:
module HiLoMultiplier(
  input         clock,
  input         reset,
  input  [15:0] io_A,
  input  [15:0] io_B,
  output [15:0] io_Hi,
  output [15:0] io_Lo
);
  wire [31:0] mult; // Chisel infers this to be 32 bits
  wire [15:0] _T_6;
  wire [15:0] _T_7;
  assign mult = io_A * io_B;
  assign _T_6 = mult[15:0];
  assign _T_7 = mult[31:16];
  assign io_Hi = _T_7;
  assign io_Lo = _T_6;
endmodule
As we get to more complicate designs, it will become more clear that bit inference in Chisel is a very powerful feature that makes constructing hardware more efficient. A list of common bit inferences is shown below for commonly used operations:
| Operation | Result Bit Width |
|---|---|
| Z = X + Y | max(Width(X), Width(Y)) |
| Z = X - Y | max(Width(X), Width(Y)) |
| Z = X & Y | max(Width(X), Width(Y)) |
| Z = X | Y | max(Width(X), Width(Y)) |
| Z = X ^ Y | max(Width(X), Width(Y)) |
| Z = ~X | Width(X) |
| Z = Mux(C, X, Y) | max(Width(X), Width (Y)) |
| Z = X * Y | Width(X) + Width(Y) |
| Z = X << n | Width(X) + n |
| Z = X >> n | Width(X) - n |
| Z = Cat(X, Y) | Width(X) + Width(Y) |
| Z = Fill(n, x) | Width(X) + n |
The Bool class in Chisel is used to represent the result of logical expressions and takes either the values true or false. These can be used in conditional statements such as when blocks.
val change = io.a === io.b // change gets Bool type
when (change) {            // exec if change is true
  ...
} .otherwise {
  ...
}
You can instantiate a Bool value like this:
val true_value  = Bool(true)
val false_value = Bool(false)When assigning values, it is required that you assign a value of the same type. For instance, if you try to assign a Bool type to an output value that is expecting a UInt type, you will get an error because value types are not converted automatically.
  ...
  val io  = new Bundle {
    val in  = Input(UInt(2.W))
    val out = Output(UInt(1.W))
  }
  // attempted Bool assignment to UInt
  io.out := (in === UInt(0))
  ...
The correct way to perform the intended operation is to explicitly cast the resulting Bool type to a UInt using the toUInt() cast. The correct Chisel code will look like:
  ...
  val io = new Bundle {
    val in  = Input(UInt(2.W))
    val out = Output(UInt(1.W))
  }
  io.out := (in === UInt(0)).asUInt() // UInt cast
  ...
Some of the common casts that you may use are:
asUInt()
asSInt()
asBool()Like other hardware description languages, Chisel allows fairly straightforward module instantiation to enable modularity and hierarchy. In Chisel, instantiating a Module class is the equivalent to instantiating a module in Verilog. To do this, we simply use a call to Module with module created with the Scala new keyword in order to indicate that we are instantiation a new module. We want to make sure we assign this to a value so that we can reference its input and outputs which we also need to connect.
For example, suppose we would like to construct a 4-bit adder using multiple copies of the FullAdder module.
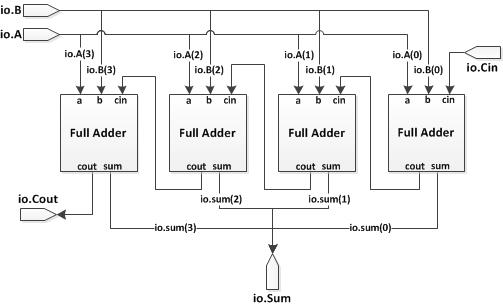
The Chisel source code is shown below.
//A 4-bit adder with carry in and carry out
class Adder4 extends Module {
  val io = IO(new Bundle {
    val A    = Input(UInt(4.W))
    val B    = Input(UInt(4.W))
    val Cin  = Input(UInt(1.W))
    val Sum  = Output(UInt(4.W))
    val Cout = Output(UInt(1.W))
  })
  //Adder for bit 0
  val Adder0 = Module(new FullAdder())
  Adder0.io.a := io.A(0)
  Adder0.io.b := io.B(0)
  Adder0.io.cin := io.Cin
  val s0 = Adder0.io.sum
  //Adder for bit 1
  val Adder1 = Module(new FullAdder())
  Adder1.io.a := io.A(1)
  Adder1.io.b := io.B(1)
  Adder1.io.cin := Adder0.io.cout
  val s1 = Cat(Adder1.io.sum, s0)
  //Adder for bit 2
  val Adder2 = Module(new FullAdder())
  Adder2.io.a := io.A(2)
  Adder2.io.b := io.B(2)
  Adder2.io.cin := Adder1.io.cout
  val s2 = Cat(Adder2.io.sum, s1)
  //Adder for bit 3
  val Adder3 = Module(new FullAdder())
  Adder3.io.a := io.A(3)
  Adder3.io.b := io.B(3)
  Adder3.io.cin := Adder2.io.cout
  io.Sum := Cat(Adder3.io.sum, s2).asUInt
  io.Cout := Adder3.io.cout
}
In this example, notice how when referencing each module I/O we must first reference the io that contains the ports for the I/Os. Again, note how all assignments to the module I/Os use a reassignment operator :=. When instantiating modules, it is important to make sure that you connect all the input and output ports. If a port is not connected, the Chisel compiler may optimize away portions of your design that it find unnecessary due to the unconnected ports and throw errors or warnings.
The Vec class allows you to create an indexable vector in Chisel which can be filled with any expression that returns a chisel data type. The general syntax for a Vec declaration is given by:
val myVec = Vec(Seq.fill( <number of elements> ) { <data type> })Where <number of elements> corresponds to how long the vector is and <data type> corresponds to what type of class the vector contains.
For instance, if we wanted to instantiate a 10 entry vector of 5 bit UInt values, we would use:
val ufix5_vec10 := Vec(Seq.fill(10) { UInt(5.W) })Vector of Registers is strongly advised not to be used.
Instead, you create a register of vector:
val reg_vec32 = Reg(Vec(Seq.fill(32){ UInt() }))In order to assign to a particular value of the Vec, we simply assign the target value to the vector at a specified index. For instance, if we wanted to assign a UInt value of zero to the first register in the above example, the assignment would look like:
reg_vec32(0) := 0.UTo access a particular element in the vector at some index, we specify the index of the vector. For example, to extract the 5th element of the register vector in the above example and assign it to some value reg5, the assignment would look like:
val reg5 = reg_vec(5)The syntax for the Vec class is slightly different when instantiating a vector of modules1
. When instantiating a vector of modules the data type that is specified in the braces is slightly different than the usually primitive types. To specify a vector of modules, we use the io bundle when specifying the type of the vector. For example, in order to specify a Vec with 16 modules, say FullAdders in this case, we would use the following declaration:
val FullAdders = Vec(Seq.fill(16){ Module(new FullAdder()).io })Notice we use the keyword new in the vector definition before the module name FullAdder. For how to actually access the io on the vector modules, refer to the next section.
The next assignment is to construct a simple bit shift register. The following is a the template from $LJHOME/src/main/scala/problems/VecShiftRegisterSimple.scala:
class VecShiftRegisterSimple extends Module {
  val io = IO(new Bundle {
    val in  = Input(UInt(8.W))
    val out = Output(UInt(8.W))
  })
  val initValues = Seq.fill(4) { 0.U(8.W) }
  val delays = RegInit(Vec(initValues))
  ...
  io.out := 0.U
}
where out is a four cycle delayed copy of values on in. Implement the appropriate lines and run:
test:run-main problems.Launcher VecShiftRegisterSimpleuntil you get SUCCESS.
In the previous Adder example, we explicitly instantiated four different copies of a FullAdder and wired up the ports. But suppose we want to generalize this structure to an n-bit adder. Like Verilog, Chisel allows you to pass parameters to specify certain aspects of your design. In order to do this, we add a parameter in the Module declaration to our Chisel definition. For a carry ripple adder, we would like to parametrize the width to some integer value n as shown in the following example:
// A n-bit adder with carry in and carry out
class Adder(n: Int) extends Module {
  val io = IO(new Bundle {
    val A    = Input(UInt(n.W))
    val B    = Input(UInt(n.W))
    val Cin  = Input(UInt(1.W))
    val Sum  = Output(UInt(n.W))
    val Cout = Output(UInt(1.W))
  })
  // create a vector of FullAdders
  val FAs = Vec(Seq.fill(n){ Module(new FullAdder()).io })

  // define carry and sum wires
  val carry = Wire(Vec(n+1, UInt(1.W)))
  val sum   = Wire(Vec(n, Bool()))

  // first carry is the top level carry in
  carry(0) := io.Cin

  // wire up the ports of the full adders
  for(i <- 0 until n) {
    FAs(i).a   := io.A(i)
    FAs(i).b   := io.B(i)
    FAs(i).cin := carry(i)
    carry(i+1) := FAs(i).cout
    sum(i)     := FAs(i).sum.toBool()
  }
  io.Sum  := sum.asUInt
  io.Cout := carry(n)
}
Note that in this example, we keep track of the sum output in a Vec of Bools. This is because Chisel does not support bit assignment directly. Thus in order to get the n-bit wide sum in the above example, we use an n-bit wide Vec of Bools and then cast it to a UInt().
You will notice that modules are instantiated in a Vec class, which allows us to iterate through each module when assigning the ports connections to each FullAdder. This is similar to the generate statement in Verilog. However, you will see in more advanced tutorials that Chisel can offer more powerful variations.
Instantiating a parametrized module is very similar to instantiating an unparametrized module except that we must provide arguments for the parameter values. For instance, if we wanted to instantiate a 4-bit version of the Adder module we defined above, it would look like:
val adder4 = Module(new Adder(4))We can also instantiate the Adder by explicitly specifying the value of it parameter n like the this:
val adder4 = Module(new Adder(n = 4))Explicitly specifying the parameter is useful when you have a module with multiple parameters. Suppose you have a parametrized FIFO module with the following module definition:
class FIFO(width: Int, depth: Int) extends Module {...}You can explicitly specify the parameter values in any order:
val fifo1 = Module(new FIFO(16, 32))
val fifo2 = Module(new FIFO(width = 16, depth = 32))
val fifo3 = Module(new FIFO(depth = 32, width = 16))
All of the above definitions pass the same parameters to the FIFO module. Notice that when you explicitly assign the parameter values, they can occur in any order you want such as the definition for fifo3.
Although parameters can be passed explicitly through a Module’s constructor, this technique does not scale when parameterizing large designs with many generic components. For a more detailed explanation of why a better parameterization method is needed, please see the Advanced Parameterization Manual. In addition, this manual explains heuristics for how to organize and parameterize large designs, which we highly recommend one reads prior to using this functionality in a design. The following, however, is a basic introduction.
Every Module has its own params object, which acts as a dictionary. Querying this object is shown below.
val width = params[Int]('width')If params is queried and no parameter matches the query, Chisel throws a ParameterUndefinedException. Notice the query return type must be provided.
When a parent Module creates a child Module, the parent’s params object is automatically cloned and passed to the child. In the following example, suppose the parent’s params object returns 10 when queried for width. Because the Parentparams object is automatically cloned for Child, the Child query also returns 10.
class Parent extends Module {
  val io = IO(new Bundle { ... })
  val width = params[Int]('width') // returns 10
  // create child Module implicitly passing params
  val child = Module(new Child)
}
class Child extends Module {
  val io = IO(new Bundle { ... })
  val width = params[Int]('width') // returns 10
}
Suppose a parent Module wants to override or add parameters to its child’s params object. This case requires adding a partial function (a Scala way of defining key-value mappings) to the Child Module constructor:
class Parent extends Module {
  val io = IO(new Bundle { ... })
  val width = params[Int]('width') // returns 10
  val n = params[Int]('n') // returns 20
  // Partial function is added to Module constructor
  val child = Module(new Child,{'n' => 40})
}
class Child extends Module {
  val io = IO(new Bundle { ... })
  val width = params[Int]('width') // returns 10
  val n = params[Int]('n') // returns 40
}
An example which is impossible to do with simple parameterization, but simple with the advanced parameterization, is when using a generic Mesh generator with a custom MyRouter Module. The existing source code might look like:
class Mesh(routerConstructor: () => Router, n:Int) extends Module {
  val io = new Bundle { ... }
  val routers = Vec.fill(n){Module(routerConstructor())}
  hookUpRouters(routers)
}
However, our custom MyRouter Module requires a parameter, RoutingFunction that we want to sweep for a design space evaluation. Using the simple parameterization method would require a change to the Mesh Module’s constructor to include RoutingFunction.
Alternatively, one can use the params object to implicitly pass the RoutingFunction:
class MyRouter extends Module {
  val io = IO(new Bundle { ... })
  val myRoutingFunction = params[RoutingFunction]('r')
  ...
}
class Top extends Module {
  val io = IO(new Bundle { ... })
  val mesh = Module(new Mesh(() => new MyRouter),{'r' => new RoutingFunction})
}
For more advanced uses, tips, and tricks, please see the Advanced Parametrization Manual, in the Documentation section of the website or the doc/parameters directory of the git repo. This is an evolving area and the documentation may not be as up-to-date as the code.
Like other HDL, Chisel provides some very basic primitives. These are constructs that are built in to the Chisel compiler and come for free. The Reg, UInt, and Bundle classes are such primitives that have already been covered. Unlike Module instantiations, primitive do not require explicit connections of their io ports to use. Other useful primitive types include the Mem and Vec classes which will be discussed in a more advanced tutorial. In this tutorial, we explore the use of the Mux primitive.
The Mux primitive is a two input multiplexer. In order to use the Mux we first need to define the expected syntax of the Mux class. As with any two input multiplexer, it takes three inputs and one output. Two of the inputs correspond to the data values A and B that we would like to select which can be any width and data type as long as they are the same. The third input select which is a Bool type determines which one to output. A select value of true will output the first value A, while a select value of false will pass B.
val out = Mux(select, A, B)Thus if A=10, B=14, and select was true, the value of out would be assigned 10. Notice how using the Mux primitive type abstracts away the logic structures required if we had wanted to implement the multiplexer explicitly.
The next assignment is to construct an adder with a parameterized width and using the built in addition operator +. The following is a the template from $TUT_DIR/problems/Adder.scala:
class Adder(val w: Int) extends Module {
  val io = IO(new Bundle {
    val in0 = Input(UInt(1.W))
    val in1 = Input(UInt(1.W))
    val out = Output(UInt(1.W))
  })

  io.out := 0.U
}
where out is sum of w width unsigned inputs in0 and in1. Notice how val is added to the width parameter value to allow the width to be accessible from the tester as a field of the adder module object. Run
test:run-main problems.Launcher Adderuntil your circuit passes the tests.
<<< Previous Page (Tutorial page 2) Next Page >> (Tutorial temp end)
1: For details, see this discussion.