

Features a working multiplayer sample using AWS GameLift and Mirror on Unity. Supports IL2CPP and mobile devices
- Requirements
- Understanding the Structure
- Working with the sample
- GameLift Authentication
- IL2CPP Considerations
- What now?
- References
- Unity 2019.4.17f1 or later
- AWS CLI
- Java [Local testing only]
First, let's dive into the components included in the Unity Project, what they do and how they work together:
- AWS GameLift Server SDK [Server-Only]
- Communicates with the AWS GameLift service to register Game Session callbacks
- Dependencies:
- Google.Protobuf
- log4net
- Newtonsoft.Json
- System.Buffers
- System.Collections.Immutable
- System.Memory
- websocket-sharp
- System.Runtime.CompilerServices.Unsafe
- AWS GameLift SDK [Client-only]
- Communicates with the AWS GameLift service to create a Player Session and be able to join the game session
- Dependencies:
- AWS Core
- Microsoft.Bcl.AsyncInterfaces
- System.Threading.Tasks.Extensions
- System.Runtime.CompilerServices.Unsafe
- Mirror [Both]
- Handles game client/server communication, sync and connections. The gameplay is created using Mirror.
Since we have libraries we're only ever using on the server or in the client, we need to be able to include/exclude them from the build. So,
for everything that is only required on the server, we only compile and include when the scripting define SERVER is specified. For
the client, the same goes for the CLIENT define.
Mirror always has to be included, since the gameplay needs to exist both in the server and in the client. If you have any code that is worthless for the server or for the client, you can use these defines to restrict the code compilation.
- AWS GameLift manages server instantiation and auto-scaling
- You need a custom AWS Game Server build
- After handling the AWS GameLift communication and connections, Mirrors comes in
- You create your gameplay using Mirror
- You connect to the Game Server via Mirror, using the given IP Address from GameLift
- Multiplayer Game runs
I highly recommend that you start by testing locally, specially if you still don't have an AWS account.
- Make sure to download the GameLift Managed Servers SDK
- Open the GameLift Local folder and run:
java -jar GameLiftLocal.jar -p 7778 - Set the port in
GameLiftClient.csline 43 to the port you started the GameLift local service:config.ServiceURL = "http://localhost:7778";
- Setup your AWS credentials in
GameLiftClient.csline 46:
client = new AmazonGameLiftClient("access-key", "secret-key", config);Locally, these values do not matter. You shouldn't commit these values in your repository, or if you do, make sure they have restrictive AWS roles.
Now, to begin testing, you need to create a server build. In order to do that, make sure you are in the correct environment. Check Environment/Server.
If the option is greyed out, then you're already in the SERVER environment. Now you can make a Standalone Build for your desired platform. If you're
testing locally, choose your own OS. Otherwise I recommend you to use linux to upload the build to AWS.
Server Build when building the game server!
Here, you should start your local GameLift server for testing and then executing your server build.
You can now upload your build to the AWS GameLift service by using the following command:
aws gamelift upload-build --name <your build name> --build-version <your build number> --build-root <local build path> --operating-system AMAZON_LINUX --region <your region>
With the remote build setup, you can now create a fleet that will control the game server creation. Make sure to input the correct build,
providing the correct executable path and extension. Also, it's helpful if you provide an additional argument to output logs to a file: -logfile logs/server.log.
This way, when the Game Session gets terminated, you can download the logs via the AWS GameLift console.
Also remember to open the ports necessary for the client to communicate with the server. For this sample, I simply opened ports 7770-7780 on TCP and UDP.
The fleet initialization should take some time. After its status is set to ACTIVE you can create a Game Session.
Either locally or remotely, you will have to manually create your game sessions via the AWS CLI:
- Set the
--endpoint-urlto your local ip and port used to start the GameLift local service - The
--fleet-idvalue does not really matter locally as long as it starts withfleet-
aws gamelift create-game-session --endpoint-url http://localhost:7778 --maximum-player-session-count 10 --fleet-id fleet-123
- Make sure you have configured your AWS CLI via
aws configwith your credentials and region - You can get your fleet id on the AWS GameLift Console
aws gamelift create-game-session --maximum-player-session-count 10 --fleet-id <your fleet id>
The Game Session should take a few seconds to start, and then it's ready to receive player sessions.
Make sure your environment is set to the CLIENT in Environment/Client. You can now make a client build if you want.
To test locally, you must check the Local toggle in the Game Server object on the NetworkScene.
Whenever you hit play in the Unity Editor, or simply run a client build, it will do the following steps:
- Initialize the GameLift SDK
- Connect to the AWS GameLift
- Generate a random PlayerId
- Get active fleets [Remote-only]
- Get game sessions
- Attempt to create a Player Session for the first active game session
- Connect to the server via Mirror
At this point, you have reached the game server and you should only worry about gameplay.
I had to create a simple Authentication layer with Mirror to pass the GameLift Player Session Id to the server.
That way, it can call GameLiftServerAPI.AcceptPlayerSession() and preserve the connection, otherwise the player would just get disconnected after 1 minute.
In order to work with IL2CPP, all client binaries are Net Standard 2.0 and the following link.xml is provided:
<linker>
    <assembly fullname="AWSSDK.Core" preserve="all"/>
    <assembly fullname="AWSSDK.GameLift" preserve="all"/>
</linker>
I didn't have to recompile any binaries, just simply downloaded the official Net Standard 2.0 versions (and their dependencies) from NuGet. The server does not have any requirement to be IL2CPP since it's a desktop build, so I only built it with Mono.
Now you should be able to use this sample as a reference to your own game and focus on creating the gameplay, instead of wasting any additional time digging service documentations and tutorials. If there's anything else I could do to help you speed up this process, please do let me know.
- AWS GameLift API Reference
- AWS GameLift Server API Reference
- Add GameLift to your game server
- Add Amazon GameLift to Your Game Client
- Testing Your Integration
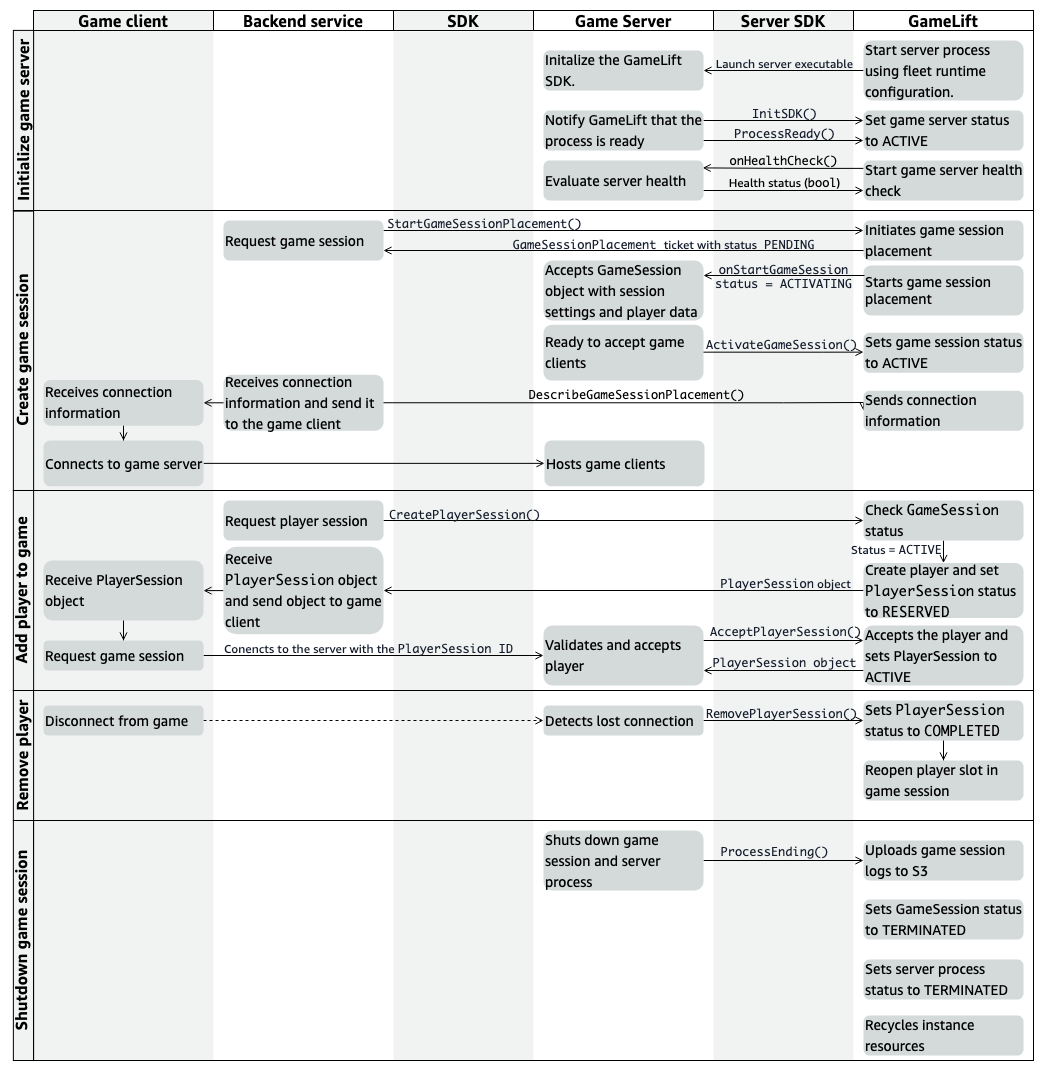
- Amazon GameLift Game Server/Client Interactions Diagram
- Official AWS GameLift Unity Sample
- BatteryAcid's Unity Custom GameLift Server Tutorial
- BatteryAcid's Unity Custom GameLift Client Tutorial
Don't hesitate to create issues for suggestions and bugs. Have fun!