

![]()
![]()
![]()
ZCS Lawn Mower Robots platform as a Custom Component for Home Assistant. All Ambrogio, Techline, Wiper and some Kubota, Stiga and Wolf robotic lawn mowers with Connect module are supported. This integration does not support Bluetooth connectivity with lawn mowers.
With configured map and activated vacuum entity, the lawn mower can be displayed on a Lovelace Vacuum Map card:
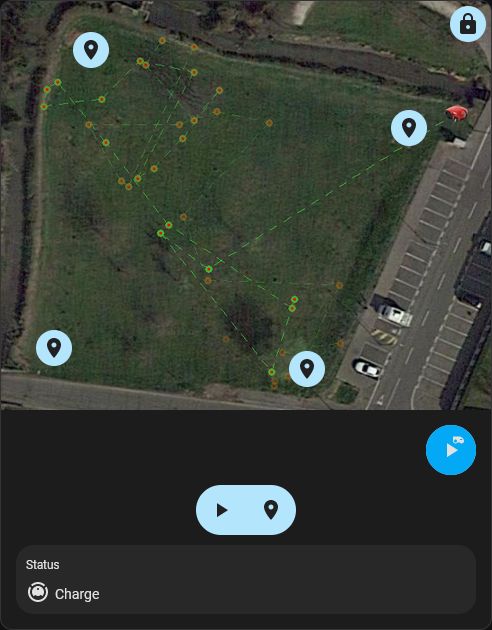
The spot cleaning points can be used to start the lawn mower in a specific area.
Important
Requires Home Assistant 2025.2.0 or newer.
Installation using Home Assistant Community Store (HACS) is recommended.
-
If HACS is not installed, follow HACS installation and configuration at https://hacs.xyz/.
-
Click the button below or visit HACS and search for "ZCS Lawn Mower Robot" (make sure no type filter is set).
-
Install the integration.
-
Restart Home Assistant!
-
Make sure that you refresh your browser window too.

-
Download the
zcsmower.zipfile from the repository release section.Do not download directly from the
mainbranch. -
Extract and copy the content into the path
/config/custom_components/zcsmowerof your HA installation. -
Restart Home Assistant!
-
Make sure that you refresh your browser window too.
Start setup:
-
Click this button:
-
Or use the "Add Integration" in Home Assistant, Settings, Devices & Services and select "ZCS Lawn Mower Robot".

In this step, a new account is created at ZCS Cloud, to which your lawn mower(s) will later be linked.
-
Garage name: You can freely choose the name.
-
Position tracing: Activate this field if you want to use the periodical position tracing of your lawn mower(s). Your lawn mower(s) will report their position more often.
⚠️ Attention: Activating this function increases data usage significantly. For additional information go to General settings. -
Map activation: Check this box if you want to set up your own map view. For additional information go to Map.
The image entity will plot the current coordinates and location history of the lawn mower on a user provided image. To configure the entity you need to upload your desired map image and determine the coordinates of the top left corner and the bottom right corner of your selected image.
Tip
If you don't like the map orientation, you can also rotate the section. First, adjust your image, note the degree of rotation and enter it in the map settings.
The image entity is configured via the setup and options flow on the integration.
You can then provide the path to the image you would like to use for the map and marker.
Best practice:
-
Create a new map on Google My Maps.
-
Take a snapshot of the desired area and save it. This has been tested with the PNG format, other formats may work.
-
Store the snapshot into your home assistant instance, e.g.
/config/www/mower/.The folder
/config/custom_components/zcsmower/resources/is over written when the integration is updated, store the custom image in another location. -
Type the full path to map into the config flow dialog.
-
Mark the corner points and export as CSV.
-
Type the coordinates into the config flow dialog. To enter the coordinates, ensure that they are in signed degree format and separated by a comma for example:
45.0135543,7.6181209⚠️ Pay attention to the correct order of latitude and longitude. -
(Optional) Enter the rotation of your map image in degrees.
-
(Optional) Get a image of your lawn mower with transparent background as a marker for the current position. Store the image into your home assistant instance, e.g.
/config/www/mower/and type the full path into the config flow dialog.The default marker
/config/custom_components/zcsmower/resources/marker.pngis over written when the integration is updated, store the custom image in another location.
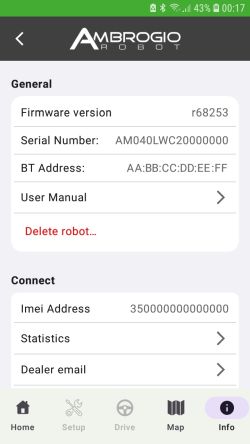
Get IMEI address from your lawn mower(s):
-
Open the app on your mobile device and select the lawn mower.
-
Click on the
Infotab and scroll to theConnectsection. -
You need the
Imei Address(starts with35):
-
Type this address into the config flow dialog.
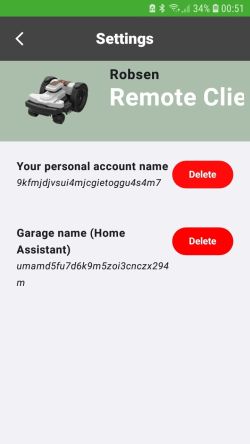
When adding a robot, you may receive a message that too many clients are linked to the lawn mower. Only five remote clients can be linked to the lawn mower.
You can fix this problem as follows:
-
Open the app on your mobile device.
-
Connect to the lawn mower via Bluetooth.
-
Click on the
Setuptab and scroll to bottom. -
Click on the
General Settingssection and open to theClient List:
-
Click on the "Delete" button of the client that you no longer need.
Note
These settings have a major impact on data usage of the Connect module.
- In the best case, activate +Infinity for your lawn mower(s).
- If you have not activated +Infinity, you should only carefully select lower values than the default values. If you change these values, you should daily monitor your data usage in the mobile app and adjust the settings again if necessary.
The following settings are available:
-
Winter storage: When all lawn mowers are on their winter break, they can no longer be controlled. Hibernation mode must be activated or deactivated manually. When hibernation mode is activated, all control entities are no longer available. In addition, the update interval is reduced to once a day.
-
Start and end of daily standby time: To save data volume at times when the lawn mowers are not working by default (e.g. at night), the start and end of the usual working hours can be specified. During this standby time, the status is updated more frequently than outside these times.
-
Update interval if at least one lawn mower is working:
- Standard plan: A good value is 120 seconds.
- +Infinity plan: A good value is 60 seconds.
-
Update interval on standby time if no lawn mower is working:
- Standard plan: A good value is 300 seconds.
- +Infinity plan: A good value is 120 seconds.
-
Update interval outside standby time (all lawn mowers are idle):
- Standard plan: A good value is 3600 seconds.
- +Infinity plan: A good value is 900 seconds.
-
Position tracing: Activate this field if you want to use the periodical position tracing of your lawn mower(s). Your lawn mower(s) will report its position more often.
⚠️ Attention: Activating this function increases data usage significantly. -
Wake up command on lawn mower(s): While the lawn mower is working, the Connect Module must be woken up from time to time to send a current status. Waking up has a strong influence on data usage. For this reason, one value can be specified for lawn mower(s) with activated +Infinity and a value without.
- Standard plan: A good value is 1800 seconds.
- +Infinity plan: A good value is 300 seconds.
-
Re-generate client key: Regeneration is only recommended if authentication is no longer possible (see Debugging) and the state of the lawn mowers can no longer be retrieved.
ℹ️ Please note that regenerating will not bring any improvement if the monthly data volume has reached or the Connect expiration date has exceeded.
-
All entities
Attributes:
imei
-
binary_sensor.mower_{imei}_connection
Attributes:
last_communication, last_seen, last_poll, next_poll -
binary_sensor.mower_{imei}_error
Attributes:
reason
-
button.mower_{imei}_update_now
-
button.mower_{imei}_wake_up
-
button.mower_{imei}_work_now
-
button.mower_{imei}_charge_now
-
button.mower_{imei}_border_cut
-
button.mower_{imei}_trace_position
-
device_tracker.mower_{imei}
Attributes:
latitude, longitude, source_type (GPS), location_accuracy (10 meters)
-
image.mower_{imei}_map
Attributes:
calibration_points
-
lawn_mower.mower_{imei}
States:
Values Description Lawn mower state(s) mowing Mowing Work, Go to area, Go to station, Border cut, Mapping started, Mapping ended docked Docked Charge paused Paused Pause, Work standby error Error Error, No signal, Expired, Renewed, Hot temperature Attributes:
status
These entities are disabled by default. You have to activate it if you want to use it.
-
number.mower_{imei}_work_for
-
number.mower_{imei}_charge_for
-
number.mower_update_interval_working_{config_id}
This entity only exists once per configuration entry. The configuration affects all lawn mowers set up for this configuration entry.
-
number.mower_update_interval_standby_{config_id}
This entity only exists once per configuration entry. The configuration affects all lawn mowers set up for this configuration entry.
-
number.mower_update_interval_idling_{config_id}
This entity only exists once per configuration entry. The configuration affects all lawn mowers set up for this configuration entry.
-
sensor.mower_{imei}
States:
Values Description unknown Unknown charge Charge work Work pause Pause fail Error nosignal No signal gotostation Go to station gotoarea Go to area bordercut Border cut expired Expired renewed Renewed work_standby Work standby hot_temperature Hot temperature mapping_started Mapping started mapping_ended Mapping ended -
sensor.mower_{imei}_connect_expiration
Attributes:
infinity_state, infinity_expiration
-
switch.mower_hibernation_{config_id}
This entity only exists once per configuration entry. The configuration affects all lawn mowers set up for this configuration entry.
-
switch.mower_trace_position_{config_id}
This entity only exists once per configuration entry. The configuration affects all lawn mowers set up for this configuration entry.
This entity is disabled by default. You have to activate it if you want to use it.
-
vacuum.mower_{imei}
States:
Values Description Lawn mower state(s) cleaning Mowing Work, Go to area, Border cut, Mapping started docked Docked Charge paused Paused Pause returning Returning to dock Go to station, Mapping ended idle Idle Work standby error Error Error, No signal, Expired, Renewed, Hot temperature Attributes:
status
-
zcsmower.update_now:Fetch data for lawn mower immediately from API.
-
zcsmower.wake_up:Command the lawn mower to wake up and connect to the cloud.
-
zcsmower.set_profile:Configure the profile for auto-mode.
-
zcsmower.work_now:Command the lawn mower to mow now.
-
zcsmower.work_for:Command the lawn mower to mow for a certain duration.
-
zcsmower.work_until:Command the lawn mower to mow until a certain time.
-
zcsmower.border_cut:Command the lawn mower to cut the border.
-
zcsmower.charge_now:Command the lawn mower to charge now.
-
zcsmower.charge_for:Command the lawn mower to charge for a certain duration.
-
zcsmower.charge_until:Command the lawn mower to charge until a certain time.
-
zcsmower.trace_position:Command the lawn mower to report its current position.
-
zcsmower.keep_out:Commands the lawn mower to keep out of a location (no-go area).
-
zcsmower.custom_command:Send a custom command to the mower, like a command for a new feature, which is not implemented yet by this integration.
-
lawn_mower.start_mowing,vacuum.start:The lawn mower starts to mow, within the specified schedule.
-
lawn_mower.dock,vacuum.return_to_base:The lawn mower returns to the base and parks there until the next schedule start.
-
vacuum.stop:Same as
lawn_mower.dockandvacuum.return_to_base. -
button.charge_now:Override schedule to charge lawn mower now.
-
button.work_now:Override schedule to mow now.
-
button.border_cut:Override schedule to cut the border now.
-
number.charge_for:Override schedule to charge lawn mower for specified number of minutes.
-
number.work_for:Override schedule to mow for specified number of minutes.
To enable debug logging for this integration you can control this in your Home Assistant configuration.yaml file.
Set the logging to debug with the following settings in case of problems:
logger:
  default: warn
  logs:
    custom_components.zcsmower: debug
After a restart detailed log entries will appear in /config/home-assistant.log.