A tutorial on how to get TELUS Optik TV working with the UDM and Ubiquiti APs.
- Introduction
- Register your TELUS TV boxes
- Create a VLAN for your TV traffic
- Add firewall rules to allow TV traffic into your network
- Install and configure igmpproxy
- Configure igmpproxy to run on boot
- Connect Wireless Digital Boxes to your Ubiquiti WiFi
- Credits
TELUS Optik TV uses multicast to deliver their TV streams to the TELUS TV boxes. The UDM can do multicast routing since version 1.11.0, but it has to be configured manually through the command line. If not configured, TV channels will only play for 15 seconds before stopping. This tutorial will show you how to install and configure igmpproxy for TELUS Optik TV, and how to connect your PVR and wireless digital boxes to the UDM and Ubiquiti APs. Following this tutorial successfully will allow you to watch Optik TV without interruption with your UDM and Ubiquiti APs.
Most of this tutorial uses the new UI, so it is recommended to follow this tutorial with the new UI unless you know where the options are in the old UI. The UDM Pro and UDM Base are both supported.
Your TELUS TV boxes (the PVR and wireless digital boxes) must already be registered with the TELUS network before proceeding. To verify that your TV boxes are registered, connect them to your TELUS-provided router (T3200M or WiFi Hub) and make sure that you can watch TV on them and access your PVR. Make sure you test both wired and wireless boxes.
- If you cannot watch TV or access your PVR when you connect your TV boxes to the TELUS-provided router, then you will have to call TELUS to help you fix it before proceeding.
- The UDM cannot be used to register the TV boxes. You will need to use the TELUS-provided router for this step. After registration, you will not need the TELUS-provided router anymore and can turn it off.
- Failure to register the boxes will result in client initialization errors if you connect the boxes to the UDM, and they will not work.
This step is optional but recommended so that TELUS IPTV traffic does not flood your other networks. Creating a separate VLAN will allow us to isolate IPTV traffic to just this network.
- In your UDM network controller, go to Settings -> Networks -> Add New Network. Set Name to IPTV. Change the following options under Advanced.
- VLAN ID: 33
- Disable Auto Scale Network.
- Set Gateway IP/Subnet to something unique like 192.168.33.1/24. Click Auto-Configure under DHCP Range or adjust for your needs.
- Change IPv6 Interface Type to Prefix Delegation to enable IPv6, or set it to None to disable IPv6. IPv6 is not required for Optik TV to work, so it is optional to enable it.
- If you do opt to use IPv6, make sure you configured your WAN's IPv6 settings first under Settings -> Internet -> Click your WAN -> Advanced -> Set IPv6 Connection to DHCPv6 and Prefix Delegation Size to 56.
- Hit Add Network to save.
- Note if you are using the SFP+ port for your Internet (WAN2) and enabled IPv6, you need to change the IPv6 Prefix Delegation Interface option in the old UI to WAN2. This option is not available yet in the new UI. To change this option, do the following:
- Switch to the Old UI by disabling Settings -> System -> New User Interface.
- Go to Settings -> Networks -> Edit IPTV Network -> Configure IPv6 Network, and set IPv6 Prefix Delegation Interface to WAN2.
- Put your TELUS PVR and wired digital boxes on the new VLAN network by changing the port profile to IPTV on the switch ports connected to your TV boxes.
- If your TV box is connected directly to the UDM: Go to Unifi Devices -> Click the UDM -> Settings -> Click the port the box is connected to -> Change Port Profile to IPTV -> Apply Changes.
- If your TV box is connected to a downstream Ubiquiti switch: Go to Unifi Devices -> Click the switch the box is connected to -> Settings -> Click the port the box is connected to -> Change Port Profile to IPTV -> Apply Changes.
- Unplug and replug the TV box so it obtains an IP on the new VLAN.
-
Add the IPTV Multicast Rule to allow IPTV multicast traffic into your WAN.
- On your UDM, go to Settings -> Traffic & Security -> Global Threat Management -> Firewall -> Create New Rule.
- Set Type: Internet In. Description: Allow IPTV Multicast. IPv4 Protocol: UDP.
- Under Source - Source Type: Address/Port Group. Click IPv4 Address Group -> Create New Group.
- Change group's name to Optik TV. Choose type IPv4 Address/Subnet. Click Add Address and add the following 3 addresses (these are the addresses TELUS uses for IPTV):
- 207.0.0.0/8
- 209.0.0.0/8
- 216.0.0.0/8
- Click Create New Group to create the group and make sure "Optik TV" is selected under IPv4 Address Group.
- Change group's name to Optik TV. Choose type IPv4 Address/Subnet. Click Add Address and add the following 3 addresses (these are the addresses TELUS uses for IPTV):
- Under Destination - Destination Type: Address/Port Group. Click IPv4 Address Group -> Create New Group.
- Change group's name to IGMP. Choose type IPv4 Address/Subnet. Click Add Address and add the following address:
- 224.0.0.0/4
- Click Create New Group to create it and make sure "IGMP" is selected under IPv4 Address Group.
- Change group's name to IGMP. Choose type IPv4 Address/Subnet. Click Add Address and add the following address:
- Hit Apply Changes to save the rule.
-
Add the IGMP Rule to allow IGMP traffic to travel across your WAN. This rule is to be able to use your PVR from other boxes.
- On your UDM, go to Settings -> Traffic & Security -> Global Threat Management -> Firewall -> Create New Rule.
- Set Type: Internet Local. Description: Allow IGMP Traffic. IPv4 Protocol: IGMP.
- Under Advanced, enable all four match options: Match State New, Match State Established, Match State Invalid, Match State Related.
- Hit Apply Changes to save the rule.
- Your UDM must be updated to at least version 1.11.0 to use igmpproxy.
- If you are using a version before 1.11.0, you can still use igmpproxy, but you will need to compile a custom kernel and enable the CONFIG_IP_MROUTE option (not covered here). It is recommended to update your UDM to 1.11.0 or later instead of compiling your own kernel.
-
SSH into your UDM. Replace 192.168.1.1 with your UDM's IP.
-
Download igmpproxy and configuration file.
mkdir /mnt/data/igmpproxy cd /mnt/data/igmpproxy curl -Lo igmpproxy https://raw.githubusercontent.com/peacey/udm-telus/main/igmpproxy curl -Lo igmpproxy.conf https://raw.githubusercontent.com/peacey/udm-telus/main/igmpproxy.conf chmod +x igmpproxy- Note the igmpproxy binary included in this repository was extracted directly from the debian arm64 package. If you do not trust the binary on this github, you can download it and extract it manually from the official debian package instead.
-
The default igmpproxy.conf uses eth9 (WAN2 SFP+ port) for the upstream network, and br33 (VLAN 33) for the downstream network. If you are using the Ethernet WAN port, or another VLAN for your TV, then modify igmpproxy.conf accordingly.
- TIP: To modify the config, run
vim igmpproxy.conf. Pressito start editing in vim, navigate with your arrow keys and make your changes, pressESCto exit insert mode, type:wqto save and exit. - If you are using the Ethernet WAN port on the UDM Pro, change the two instances of eth9 to eth8.
- If you are using the Ethernet WAN port on the UDM Base, change the two instances of eth9 to eth4.
- If you are using a different VLAN for TV traffic than VLAN 33, change the one instance of br33 to brX, where X is your VLAN number (br0 = default LAN).
- TIP: To modify the config, run
-
Run igmpproxy in the foreground to test if everything is working.
./igmpproxy -nd ./igmpproxy.conf
-
On your wired TELUS PVR and digital boxes (not the wireless ones), tune to a channel and check if the TV is working without interruption for longer than 15 seconds. If igmpproxy is not working, your TV will stop working after 15 seconds.
- If your box is stuck at the initialization screen, unplug it and replug it back in and wait a few minutes for it to start.
- If you cannot even get to watching TV or are getting client initialization errors, make sure your Internet is working and you have previously registered the boxes with TELUS as instructed above.
-
If the TV is working properly, press Ctrl+C in the SSH window to stop igmpproxy, then run it in the background via:
./igmpproxy ./igmpproxy.conf
-
igmpproxy will not start on boot by default. If you want to start igmpproxy at boot, read the next section.
-
If you have any wireless digital boxes, read on to the last section to learn how to set them up with your Ubiquiti WiFi network.
-
Set-up UDM Utilities Boot Script by following the instructions here. This boot script allows us to run igmpproxy on boot.
-
Install the igmpproxy boot script.
cd /mnt/data/on_boot.d curl -Lo 99-run-igmpproxy.sh https://raw.githubusercontent.com/peacey/udm-telus/main/run-igmpproxy.sh chmod +x 99-run-igmpproxy.sh -
That's it, now igmpproxy will start automatically on boot. If you restart and want to check if it's running, you can run the command
ps aux | grep igmpproxy. You should see a line that looks like this in the output if it's running:6370 root /mnt/data/igmpproxy/igmpproxy /mnt/data/igmpproxy/igmpproxy.conf
The TELUS wireless digital box uses WPS Push Button to set up which WiFi Network it connects to. It records the Network's BSSID, Name, and Password via WPS. The UDM does not support WPS Push Button (and for good reaon, because it's extremely insecure). We can however use a Linux system to broadcast a WiFi network with the same BSSID, Name, and Password as our Ubiquiti WiFi, and then initiate a WPS push button connecton on Linux. This will make the wireless digital box record our Ubiquiti's WiFi network settings, and it will be able to connect to the Ubiquiti WiFi the next time it starts.
All that is required is a computer with a WiFi card. If you do not have Linux on your computer, you can run Linux from a USB stick without installing it. In this tutorial, we will use Ubuntu, but you can use any Linux distribution you want, as long as you can install hostapd on it.
-
If you do not have Linux, create a bootable Ubuntu USB stick by following the instructions here. There are instructions for Windows or macOS. You will need at least a 4 GB USB stick.
-
Boot into your Linux system or from the USB stick.
- If booting Ubuntu from the USB stick, click "Try Ubuntu" after it boots (not Install!).
- Connect your computer to the Internet via Ethernet, or connect to your normal WiFi network (if using Ubuntu, click the WiFi icon at the top right). We will need Internet to download hostapd and linux-router.
- Confirm your Internet is working before proceeding by opening a browser and navigating to google.com (for Ubuntu, click the Firefox icon on the left).
- Open this tutorial in the browser on your Linux system so that you can easily copy and paste the commands below instead of typing them out.
-
Open a terminal window by pressing
Ctrl+Alt+T. -
Run the following commands to install hostapd on the Ubuntu Live USB. Instructions will be different for other distributions. You do not need to run the first command if you installed Ubuntu instead of running it from the USB.
sudo sed -i s/"restricted"/"universe restricted"/g /etc/apt/sources.list
sudo apt update
sudo apt -y install hostapd git curl
-
Download the linux-router script, and patch it to enable WPS Push Button. The linux-router script makes it simple to create a wireless network.
git clone https://github.com/garywill/linux-router.git
cd linux-router
curl -Lo wps.patch https://raw.githubusercontent.com/peacey/udm-telus/main/wps.patch
patch -p1 < wps.patch
-
Create a new WiFI network in your UDM's Network settings by going to Settings -> WiFi -> Add New WiFi Network.
- Name the wireless network "Optik TV" or whatever you want. Give it a password and set Network to IPTV, the VLAN network we previously created. Use WPA2 or WPA2/WPA3 for security.
- Under Advanced, enable Multicast Enhancement (or IGMPv3 in the old UI). If you do not enable this, your TV stream will lag every few seconds.
- Wait for the wireless network to come up and make sure it is being broadcast by your Ubuquiti AP.
- Obtain the following information:
- Your network's name and password.
- Your network's BSSID. This can be found by looking at Unifi Devices -> Click Your AP (or UDM Base if using UDM's built-in AP) -> WLANS. Check the BSSID of the "Optik TV" WiFI network.
- Sometimes the BSSID is cut off in this table (has '...'), you can switch to the old UI and check the BSSID there, or right click the BSSID -> inspect element on your browser and see what the full BSSID is.
- Note BSSIDs differ from AP to AP, so check the BSSID on the AP closest to the wireless digital box, or whichever AP you want the box to connect to.
- The name of your WiFi card's network interface.
- Run the command
ip linkin the Linux terminal on your computer. You should see a name like wlp2s0 or wlp3s0, this is your wireless network's interface.
- Run the command
-
Once you obtained the necessary information, disable the Optik TV WiFi network from your UDM's Network settings by going to Settings -> WiFI -> Click Optik TV WiFi -> Uncheck Enable -> Apply Changes. We will now run linux-router and broadcast the same network on Linux, so we do not want your Ubiquiti AP to interfere.
-
Run the following on your Linux computer's terminal to start the wireless network. If you were using WiFi for Internet on Linux, disconnect from the WiFi network first or turn off the WiFi before running the command below (for Ubuntu, click the WiFI icon on the top right -> Turn Off).
sudo ./lnxrouter --ap wlp3s0 NetworkName -p NetworkPass --mac 68:d7:9a:29:82:b1 --ieee80211ac --freq-band 5 --no-dnsmasq -n
-
Replace wlp3s0 with your wireless interface's name.
-
Replace NetworkName with your network's name, NetworkPass with your network's password, and 68:d7:9a:29:82:b1 with your network's BSSID.
-
If everything is successful, you should see a message saying "Setting up completed, now linux-router is working". You should also be able to see the wireless network being broadcast if you check from your phone or other device.
-
-
Connect your wireless digital TV box to the power. If the box was previously on, just disconnect the power and reconnect it. Wait for the box to start.
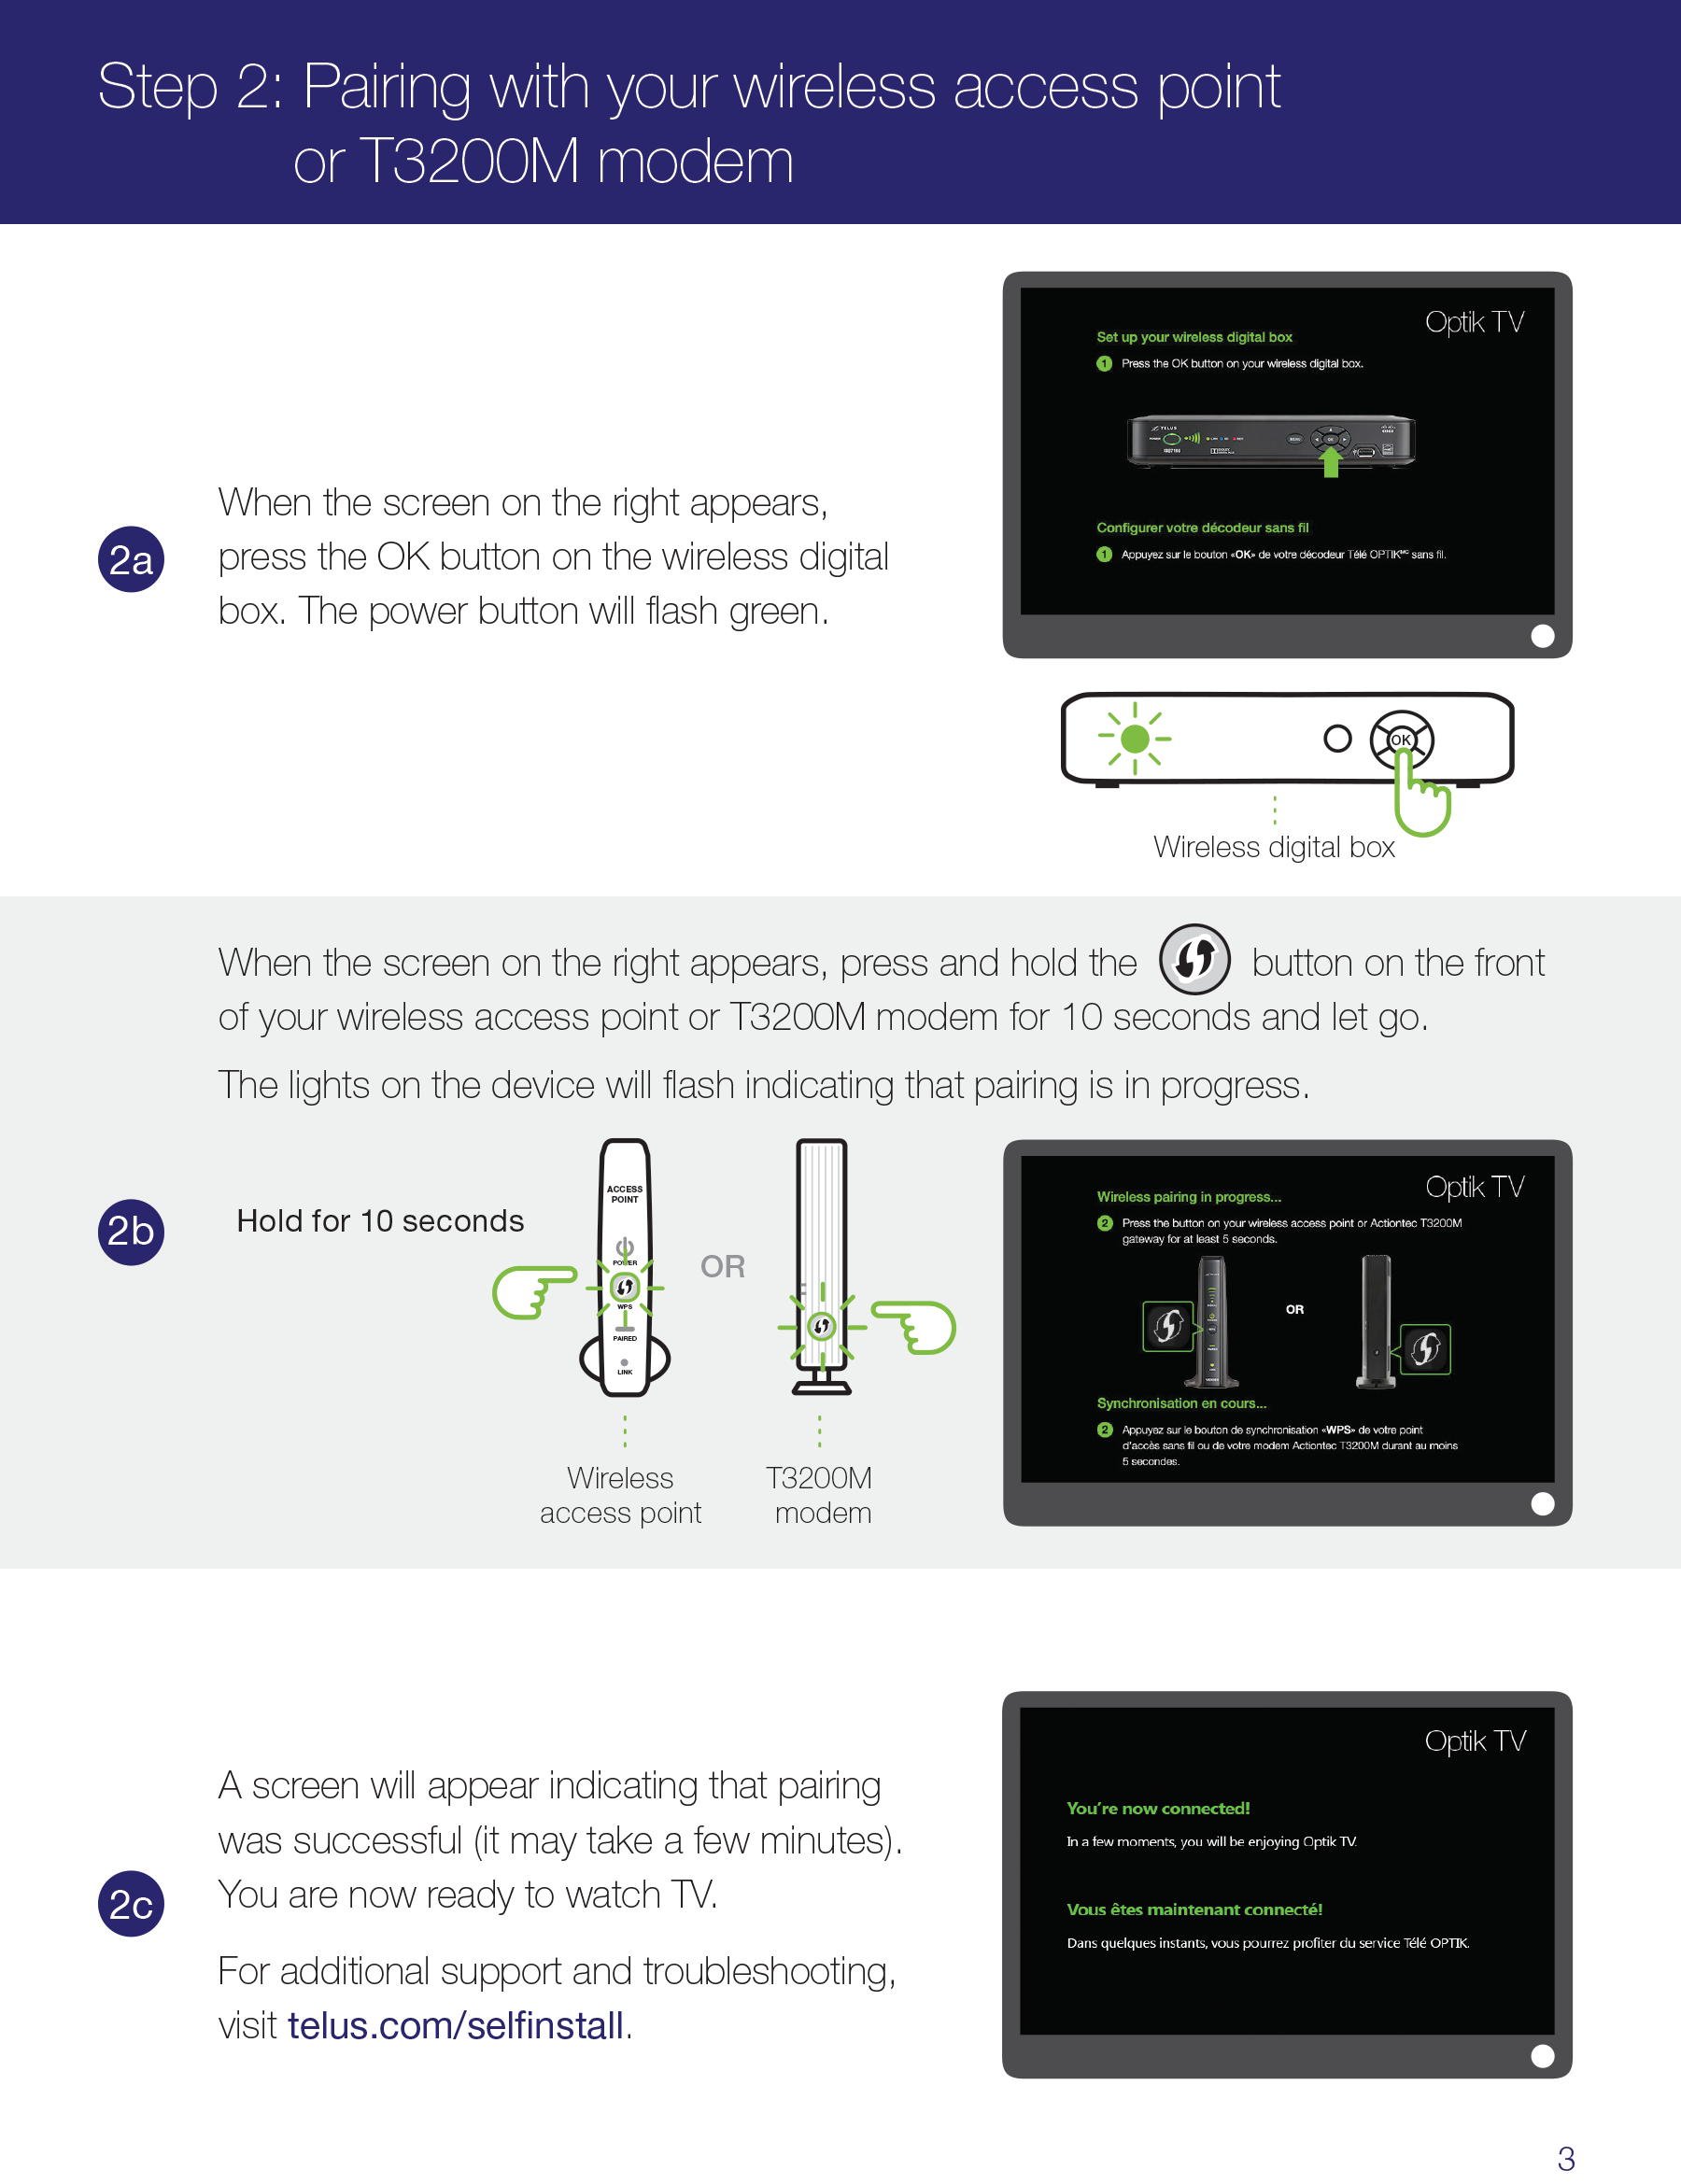
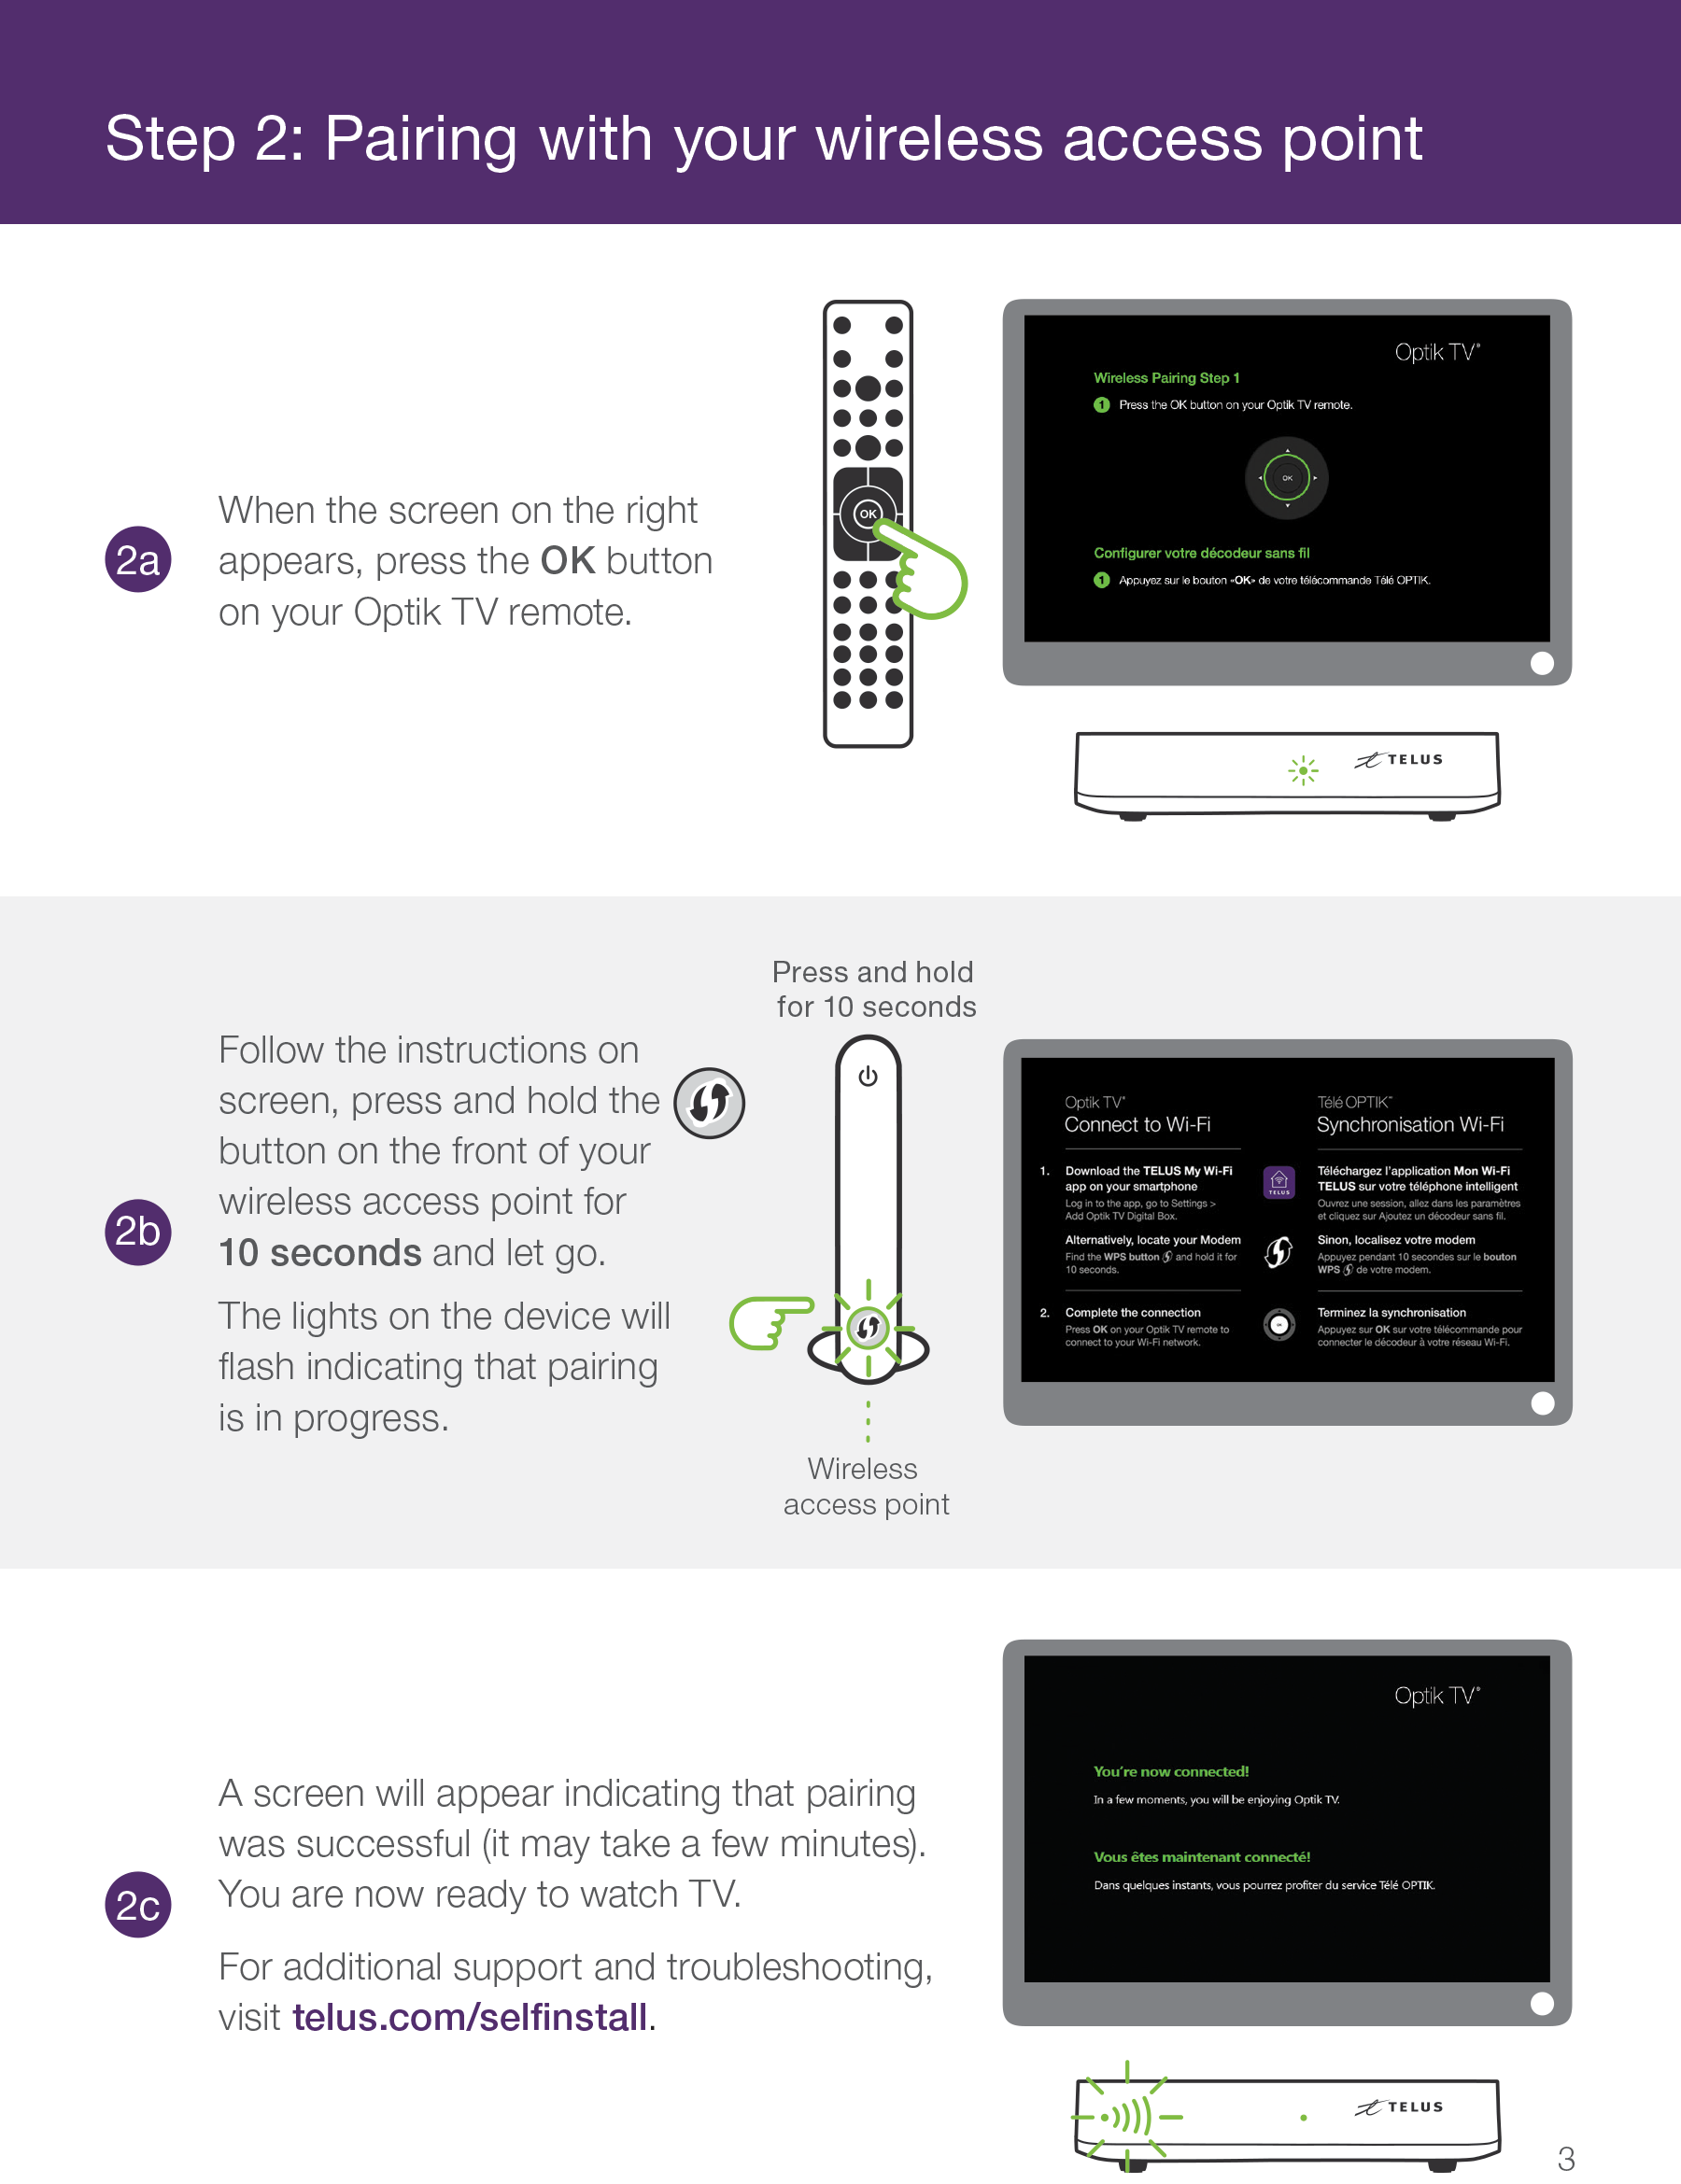
- When the box starts, it will try to connect to the TELUS WiFi but won't find it (since your TELUS-provided router is off), and after a few minutes, it will come to a wireless pairing setup screen which will instruct you to press OK on the remote or box.
- For reference, here is what the pairing screen looks like on the old wireless boxes or new wireless boxes.
- Press OK on your remote or box, and once you get to the second screen that instructs you to press the WPS Push Button on your router, proceed to the next step.
- When the box starts, it will try to connect to the TELUS WiFi but won't find it (since your TELUS-provided router is off), and after a few minutes, it will come to a wireless pairing setup screen which will instruct you to press OK on the remote or box.
-
Once the box asks to press the WPS push button on your router, run the following command on your Linux system in another terminal window or tab (do not close the current linux-router we ran before, press Ctrl+Alt+T to open a new terminal window). This command will make the Linux system wait for a WPS Push Button event.
sudo hostapd_cli -p /dev/shm/lnxrouter_tmp/lnxrouter.*/hostapd_ctrl/ wps_pbc- If this worked, you should see a new line show up in the linux-router terminal window that looks like
wlp3s0: WPS-PBC-ACTIVE.
- If this worked, you should see a new line show up in the linux-router terminal window that looks like
-
Press OK once more on your TELUS remote to initiate the push button connection with the box.
-
Watch the linux-router terminal window. If this worked, after a few seconds, you should see the wireless box trying to connect and then disconnect, and reconnect via the password. For reference, the output should look similar to this.
 wlp3s0: WPS-PBC-ACTIVE
 wlp3s0: STA 8c:5a:25:67:d5:3b IEEE 802.11: associated
 wlp3s0: CTRL-EVENT-EAP-STARTED 8c:5a:25:67:d5:3b
 wlp3s0: CTRL-EVENT-EAP-PROPOSED-METHOD vendor=0 method=1
 wlp3s0: CTRL-EVENT-EAP-PROPOSED-METHOD vendor=14122 method=254
 wlp3s0: WPS-REG-SUCCESS 8c:5a:25:67:d5:3b 4a47a63e-918e-5b15-8320-55f7eccff150
 wlp3s0: WPS-PBC-DISABLE
 wlp3s0: WPS-SUCCESS
 wlp3s0: CTRL-EVENT-EAP-FAILURE 8c:5a:25:67:d5:3b
 wlp3s0: STA 8c:5a:25:67:d5:3b IEEE 802.1X: authentication failed - EAP type: 0 (unknown)
 wlp3s0: STA 8c:5a:25:67:d5:3b IEEE 802.1X: Supplicant used different EAP type: 254 (expanded)
 wlp3s0: STA 8c:5a:25:67:d5:3b IEEE 802.11: disassociated
 wlp3s0: STA 8c:5a:25:67:d5:3b IEEE 802.11: associated
 wlp3s0: AP-STA-CONNECTED 8c:5a:25:67:d5:3b
 wlp3s0: STA 8c:5a:25:67:d5:3b RADIUS: starting accounting session 79456614B47CF489
 wlp3s0: STA 8c:5a:25:67:d5:3b WPA: pairwise key handshake completed (RSN)
-
-
If everything worked, your wireless digital box will say "You are now connected!" and the green WiFi LED on the box will turn on. The box will then restart itself.
- At this point, unplug the box then stop linux-router by pressing Ctrl+C in the linux-router terminal window.
- Linux is no longer needed. You can restart back to your normal OS if you do not use Linux.
-
Turn the Optik TV WiFi network back on in your UDM's Network settings by going to Settings -> WiFI -> Click Optik TV WiFi -> Check Enable -> Apply Changes.
- Wait for the wireless network to come up and make sure it's being broadcast by your Ubiquiti AP.
- Once you verified the wireless network is up, plug the wireless digital box back in. This time when the wireless box comes up, it should connect to your Ubiquiti AP's Optik TV WiFi network, and the green WiFI LED should turn on.
- The box will start up normally after a couple minutes and TV should be working without any interruption (as long as you configured igmpproxy properly and the box is correctly registered with the TELUS network).
-
That's it. You never have to do this process again unless you want to change the wireless network's name, password, or BSSID, or if you want to add a new wireless digital box.
- Note that the BSSIDs generated depend on the order of the wireless networks you have added. So if you remove this wireless network but then re-add it, the BSSID might change. The BSSID will also be different if you want to connect it to a different AP.
- Remember if you are adding a new wireless digital box, you must first register it with the TELUS network as explained above.
This tutorial was adapted for the UDM from the USG TELUS TV tutorial by Chad Ohman found here. Many thanks for his extremely detailed tutorial that made it a breeze to adapt.
Copyrights:
- igmpproxy: Copyright (C) 2005 Johnny Egeland
- hostapd: Copyright (c) 2002-2019, Jouni Malinen and contributors.