The following guide, and included scripts, can be to used to develop a standalone deployment server that automatically deploys hardened Windows systems (both clients and servers). That said, this guide does not yet explain how to install MDT and setup the initial environment... I do plan on creating this at some point, but until such time - the official Microsoft documentation should be used.
Note: This is very much still a WIP. That said, it is essentially a conglomeration of my own personal documentation, various blogs/tutorials, and exisitng Microsoft documentation.
Before system deployments can begin, a MDT deployment share must be created in the Deployment Workbench. This deployment share will function as a repository for operating system images, language packs, applications, device drivers, and other software that can be deployed to a client or server.
To create a deployment share in the Deployment Workbench
-
Click Start, and then point to All Programs. Point to Microsoft Deployment Toolkit, and then click Deployment Workbench.
-
In the Deployment Workbench console tree, go to Deployment Workbench/Deployment Shares.
-
In the Actions pane, click New Deployment Shares.
-
Complete the New Deployment Share Wizard using the following information.
| On this wizard page | Do this |
|---|---|
| Path | In Deployment share path, type X:\DeploymentShare$, and then click Next. |
| Share | Click Next. |
| Descriptive Name | Click Next. |
| Options | Click Next. |
| Summary | Click Next. |
| Progress | The progress for creating the deployment share is displayed. |
| Confirmation | Click Finish. |
The New Deployment Share Wizard finishes, and the new deployment share—MDT Deployment Share (X:\DeploymentShare$)—appears in the details pane.
By default, the MDT Workbench locks down the Deployment Share a bit too tight and it can cause some issues that are difficult to troubleshoot as someone new to MDT. If possible, my recommendation is to download and execute the "deploymentShareRules.ps1" script that I've included in this repository. This should be done on the server you have created your Deployment Share on (shoutout to Johan Arwidmark for coming up with the original solution).
-
Click Start, and then point to All Programs. Point to Microsoft Deployment Toolkit, and then click Deployment Workbench.
-
In the Deployment Workbench console tree, go to Deployment Workbench/Deployment Shares/MDT Deployment Share (
X:\DeploymentShare$)/Operating Systems. -
In the Actions pane, click Import Operating System.
-
Complete the Import Operating System Wizard using the following information.
| On this wizard page | Do this |
|---|---|
| OS Type | Click "Custom image file", and then click Next. |
| Image | In Source directory, enter the absolute path of the operating system image file you are attempting to deploy (e.g., E:\Resources\Operating Systems\WIMs\W11-22H2-ENT.wim), and then click Next. |
| Setup | Do not copy any setup files. |
| Destination | Click Next. |
| Summary | Click Next. |
| Progress | The progress for importing the operating system is displayed. |
| Confirmation | Click Finish. |
If you have yet to create a custom image file, put on your wizard hat and head over to the wimWizard guide to learn more. That said, you can always import an operating system .iso that includes the full set of source files. I personally do not like this method as the stock OS images tend to be extremely bloated, but to each their own!
In order to deploy Windows 10 with MDT successfully, you need drivers for the boot images and for the operating system itself. This section will show you how to add drivers for the boot image and operating system by using a few specific system types as examples.
For boot images, you need to have storage and network drivers; for the operating system, you need to have the full suite of drivers. You should only add drivers to the Windows PE images if the default drivers don't work. Adding drivers that are not necessary will only make the boot image larger and potentially delay the download time.
The key to successful management of drivers for MDT is to have a well structured and scalable driver repository. From this repository, you import drivers into MDT for deployment, but you should always maintain the repository for future use.
In the steps below, it's critical that the folder names used for various computer makes and models exactly match the results of **wmic computersystem get model,manufacturer** on the target system.
-
On the deployment server, create a new folder in a location accessible by MDT. The path to which should look something like this:
X:\Resources\driverRepository -
Within this newly created
driverRepositoryfolder, create the following folder structure:- WinPE x86:
"X:\Resources\driverRepository\WinPE x86" - WinPE x64:
"X:\Resources\driverRepository\WinPE x64" - Windows 10 x64:
"X:\Resources\driverRepository\Windows 10 x64"
- WinPE x86:
-
In the new Windows 10 x64 folder, create the following folder structure:
\Windows 10 x64\%MAKE%\%MODEL%
Even if you're not going to use both x86 and x64 boot images, it is still recommeneded that you add the support structure for future use.
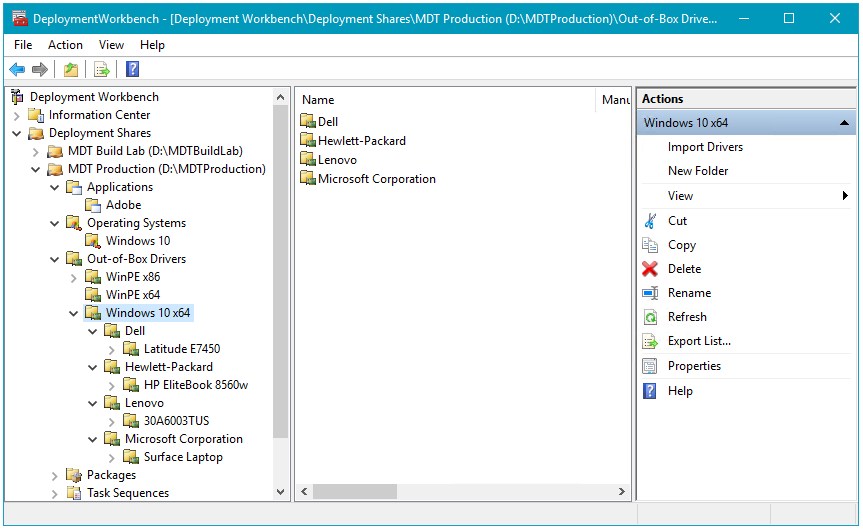
When you import drivers to the MDT driver repository, MDT creates a single instance folder structure based on driver class names. However, you can, and should, replicate the driver structure of your driver source repository in the Deployment Workbench. This can be accomplished by creating logical folders in the Deployment Workbench.
-
On MDT01, using Deployment Workbench, select the Out-of-Box Drivers node.
-
In the Out-Of-Box Drivers node, create the following folder structure:
WinPE x86WinPE x64Windows 10 x64
-
In the Windows 10 x64 folder, create the following folder structure for each manufacturer and client model you plan on deploying:
Windows 10 x64\%MAKE%\%MODEL%
The preceding folder names should match the actual make and model values that MDT reads from devices during deployment. You can find out the model values for your machines by using the following command in Windows PowerShell:
Get-WmiObject -Class:Win32_ComputerSystem
Or, you can use this command in a normal command prompt:
wmic.exe csproduct get name
If you want a more standardized naming convention, try the ModelAliasExit.vbs script from the Deployment Guys blog post, entitled Using and Extending Model Aliases for Hardware Specific Application Installation.
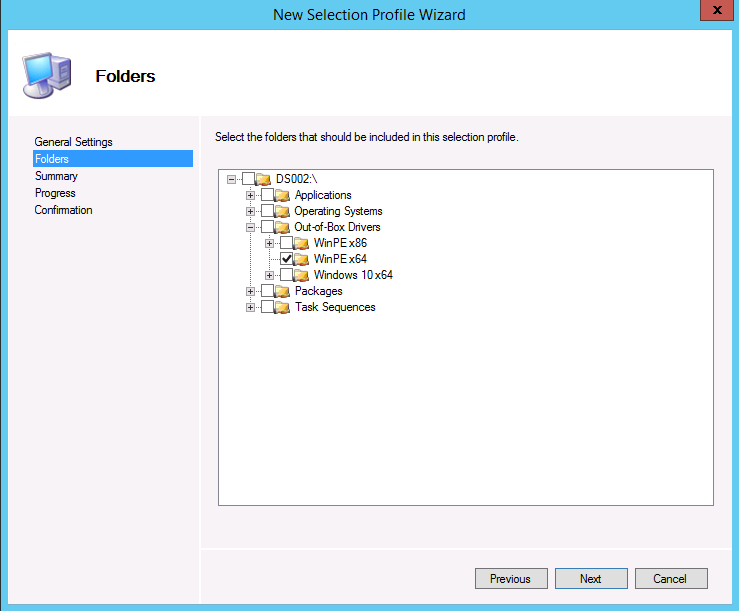
By default, MDT adds any storage and network drivers that you import to the boot images. However, you should add only the drivers that are necessary to the boot image. You can control which drivers are added by using selection profiles.
The drivers that are used for the boot images (Windows PE) are Windows 10 drivers. If you can't locate Windows 10 drivers for your device, a Windows 7 or Windows 8.1 driver will most likely work, but Windows 10 drivers should be your first choice.
-
In the Deployment Workbench, under the MDT Production node, expand the Advanced Configuration node, right-click the Selection Profiles node, and select New Selection Profile.
-
In the New Selection Profile Wizard, create a selection profile with the following settings:
- Selection Profile name: WinPE x86
- Folders: Select the WinPE x86 folder in Out-of-Box Drivers.
- Select Next, Next and Finish.
-
Right-click the Selection Profiles node again, and select New Selection Profile.
-
In the New Selection Profile Wizard, create a selection profile with the following settings:
- Selection Profile name: WinPE x64
- Folders: Select the WinPE x64 folder in Out-of-Box Drivers.
- Select Next, Next and Finish.
Windows PE supports all the hardware models that we have, but here you will learn to add boot image drivers to accommodate any new hardware that might require more drivers. In this example, you add the latest Intel network drivers to the x64 boot image.
In the Deployment Workbench:
-
Download PROWinx64.exe from Intel.com (ex: PROWinx64.exe).
-
Extract PROWinx64.exe to a temporary folder - in this example to the
C:\Tmp\ProWinx64folder.- Extracting the .exe file manually requires an extraction utility. You can also run the .exe and it will self-extract files to the
%userprofile%\AppData\Local\Temp\RarSFX0directory. This directory is temporary and will be deleted when the .exe terminates.
- Extracting the .exe file manually requires an extraction utility. You can also run the .exe and it will self-extract files to the
-
Using File Explorer, create the
D:\Drivers\WinPE x64\Intel PRO1000folder. -
Copy the content of the
C:\Tmp\PROWinx64\PRO1000\Winx64\NDIS64folder to theD:\Drivers\WinPE x64\Intel PRO1000folder. -
In the Deployment Workbench, expand the MDT Production > Out-of-Box Drivers node, right-click the WinPE x64 node, and select Import Drivers, and use the following Driver source directory to import drivers: D:\Drivers\WinPE x64\Intel PRO1000.
For the Dell Latitude E7450 model, you use the Dell Driver CAB file, which is accessible via the Dell Tech Center website.
In these steps, we assume you've downloaded and extracted the CAB file for the Latitude E7450 model to the D:\Drivers\Dell Inc.\Latitude E7450 folder.
-
In the Deployment Workbench, in the MDT Production > Out-Of-Box Drivers > Windows 10 x64 node, expand the Dell Inc. node.
-
Right-click the Latitude E7450 folder and select Import Drivers and use the following Driver source directory to import drivers:
D:\Drivers\Windows 10 x64\Dell Inc.\Latitude E7450
For the HP EliteBook 8560w, you use HP Image Assistant to get the drivers. The HP Image Assistant can be accessed on the HP Support site.
In these steps, we assume you've downloaded and extracted the drivers for the HP EliteBook 8650w model to the D:\Drivers\Windows 10 x64\Hewlett-Packard\HP EliteBook 8560w folder.
-
In the Deployment Workbench, in the MDT Production > Out-Of-Box Drivers > Windows 10 x64 node, expand the Hewlett-Packard node.
-
Right-click the HP EliteBook 8560w folder and select Import Drivers and use the following Driver source directory to import drivers:
D:\Drivers\Windows 10 x64\Hewlett-Packard\HP EliteBook 8560w
Note: VSCode version 1.77.3 will be used to illustrate this process
-
On the deployment server, create a new folder to act as a repository for the applications to be deployed with the target systems. This will look something like this:
X:\Resources\Software -
Within the newly created
Softwarefolder, create a folder for the vendor (e.g.,X:\Resources\Software\Vendor\) -
Within the
Vendorfolder, create a folder for the application itself (e.g.,X:\Resources\Software\Vendor\Application) -
Download (or locate) the executable for the application to the
Applicationsfolder that was just created.

-
In the Deployment Workbench, under the active Deployment Share node, right-click Applications and select New Application
-
Make sure that Application with source files is selected, and click Next
-
Use the table below to complete the following steps in the New Application Wizard:
| Wizard page | Do this |
|---|---|
| Details | Enter the name of the application and the version number. Click Next. |
| Source | Click Browse and navigate to the folder that was created in the previous section (e.g., E:\Resources\Software\Microsoft\VSCode). Click Next. |
| Command Details | Enter the CLI install command. In this case it should look something like this: VSCodeSetup-x64-1.77.3.exe /VERYSILENT /NORESTART /MERGETASKS="!runcode, desktopicon". Click Next. |
| Summary | Verify everything looks correct. Click Next. |
| Confirmation | Click Finish. |
-
In the Deployment Workbench, under the active Deployment Share node, click on Applications. The pane on the right should now show a list of all available applications.
-
Right-click on the application that was just imported (e.g.,
VSCode 1.77.3) and select Properties. -
A new window will appear with three tabs. Select the Details tab and verify that the quiet install command is correct. This window can also be used to edit many of the application specific settings.

This section will illustrates how to create a basic task sequence that will be used to deploy an image to the target system.
-
In the Deployment Workbench, under the MDT Production node, right-click Task Sequences, and create a folder for the general category of task sequences that this will fall into.
-
Right-click the new Windows 10 folder and select New Task Sequence. Use the following settings for the New Task Sequence Wizard:
| Wizard page | Do this |
|---|---|
| Task sequence ID | W10-X64-001 |
| Task sequence name | Windows 10 Enterprise x64 |
| Task sequence comments | This is up to you. |
| Template | Standard Client Task Sequence |
| Select OS | Windows 10 Enterprise x64 |
| Specify Product Key | Don't specify a product key at this time (unless you have one) |
| Full Name | Administrator |
| Organization | exampleOrganization |
| Internet Explorer home page | N/A |
| Admin Password | Don't specify an Administrator Password at this time |
-
Continuing from the previous procedure, right-click the Windows 10 Enterprise x64 task sequence, and select Properties.
-
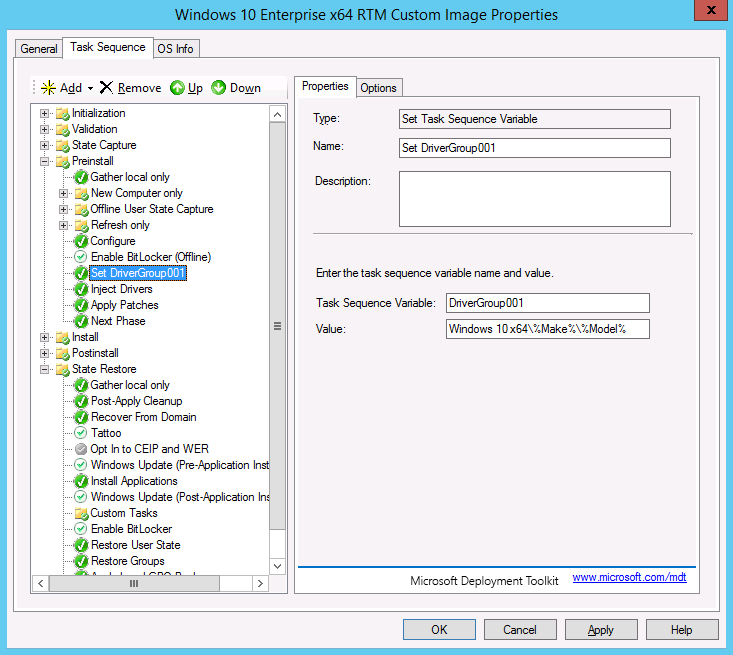
On the Task Sequence tab, configure the Windows 10 Enterprise x64 task sequence with the following settings:
-
Preinstall: After the Enable BitLocker (Offline) action, add a Set Task Sequence Variable action with the following settings:
- Name: Set DriverGroup001
- Task Sequence Variable: DriverGroup001
- Value:
Windows 10 x64\%Make%\%Model%
-
Configure the Inject Drivers action with the following settings:
- Choose a selection profile: Nothing
- Select: Install all drivers from the selection profile
-
Select OK.
-
The configuration above indicates that MDT should only use drivers from the folder specified by the DriverGroup001 property, which is defined by the "Choose a selection profile: Nothing" setting, and that MDT shouldn't use plug and play to determine which drivers to copy, which is defined by the "Install all drivers from the selection profile" setting.
-
Continuing from the previous procedure, right-click the Windows 10 Enterprise x64 task sequence, and select Properties.
-
Select the Task Sequence tab and expand the State Restore section.
-
Within this step of the task sequence you can add a wide variety of custom tasks to your task sequence (e.g., custom scripts, application installs, etc.)
-
For example, if you wanted to add a custom script to the task sequence, you would simply select the Custom Tasks folder in the task sequence and then navigate to the top of the window and click Add > General > Run PowerShell Script
-
Within the newly created Run PowerShell Script step of the task sequence, add the path to the script: (e.g.,
\\<exampleServer>\Resources\Scripts\randomPowerShellScript.ps1)
For those of you who are interested in how I have personally implemented some of the scripts included in this repository, you can use the image below to serve as a guide. That said, keep in mind that this is the structure that happened to work for the environment in which the server was originally developed for, and it could very well not work for you. Feel free to experiment! I will be including a section at some point on how to leverage Hyper-V to rapidly test changes in your task sequences (rather than using physical systems).

-
Similar to the previous procedure, right-click the Windows 10 Enterprise x64 task sequence, and select Properties.
-
Select the Task Sequence tab and expand the State Restore section.
-
Select the Custom Tasks folder in the task sequence and then navigate to the top of the window and click Add > General > Install Application
-
Select the newly created Install Application step in the task sequence, select the Install a single application radio button, click on Browse and select an available application.
-
Click on Ok and then update the deployment share (refer to Step 8)

You should enable deployment monitoring by opening up the Monitoring node in the deployment share. This can be accomplished by selecting the Monitoring tab on the deployment share properties sheet, and selecting the dialog box to indicate you would like to monitor deployments.
To enable monitoring of the deployment process
-
Click Start, and then point to All Programs. Point to Microsoft Deployment Toolkit, and then click Deployment Workbench.
-
In the Deployment Workbench console tree, go to Deployment Workbench/Deployment Shares.
-
In the details pane, click MDT Deployment Share (
X:\DeploymentShare$). -
In the Actions pane, click Properties
-
In the MDT Deployment Share (
X:\DeploymentShare$) Properties dialog box, on the Monitoring tab, select the Enable monitoring for this deployment share check box, and then click Apply. -
In the MDT Deployment Share (
X:\DeploymentShare$) Properties dialog box, on the Rules tab, notice that the EventService property has been added to the CustomSettings.ini file, and then click OK. -
Close all open windows and dialog boxes.
-
Click Start, and then point to All Programs. Point to Microsoft Deployment Toolkit, and then click Deployment Workbench.
-
In the Deployment Workbench console tree, go to Deployment Workbench/Deployment Shares.
-
In the details pane, click MDT Deployment Share (
X:\DeploymentShare$). -
In the Actions pane, click Properties and select the Rules tab
-
The following code block is an example of what I am currently using to guide the deployment process:
[Settings]

Priority=Default
Properties=MyCustomProperty

[Default]

OSDComputerName=XYZ#year(date)#-#Right(Replace("%MACADDRESS001%",":",""),5)#
OSInstall=Y
UserDataLocation=NONE
TimeZoneName=Eastern Standard Time
TimeZone=035
UILanguage=en-US
JoinWorkgroup=WORKGROUP
HideShell=NO
DoNotCreateExtraPartition=YES
ApplyGPOPack=NO
_SMSTSORGNAME=ExampleOrganization

SLShare=%DeployRoot%\Logs\%COMPUTERNAME%
SLShareDynamicLogging=%DeployRoot%\Logs\%COMPUTERNAME%
EventService=http://<exampleServer>:9800

BitsPerPel=32
VRefresh=60
XResolution=1
YResolution=1

SkipCapture=YES
SkipAdminPassword=YES
SkipProductKey=YES
SkipComputerBackup=YES
SkipAppsOnUpgrade=NO
SkipComputerName=YES
SkipDomainMembership=YES
SkipUserData=YES
SkipLocaleSelection=YES
SkipTaskSequence=NO
SkipTimeZone=YES
SkipApplications=YES
SkipBitLocker=YES
SkipSummary=YES
SkipRoles=YES
SkipFinalSummary=YES

FinishAction=RESTART
- Once you have added the rules above, click the Edit Bootstap.ini box at the bottom of the window. This will open up a
Bootstrap.inifile where you will add the following code block to guide the bootstrap process:
[Settings]
Priority=Default

[Default]
DeployRoot=\\<exampleServer>\DeploymentShare$
UserDomain=<exampleUserDomain>
UserID=Administrator
UserPassword=<examplePassword>

SkipBDDWelcome=YES
After configuring the deployment share, update it. Updating the deployment share updates all the MDT configuration files and generates a customized version of Windows PE that is used to start the target system and initiate OTI deployment.
To update the deployment share in the Deployment Workbench
-
Click Start, and then point to All Programs. Point to Microsoft Deployment Toolkit, and then click Deployment Workbench.
-
In the Deployment Workbench console tree, go to Deployment Workbench/Deployment Shares.
-
In the details pane, click MDT Deployment Share (
X:\DeploymentShare$). -
In the Actions pane, click Update Deployment Share.
-
Complete the Update Deployment Share Wizard using the following information. Accept the default values unless otherwise specified.
| On this Wizard page | Do this |
|---|---|
| Options | Click Next. |
| Summary | Click Next. |
| Progress | The progress for updating the deployment share is displayed. |
| Confirmation | Click Finish. |
The Deployment Workbench starts updating the MDT Deployment Share (X:\DeploymentShare$) and creates the LiteTouchPE_x64.iso and LiteTouchPE_x64.wim files (for 64-bit target computers) or LiteTouchPE_x86.iso and LiteTouchPE_x86.wim files (for 32-bit target computers). These will be located in the X:\DeploymentShare$\Boot folder (where deployment_share is the network shared folder used as the deployment share).
-
Click Start, and then point to All Programs. Click the Windows Administrative Tools folder and select the Windows Deployment Services application.
-
In the Windows Deployment Server console tree, expand the Servers/exampleServer node
-
Right-click the Boot Images folder and select "Add Boot Image"
-
This will open the Add Image Wizard where you will simply browse to the
X:\DeploymentShare$\Boot, select the LiteTouchPE_x64.wim boot image that you generated in the previous step, and click Next -
Click Next
-
Click Next one more time and then click Finish once the image has been successfully uploaded.
After creating the task sequence, initiate the operating system deployment process by starting the target computer and selecting Network PXE boot (IPv4) in the BIOS.
The process has been almost entirely automated, however you will need to select which task sequence to execute on the target computer depending on the deployment type and required operating system.
-
On your deployment server, click Start, and then point to All Programs. Point to Microsoft Deployment Toolkit, and then click Deployment Workbench.
-
In the Deployment Workbench console tree, go to Deployment Workbench/Deployment Shares/MDT Deployment Share
(X:\DeploymentShare$)/Monitoring -
In the Actions pane, periodically click Refresh.
-
In the details pane, view the deployment process for the target5 system
-
In the Actions pane, periodically click Refresh.
-
The status of the deployment process is updated in the details pane. Continue to monitor the deployment process until the process is complete.
-
Close the Deployment Workbench.
-
On your deployment server, in the Deployment Summary dialog box, click Details. If any errors or warnings occur, review the errors or warnings, and record any diagnostic information.
-
In the Deployment Summary dialog box, click Finish.
-
At the end of the MDT deployment process, the Deployment Summary dialog box appears. The image of Windows 10 captured from the reference computer is now installed on the target computer. If any errors or warnings occur, consult the MDT document Troubleshooting Reference.