
🖼️ UI Kit for building Nextcloud apps with Vue
- ✨ Standardized UI Components
- 🛠️ Composables and frontend utilities
- 🔗 Reference providers utilities
| Version | Target | Documentation |
|---|---|---|
| v9.x [next] | Nextcloud 30+ (Vue 3) | https://next--nextcloud-vue-components.netlify.app |
| v8.x [master] | Nextcloud 28+ (Vue 2) | https://nextcloud-vue-components.netlify.app |
| v7.x [stable7] | Nextcloud 25 - 27 | https://stable7--nextcloud-vue-components.netlify.app |
| v6.x [stable6] | Nextcloud 24 - 25 | https://stable6--nextcloud-vue-components.netlify.app |
npm i @nextcloud/vueImport corresponding components and other modules on use. Check the documentation for more details.
import NcButton from '@nextcloud/vue/components/NcButton'
import { useHotKey } from '@nextcloud/vue/composables/useHotKey'

// (Deprecated) Old import path
import NcButton from '@nextcloud/vue/dist/Components/NcButton.js'
import { useHotKey } from '@nextcloud/vue/dist/Composables/useHotKey.js'
Import from a single root is available as well. Use with caution: this might lead to slower build time and larger bundles in some cases.
import { NcButton, useHotKey } from '@nextcloud/vue'NextcloudVuePlugin registers all the components and directives globally.
⚠️ This installation method leads to extremely large bundle and removed in v9.
If you don't want to import component on usage you may use unplugin-vue-components instead.
import Vue from 'vue'
import { NextcloudVuePlugin } from '@nextcloud/vue'

Vue.use(NextcloudVuePlugin)- It's always good to check/create an issue first and discuss the problem or feature you want to work on
- Fork the repository and create a new branch
- Make the changes
- Check the change in Vue-Styleguidist and/or Nextcloud apps
- Do not forget to
lintandtestyour changes - If possible, add tests for your changes
- Do not forget to
- Commit and push your changes, create a Pull Request
- Make sure to follow the Conventional Commits in commit messages, and PR titles, for example:
fix(NcButton): correct layout on Safari - Make sure to follow the Pull Request template
- Sign-off you commits for the Developer Certificate of Origin (DCO)
- Make sure to follow the Conventional Commits in commit messages, and PR titles, for example:
- Get your PR reviewed
- If you don't receive a feedback in a week, feel free to mention the maintainers, for example, last developers worked on the module
- Get your PR merged
Please read the Code of Conduct. This document offers some guidance to ensure Nextcloud participants can cooperate effectively in a positive and inspiring atmosphere and to explain how together we can strengthen and support each other.
More information on how to contribute: https://nextcloud.com/contribute/
If you want to work on improving the components it’s best to run the latest code and link it to your local Nextcloud installation:
- Install the dependencies with
npm ci - Build the components every time you do changes:
npm run build- To make development build:
npm run dev - To watch for changes and rebuild automatically:
npm run watch - To watch for changes and rebuild development build:
npm run dev:watch
- To make development build:
- Connect it to your local Nextcloud development setup:
- In this repository do
npm link - In the repository of an app do
npm link @nextcloud/vue(you need to re-link any time you donpm ciin the app)
- In this repository do
- Then build the app with:
npm run build(or watch for changes withnpm run watch)
Use t and n functions from src/l10n.js to display translated strings. They follow gettext and ngettext interface from @nextcloud/l10n/gettext.
<script setup lang="ts">
import { t } from '../../l10n.js'
</script>

<template>
	<element>
		{{ t('Choose') }}
	</element>
</template>
When you edit/create a translated string, you need to update the l10n files. Our awesome translation community will then be notified and a bot will sync translations automatically.
npm run l10n:extractWhen developing new components or extending components, make sure to also have some bits of related documentation like examples, where applicable.
To test components and the documentation in that context, you can run npm run styleguide to run a local server that serves the style guide
with all the components.
If you want to use vue-devtools in Firefox, you need to:
- Either enable the HMR Enabler app …
- … or patch your nextcloud instance as follows:
diff --git a/lib/public/AppFramework/Http/ContentSecurityPolicy.php b/lib/public/AppFramework/Http/ContentSecurityPolicy.php
index 0e3a6a705d..416b8b0fb9 100644
--- a/lib/public/AppFramework/Http/ContentSecurityPolicy.php
+++ b/lib/public/AppFramework/Http/ContentSecurityPolicy.php
@@ -41,9 +41,9 @@ namespace OCP\AppFramework\Http;
  */
 class ContentSecurityPolicy extends EmptyContentSecurityPolicy {
        /** @var bool Whether inline JS snippets are allowed */
-       protected $inlineScriptAllowed = false;
+       protected $inlineScriptAllowed = true;
        /** @var bool Whether eval in JS scripts is allowed */
-       protected $evalScriptAllowed = false;
+       protected $evalScriptAllowed = true;
        /** @var bool Whether strict-dynamic should be set */
        protected $strictDynamicAllowed = false;
/** @var array Domains from which scripts can get loaded */- Pull the latest changes from
masterorstableX - Checkout a new branch with the tag name (e.g
v4.0.1):git checkout -b v<version> - Run
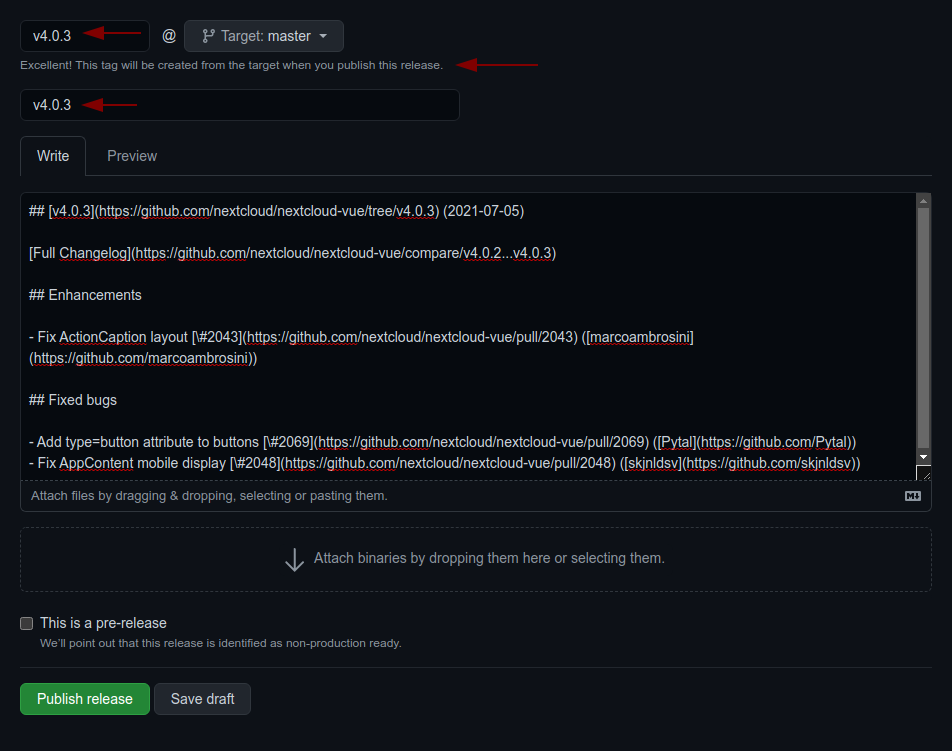
npm version patch --no-git-tag-version(npm version minor --no-git-tag-versionif minor). This will return a new version name, make sure it matches what you expect - Generate the changelog content from the release page.
Create a draft release, select the previous tag, click
generatethen paste the content to theCHANGELOG.mdfile- use the the version as tag AND title (e.g
v4.0.1) - add the changelog content as description (https://github.com/nextcloud-libraries/nextcloud-vue/releases)
- use the the version as tag AND title (e.g
- Commit, push and create PR
- Get your PR reviewed and merged
- Create a milestone with the follow-up version at https://github.com/nextcloud-libraries/nextcloud-vue/milestones
- Move all open tickets and PRs to the follow-up
- Close the milestone of the version you release
- Publish the previously drafted release on GitHub

A pre-release can be built in the same way as described above, however it requires manual adjustments to avoid that npm ships the pre-release to all users:
-
Retag latest to the last stable release
npm dist-tag add @nextcloud/[email protected] latest
-
Tag the new pre-release as next
npm dist-tag add @nextcloud/[email protected] next