Node-RED Energy Harvesting dashboard example, weather forecast, temperature and humidty measurement. MQTT, ESP32, u-blox NINA-W10, HTU21D, IBM Cloud, CloudMQTT


- How to build PlatformIO based project
- TODO
- Energy Harvesting
- MQTT Broker
- IBM Node-RED Hosting
- Node-RED Flow
- OpenWeatherMap API
- Node-RED Notification
- Programming
- Calibrating ADC for ESP32
- Partition Table and Flash size
- Erase Flash
- Power Measurement
- PCB
- Final Thoughts or Improvements
- Credits
-
More information can be found on their comprehensive Docs. But Basically:
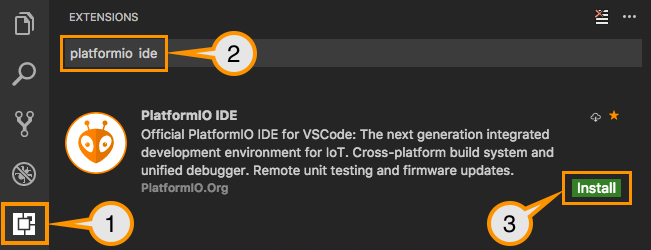
- Download and install official Microsoft Visual Studio Code. PlatformIO IDE is built on top of it
- Open VSCode Package Manager
- Search for official
platformio-ideextension - Install PlatformIO IDE.
- More detailed IBM deploy;
- Details on the flows;
- Node to be installed;
- Energy Harvesting details;
| Component | ~Typ mA |
|---|---|
| NINA-W102 | 120 |
| Component | ~Typ μA |
|---|---|
| TPL5110 | 0.035 |
| Cap leak | 30 |
| LDO | 1 |
| Passive | 5 |
- The code takes in average 2000ms to execute;
- Wakes up every hour;
- 10 hours of charging soruce;

The MQTT Broker used is CloudMQTT they offer Free accounts 😉 that works just fine.
The process was a bit tedious and took a while to get it properly running as of today (2019/06/15) the information provided on the tutorial had few broken links.
https://nodered.org/docs/platforms/bluemix
- Sign-up/Log in to https://cloud.ibm.com/;
- Using the top search bar, search for
Node-RED Starter; - Fill the required fields,
App name,Host name, etc... - Select
LiteforSDK for Node.jsandCloudant, those are free, you can upgrade later if required; - Click
Createat the bottom right, the circle will spin, take few seconds; - You will be redirected to the next page and should see
runningwhen everything is ready for use:

- Go to your App URL, something like http://AppName.eu-gb.mybluemix.net and complete the initial set-up;
- The Node-Red GUI Flow Editor is available at http://AppName.eu-gb.mybluemix.net/red
- After installing the Node desbribed below, Your Node-red Dashboard is available at http://AppName.eu-gb.mybluemix.net/ui
- Menu -> Manage Palette -> Install tab. You will need
node-red-node-openweathermapandnode-red-dashboard
- Copy the flow below and import to your Nore-RED available at
yournode.eu-gb.mybluemix.net/redImport > Clipboard, paste it.
You will find the flow.json here.

- Generally Cloudant autheticate via IBM cloud therefore we need to create new Credentials and use the username and password for authentication on the
delet inputs on databasenode.

- In order to get the weather forecast information for the OpenWeatherMap node, you will need to get your API at https://openweathermap.org/api
- Then define your location and the information you would like to show on the "Forecast String" node:
{
  "coord":{"lon":139,"lat":35},
  "sys":{"country":"JP","sunrise":1369769524,"sunset":1369821049},
  "weather":[{"id":804,"main":"clouds","description":"overcast clouds","icon":"04n"}],
  "main":{"temp":289.5,"humidity":89,"pressure":1013,"temp_min":287.04,"temp_max":292.04},
  "wind":{"speed":7.31,"deg":187.002},
  "rain":{"3h":0},
  "clouds":{"all":92},
  "dt":1369824698,
  "id":1851632,
  "name":"Shuzenji",
  "cod":200
}
- Via the
catchnode, you can enable notification, for your phone for example. Below I have quickly show few options:
- Use the
emailoutput, configured with your email provider info;
- PushSafer
- Offers several customizations, sound, vibration, icons, etc:
- GET request url:
https://www.pushsafer.com/api?k=YOURKEY&c=%23ff0000&v=1&a=1&m={{payload}}
- Twilio SMS
- SMS API, built-in to the Node-RED and IBM example;
- IFTT
- If this than that, with android and iOS apps can be accesible via webhooks;
- GET
https://maker.ifttt.com/trigger/YOUR_EVENT/with/key/YOUR_KEY?value1=MESSAGE
-
An external 3.3V UART/USB Converter is required in combination with jumper configuration and button pressing:
- Remove the 2 jumpers and set it to
FlashPosition:

- Power or reset the board while keeping
BOOTlow/pressed.
- Remove the 2 jumpers and set it to
-
In order to program the Nano Timer
TPL5110the DIP switch needs to be set before connecting power/supercap.

- ADC on ESP32 has been reported being innacurate, therefore one can use
adc2_vref_to_gpio( GPIO_NUM_25 );to routeVreftoGPIO_NUM_25that can be measured overNINA PIN 16 -> R7in order to calibrate during ADC measurement. - Calling for
esp_adc_cal_characterize(ADC_UNIT_1, ADC_ATTEN_DB_6, ADC_WIDTH_BIT_11, Vref, adc_chars);
-
You can create a custom partitions table (CSV) following ESP32 Partition Tables documentation.
-
Partitions examples are available at GitHub arduino-esp32
-
minimal.csvis the default defined on nina_w10.json however I changed it in order to free some space up used by spiffs found onpartitions_custom.csvhere- No OTA;
- No SPIFFS;
- No EEPROM;
pio run -t erase - > all data will be replaced with 0xFF bytes.
- The overall power/current can be measure by diconeting the Storage element and connecting the meter in series;
- Alternativelly, to analyze NINA-W1 power profile, remove
Vbatjumper and measure the current on the following position:


- Use 3.0V LDO, HT7830;
- Replace LDO for a smaller drop-out voltage or lower power-down current;
- Use a Buck/Boost converter instead of LDO in order to discharge super cap until 2.8V;
GitHub Shields and Badges created with Shields.io
Weather information from OpenWeatherMap
Webcam picture from webcam.travel
Adafruit HTU21D GitHub Library