![]()


Simple & Extensible Dotfile Manager Unifying Your Terminal Operations (PRs and Forks are welcome !)
Let's Oxidize Development Environments
For macOS / Linux (Intel)
git clone --depth=1 https://github.com/ivaquero/oxidizer.git && bash oxidizer/install.sh

# customize path for Oxidizer
export OXIDIZER=$HOME/oxidizer
Note that Homebrew is an essential dependency for Oxidizer on macOS / Linux. For China mainland users, you may set BREW_CN variable to install Homebrew through domestic mirror
export BREW_CN=1Note that Oxidizer only support limited functionality on Linux-on-ARM yet.
For Windows
git clone --depth=1 https://github.com/ivaquero/oxidizer.git; . oxidizer\install.ps1

# customize path for Oxidizer
$env:OXIDIZER = "$HOME\oxidizer"
Note that Scoop is an essential dependency for Oxidizer on Windows. For China mainland users, you may set SCOOP_CN variable to install Scoop through domestic mirror
$env:scoop_mirror = 1For Cmder users, you need to remove the
-Options ReadOnlyfromSet-Item -Path function:\prompt -Value $Prompt -Options ReadOnlyin the last line of%CMDER_ROOT%\vendor\profile.ps1.
After installation, you might personalize your preference in custom.sh, check defaults.sh. Open custom.sh or custom.ps1 by following command
edf oxTo keep up the updates, simply use upox function.
Oxidizer is originally designed for non-administrator users. It saves your time from repetitive and tedious setups of coding environments, and it aims to provide with following features:
- Cross-Platform (mainly Rust toolchains)
- Minimal Dependencies & Minimal Installation
- Extensible Architecture
- Unified Interface & Smooth Usage
- Super-Fast! (loading time < 1 s)
☑️ means required in the installation.
- coreutils
- Use bat instead of
cat - Use lsd instead of
ls - Use uutils-coreutils instead of
coreutils
- Use bat instead of
- non-coreutils
- Use dust instead of
du - Use fd instead of
find - Use ripgrep instead of
grep - Use sd instead of
sed - Use tlrc instead of
tldrorman - Use zoxide instead of
cdorz - Use hyperfine instead of
time - Use procs instead of
ps - Use starship instead of
powerline10korohmyposh - Use tokei instead of
cloc - Use tre instead of
tree
- Use dust instead of
Nushellis a cross-platform written in Rust, but it doesn't support dynamical path for the moment.
- Use bottom instead of
toporhtop - Use gitui instead of
lazygit - Use yazi instead of
range - Use helix instead of
vim(Not drop-in) - Use zellij instead of
tmux(Not supported on Windows)
WezTermis more recommended because it has a built-in multiplexer.
- ouch: Painless compression and decompression tool
- pueue: Command-line task management tool for sequential and parallel execution of long-running tasks
- kondo: A tool to clean dependencies and build artefacts from your projects.
- navi: An interactive cheatsheet tool for the command-line
- onefetch: Command-line Git information tool
Oxidizer is designed to be extensible, you can personalize OX_PLUGINS in custom.sh to load the plugins by your need.
Of course, you are allowed to write your own plugins, see Writing A Plugin for details.
The plugins are hosted in OxPlugins OxPlugins-PowerShell has stopped maintenance.
| Plugin Abbr. | Category | Support | Must? |
|---|---|---|---|
oxpbg |
Better to Have | Git | |
oxpom |
OS Shortcuts | macOS | ✓ |
oxpod |
OS Shortcuts | Debian-Based Systems | ✓ |
oxpor |
OS Shortcuts | RedHat-Based Systems | ✓ |
oxpow |
OS Shortcuts | Windows (include winget) | ✓ |
oxppb |
Package Manager | Homebrew (macOS & Linux) | ✓ |
oxpps |
Package Manager | Scoop (Windows) | ✓ |
oxppc |
Package Manager | Conda (Multi-Languages) | |
oxppcn |
Package Manager | Conan (C++) | |
oxppn |
Package Manager | NPM (JavaScript) | |
oxpptl |
Package Manager | tlmgr (TeXLive) | |
oxpljl |
Programming Language | Julia | |
oxplrb |
Programming Language | Ruby (include gem) | |
oxplrs |
Programming Language | Rust (include cargo, rustup) | |
oxpsc |
Service | Container (Docker & Podman) | |
oxpsp |
Service | Pueue | |
oxpcbw |
App CLI | Bitwarden | |
oxpces |
App CLI | Espanso | |
oxpcjr |
App CLI | Jupyter (notebook / lab, book) | |
oxpcvs |
App CLI | VSCode | |
oxpuf |
System Utils | File Operation | ✓ |
oxpufm |
System Utils | Formats Conversion | |
oxpunw |
System Utils | Network Configuration | ✓ |
oxptwr |
Terminal Utils | Weather (wttr-based) | |
oxptzj |
Terminal Utils | Zellij (macOS & Linux) | |
oxpxns |
Extra Utils | Notes Apps (Obsidian & Logseq) |
To load a plugin, simply add its abbreviation into the OX_PLUGINS array of ~/oxidizer/custom.sh, like
OX_PLUGINS=(
    oxpbg
    oxpufm
    oxplrs
)
Oxidizer uses Homebrew or Scoop to manage packages and software programs to bypass the requirement of administrator privilege.
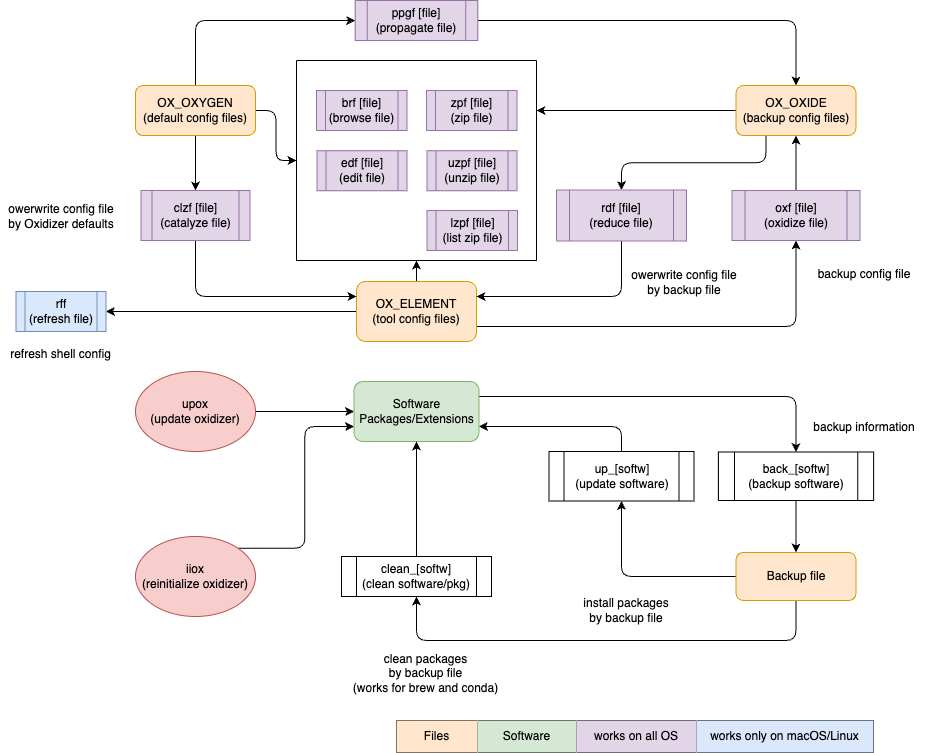
rff- refresh file by
source
- refresh file by
edf- edit file by
$EDITOR(default: VSCode)
- edit file by
brf- file: browse by
bat/cat - folder: browse by
lsd/ls
- file: browse by
rdf(alias:ipf, means import file)- reduce file: overwrite configuration file by backup (customized) file
oxf(alias:epf, means export file)- oxidize file: backup configuration file to backup folder
clzf(alias:iif, means initialize file)- catalyze file: overwrite configuration file by Oxidizer defaults
ppgf- propagate file: backup Oxidizer defaults to backup folder
For example, if you want to edit ~/.zshrc, you can type edf zs.
When you use oxf zs, ~/.zshrc will be copied and save in $OX_BACKUP/shell folder, where $OX_BACKUP is the backup path that can be personalized in $OXIDIZER/custom.sh. As mentioned in Get Started, you can open custom.sh simply by edf ox.
The table below lists the information of specific configuration files:
| Origin | File Abbr. | File | in Plugin |
|---|---|---|---|
| oxidizer | ox |
custom.sh |
|
| zsh | zs |
.zshrc |
built-in |
| starship | ss |
starship.toml |
built-in |
| wezterm | wz |
wezterm.lua |
custom.sh |
| debian | sc |
/etc/apt/sources.list |
oxpod |
| winget | w |
winget.json |
oxpow |
| git | gi |
.gitignore |
oxpbg |
| git | g |
.gitconfig |
oxpbg |
| conda | c |
.condarc |
oxppc |
| conan | cn |
conan.conf |
oxppcn |
| conan | cnr |
remotes.json |
oxppcn |
| conan | cnd |
profiles/default |
oxppcn |
| javascript | jsx |
js-pkgs.txt |
oxppn |
| npm | n |
.npmrc |
oxppn |
| latex | tl |
texlive-pkgs |
oxpptl |
| julia | jl |
startup.jl |
oxpljl |
| julia | jlx |
julia-pkgs.txt |
oxpljl |
| julia | jlp |
Project.toml |
oxpljl |
| julia | jlm |
Manifest.toml |
oxpljl |
| cargo | cg |
config.toml |
oxlrs |
| rustup | rs |
settings.toml |
oxlrs |
| espanso | es |
default.yml |
oxpces |
| espanso | esb |
match/base.yml |
oxpces |
| espanso | esx_ |
match/packages |
oxpces |
| vscode | vs |
settings.json |
oxpcvs |
| vscode | vsk |
keybindings.json |
oxpcvs |
| vscode | vss_ |
snippets |
oxpcvs |
| vscode | vsx |
vscode-pkgs.txt |
oxpcvs |
| jupyter | jr |
jupyter_notebook_config.py |
oxpcjr |
| pueue | pu |
pueue.yml |
oxpsp |
| pueue | pua |
pueue_aliases.yml |
oxpsp |
| zellij | zj |
config.kdl |
oxptzj |
| zellij | zjl_ |
layouts |
oxptzj |
_denotes a folder, and you can check these abbreviations closely bybrf [Plugin Abbr.]oredf [Plugin Abbr.].
Oxidizer uses ouch to deal with compression and decompression, and provides with 3 shortcuts
zpf: compress fileuzpf: decompress filelzpf: list items in the compressed file
back_* and up_* work for brew, scoop, conda, vscode (only for windows), julia, tlmgr, npm. clean_* works for brew and conda.
back_*- file: export package/extension info into
$OX_BACKUPfolder
- file: export package/extension info into
up_*- file: install packages/extensions by predefined files in
$OX_BACKUP
- file: install packages/extensions by predefined files in
clean_*- file: clean package/extension info by predefined files in
$OX_BACKUPfolder
- file: clean package/extension info by predefined files in
Oxidizer aims to provide a unified interface for all package manager-related commands to reduce typing and memory burden of command-line users.
| Suffix | Action | brew b |
scoop s |
conda c |
npm n |
cargo cg |
rustup rs |
julia jl |
gem rb |
conan cn |
tlmgr tl |
|---|---|---|---|---|---|---|---|---|---|---|---|
*h |
help | ✅ | ✅ | ✅ | ✅ | ✅ | ✅ | ✅ | ✅ | ✅ | |
*cf |
config | ✅ | ✅ | ✅ | ✅ | ||||||
*is |
install | ✅ | ✅ | ✅ | ✅ | ✅ | ✅ | ✅ | ✅ | ✅ | ✅ |
*us |
uninstall | ✅ | ✅ | ✅ | ✅ | ✅ | ✅ | ✅ | ✅ | ✅ | ✅ |
*up |
update | ✅ | ✅ | ✅ | ✅ | ✅ | ✅ | ✅ | ✅ | ✅ | ✅ |
*ups |
update self | ✅ | ✅ | ✅ | |||||||
*ls |
list | ✅ | ✅ | ✅ | ✅ | ✅ | ✅ | ✅ | ✅ | ✅ | |
*lv |
leaves | ✅ | ✅ | ✅ | ✅ | ✅ | ✅ | ||||
*sc |
search | ✅ | ✅ | ✅ | ✅ | ✅ | ✅ | ✅ | |||
*cl |
clean | ✅ | ✅ | ✅ | ✅ | ✅ | ✅ | ✅ | |||
*if |
info | ✅ | ✅ | ✅ | ✅ | ✅ | ✅ | ✅ | |||
*st |
status | ✅ | ✅ | ✅ | ✅ | ||||||
*ck |
check | ✅ | ✅ | ✅ | ✅ | ✅ | ✅ | ✅ | ✅ | ||
*pn |
pin | ✅ | ✅ | ✅ | |||||||
*upn |
unpin | ✅ | ✅ | ✅ | |||||||
*dp |
depends | ✅ | ✅ | ✅ | ✅ | ✅ | ✅ | ✅ | |||
*rdp |
needs | ✅ | ✅ | ||||||||
*xa |
add repo | ✅ | ✅ | ✅ | ✅ | ||||||
*xrm |
remove repo | ✅ | ✅ | ✅ | ✅ | ||||||
*xls |
list repo | ✅ | ✅ |
Particularly, Oxidizer provides with two groups of experimental functions with suffix p for installing and downloading packages in parallel
- brew:
bisp,biscp,bupp - scoop:
sisp,supp
For example, when you have more than 1 packages to install, instead of using bis [pkg1] [pkg2] , you can use bisp [pkg1] [pkg2] then the packages will be downloaded and installed in parallel.
Similarly, biscp, bupp, are the parallel version of bisc, bup, respectively.
Before using parallel functions, pueue service need to be enabled by
# All OS
pueued -d
# or macOS / Linux
bss pu
Some package managers also have functionality of project management
| Suffix | Action | brew b |
scoop s |
conda c |
npm n |
cargo cg |
rustup rs |
julia jl |
gem rb |
conan cn |
|---|---|---|---|---|---|---|---|---|---|---|
*ii |
init/create | ✅ | ✅ | ✅ | ✅ | ✅ | ✅ | |||
*b |
build | ✅ | ✅ | ✅ | ✅ | |||||
*r |
run | ✅ | ✅ | ✅ | ✅ | ✅ | ||||
*ed |
edit | ✅ | ||||||||
*ct |
cat | ✅ | ✅ | ✅ | ||||||
*ln |
link | ✅ | ||||||||
*ts |
test | ✅ | ✅ | ✅ | ✅ | ✅ | ||||
*au |
audit | ✅ | ✅ | |||||||
*fx |
fix | ✅ | ✅ | ✅ | ||||||
*pb |
publish | ✅ | ✅ |
Some of the package managers shortcuts are included in corresponding system plugins.
ox-macos: autoloaded, contains alias and functions formasox-debians: autoloaded, contains alias and functions foraptox-windows: autoloaded, contains alias and functions forwingetandwsl
| Suffix | Action | mas m |
apt a |
winget w |
wsl wl |
|---|---|---|---|---|---|
*h |
help | ✅ | ✅ | ✅ | ✅ |
*is |
install | ✅ | ✅ | ✅ | ✅ |
*us |
uninstall | ✅ | ✅ | ✅ | ✅ |
*up |
update | ✅ | ✅ | ✅ | ✅ |
*ups |
update self | ✅ | ✅ | ✅ | |
*ls |
list | ✅ | ✅ | ✅ | |
*lv |
leaves | ||||
*sc |
search | ✅ | ✅ | ||
*cl |
clean | ✅ | ✅ | ||
*if |
info | ✅ | ✅ | ✅ | |
*st |
status | ✅ | |||
*ck |
check | ✅ | |||
*dp |
depends | ✅ | |||
*xa |
add repo | ✅ | ✅ | ||
*xrm |
remove repo | ✅ | ✅ | ||
*xls |
list repo | ✅ | ✅ |
bis: brew installbris: brew reinstall
suffix c is a flag to specify brew commands only work on casks
-
bisc: brew install --cask -
brisc: brew reinstall --cask -
bupc: brew upgrade --cask -
bupg: brew upgrade --greedy -
brp: replace brew cache file by pre-downloaded file -
bmr: using brew mirror -
bmrq: reset brew git source to official repositories,qis for quit.
Note that some shortcuts of the ox-conda plugin is based on the package conda-tree that you need to install
conda install -c conda-forge conda-treeBesides the shortcuts mentioned above in Package Management, the conda plugin also provides with Conda environment management shortcuts which start with ce
ceat: activate environment$1length = 0: activatebaseenv$1length = 1 or 2: activate predefined envOX_CONDA_ENV$1length > 2: activate new env
OX_CONDA_ENV can be personalized in custom.sh
For example, assume your environment's name is hello, you can set
# macOS / Linux
OX_CONDA_ENV[h]="hello"
# Windows
$Global:OX_CONDA_ENV.h = "hello"
then, you will be able to manipulate the environment by
# create environment
cecr h
# remove environment
cerm h
# update all packages in the specific environment
cup h
# list all packages in the specific environment
cls hcerat: reactivate environment, works liveceatceq: quit environment (qis forkill/quit)cecr: createcerm: remove environment, works liveceatbut won't removebaseenvcels: environment listcedf: compare packages between conda environmentscern: renames an existing environmentcesd: change environment'sconda-forge subdiri: forosx-64orlinux-64orwin-64a: forosx-arm64orlinux-aarch64orwin-arm64p: forppc64les: forlinux-s390x
ceep: export environment
-
gclhs: delete commit history
for aliases, check .gitconfig in defaults folder by edf oxg
This work is released under the GPL-v3 license.