
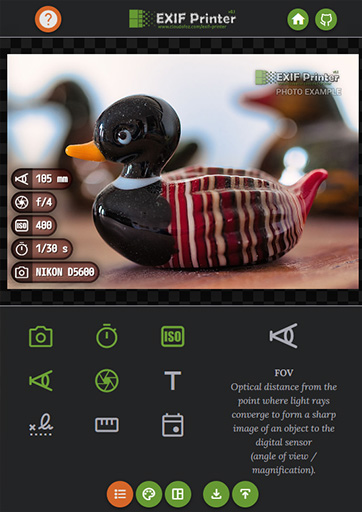
A small web tool to automatically read and draw on photos their technical information (EXIF data), such as the camera model or focal length used. It is aimed at amateur and enthusiast photographers who want to share this data alongside their images.
For the online version: click here
- Responsive web design (desktop and mobile)
- Full resolution-indipendent vector graphics
- Theme editor for changing colors, styles (with color pickers and sliders) and metrics (line-spacing, icons and text size)
- Easily extendable (EXIF/IPTC tags are managed through a JSON)
- Tag Icons: Support for any Google Material Symbol
- Tag Icons: Basic support for custom SVG icons (with a parser to convert from SVG to a Path2D compatible with the renderer)
- Support for custom tags
- 100% front-end: data is never uploaded to the server
Instructions on how to use it are provided automatically when you open the page.
Adding a new tag is very simple. In this example I'll show you how to enable the display of the photo copyright tag.
Simply add this entry to ep_tags_data.json:
"copyright": {
    "iconID": "copyright",
    "iconType": "material_symbol",
    "name": "Copyright",
    "desc": "Who owns the copyright of this image.",
    "tagID": "Copyright",
    "tagType": "exif"
}
iconID: It can be the code of a Google Material Symbol, like in this case, or a path to a SVG.iconType: It can bematerial_symbolificonIDis the code of a Material Symbol orlocal_svgificonIDis the path of an SVG. An SVG icon has to be centered in a box of(0, 0, 24, 24)pixels and can have only a combination of two styles namedfillStyleandstrokeStyle. EXIF Printer will fill any path calledfillStyleand draw the outline of any path calledstrokeStyle. Real colouring and styling are completely managed by EXIF Printer.name: It's the name displayed when you click on the icondesc: It'a brief description of the tag, it will displayed alongsiename.tagID: It's the key used byexif-jsto store the EXIF/IPTC tag. It can be a custom unique id for custom tags.tagType: It can beexififtagIDis an EXIF tag id. Other possible values are:iptcorcustom. Custom tags have to be manually implemented inside the code.
Python can be used to start a server in the project path:
- Navigate to the EXIF Printer directory.
- Execute the command to start the server:
Python 2 — python -m SimpleHTTPServer 8000
Python 3 — python -m http.server 8000
- Open a web browser at
http://localhost:8000/.
- Materialize CSS
- exif-js - A library for reading EXIF meta data from image files.
- tinycolor - A small, fast library for color manipulation and conversion.
- pickr - Flat, Simple, Hackable Color-Picker.