If you are suffering from writting just a simple for loop in Robot Framework, or if you are suffering from figuring out how fixture be called in PyTest, you come to the right place.
PySimpleTest use native python grammar and logic and make test very easy. It has following advantages:
- Use native python interpreter (not like pytest or robot framework).
- Only provide functions. No class, fixture, decorator or other weird things.
- Provide "super-realism" assertion system such as
should_become_true,should_keep_true. - Provide article liked log system. You can use
section,subsection, ... to organize your test report. - Provide many test assistant functions like
waitwith GUI progress bar,sayto speake string out. - Provide manual operation request functions like
pleaseandplease_check - Colored cmd output to indicate Fail, Pass, Error, etc.
- Log file with link information. If you use editor like Sublime, can realize double-click test report line to jump to corresponding code.
So for writting small test, PySimpleTest is a good choice. In addition, you can find PyPI index at: https://pypi.org/project/PySimpleTest/
Write a file main.py:
import PySimpleTest as pst

a = 2
pst.should_be_equal(a, 2)
pst.should_be_less(a, 1)
Then run it. You can get following cmd output:
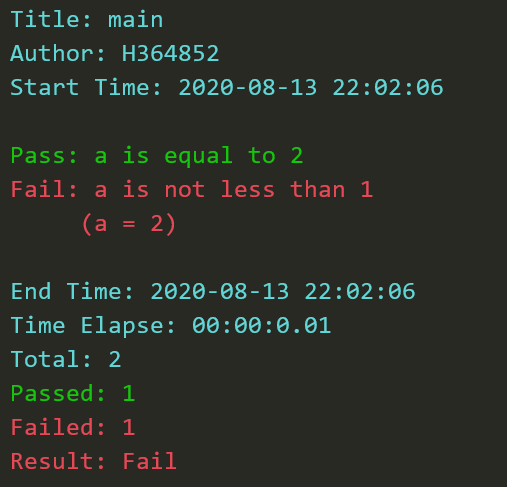
And you can see 3 output file: main.log, main.info and main.linfo:
main.infohas the same content as console output.main.linfohas the same content asmain.infobut with<file>:<line-number>link information. It's for double-click jump purpose. See details in section External Configurationmain.log:infofunction will not save into.logfile. See details in info function description
So what functions can I use just like should_be_equal and should_be_less? See in section Function List
This section will introduce all functions provided by PySimpleTest
For all assertion functions, will return True when Pass, return False when Fail. These function are listed below:
should_be_true(expression):
Ifexpressionis True, it will print "Pass: (<expression>) is True" and log in three output files. Else "Fail: (<expression>) is False" will be printed and logged.should_be_false(expression): Pass whenexpressionis False.should_be_equal(value1, value2): Pass whenvalue1 == value2.should_not_be_equal(value1, value2): Pass whenvalue1 != value2.should_be_less(value1, value2): Pass whenvalue1 < value2.should_not_be_less(value1, value2): Pass whenvalue1 >= value2.should_be_greater(value1, value2): Pass whenvalue1 > value2.should_not_be_greater(value1, value2): Pass whenvalue1 <= value2.should_be_approx(value1, value2, tolerance = 5, func = abs): Pass whenfunc(value1-value2) <= tolerance.should_not_be_approx(value1, value2, tolerance = 5, func = abs): Pass whenfunc(value1-value2) > tolerance.should_keep_true(expression, duration): Pass whenexpressionkeeps True fordurationseconds. Try following example:
import PySimpleTest as pst
import time

start_time = time.time()
pst.should_keep_true(time.time()-start_time < 3, 2)

start_time = time.time()
pst.should_keep_true(time.time()-start_time < 3, 5)
should_keep_false(expression, duration): Pass whenexpressionkeeps False fordurationseconds.should_become_true(expression, timeout): Pass whenexpressionbecomes True intimeoutseconds.should_become_false(expression, timeout): Pass whenexpressionbecomes False intimeoutseconds.should_raise(expression, exception=None): Pass whenexpressionraise a exception.- If parameter
exceptionisNone, all exceptions raised will be passed; - If parameter
exceptionis an exception type such asZeroDivisionError, all exceptions that are the instance of such type raised will be passed; - If parameter
exceptionis an exception instance such asBaseException(), only exception that just the same with such exception instance raised will be passed; Try following example:
- If parameter
import PySimpleTest as pst

pst.should_raise(lambda:1/0)
pst.should_raise(lambda:1/0, ZeroDivisionError)
pst.should_raise(lambda:1/0, NameError)
pst.should_raise(lambda:1/0, ZeroDivisionError("division by zero"))should_not_raise(expression): Pass whenexpressiondosen't raise any exception;should_keep_raising(expression, duration, interval=0.1, exception=None): Pass whenexpressionkeeps raisingexception;should_keep_not_raising(expression, duration, interval=0.1): Pass whenexpressionkeeps raise nothing;should_become_raising(expression, timeout=480, interval=0.1, exception=None): Pass whenexpressionraiseexceptionintimeoutseconds;should_become_not_raising(expression, timeout=480, interval=0.1): Pass whenexpressionbecome not raising anything intimeoutseconds;
In above function list, all parameter named with
expressioncan be a normal expression or a lambda expression. But you can only use lambda expression in Python console mode.
Every function start with
should_has it's blocked version start withmust_. For example,must_be_true(expression).must_*functions do the same thing asshould_*functions only except when assertion is failed,must_*function will raise anAssertionErrorwith fail message.
log(*args, **kwargs):
Uselogjust likeprint. It will print in console as well as write into log file. For example:
a = {"key": 5}
log("a =", a)
Default log file has the same base name with your python script but with expand name ".log" lays in the same folder with your python script. If you want to change path, use --logfile argument. See details in Terminal Arguments.
In addition to print, log support color print, you can use color and style argument to control the print format. For example:
log("I am here!", color = "red", style = "highlight")
color can choose in list: ["black", "red", "green", "yellow", "blue", "purple", "cyan", "white"]
style can choose in list: ["default", "highlight", "underline", "shining", "anti"]
-
info(*args, **kwargs):
Useinfojust likelog.infowill not write into.logfile but into.infofile. In fact,logwill also write into.infofile. Providinginfofunction is aim to keep.logfile clean. You can useinfoto print and note some assistant information. It will not disturb main test log file. -
section(name, level = 1):
To make following log with one level indent. For example:
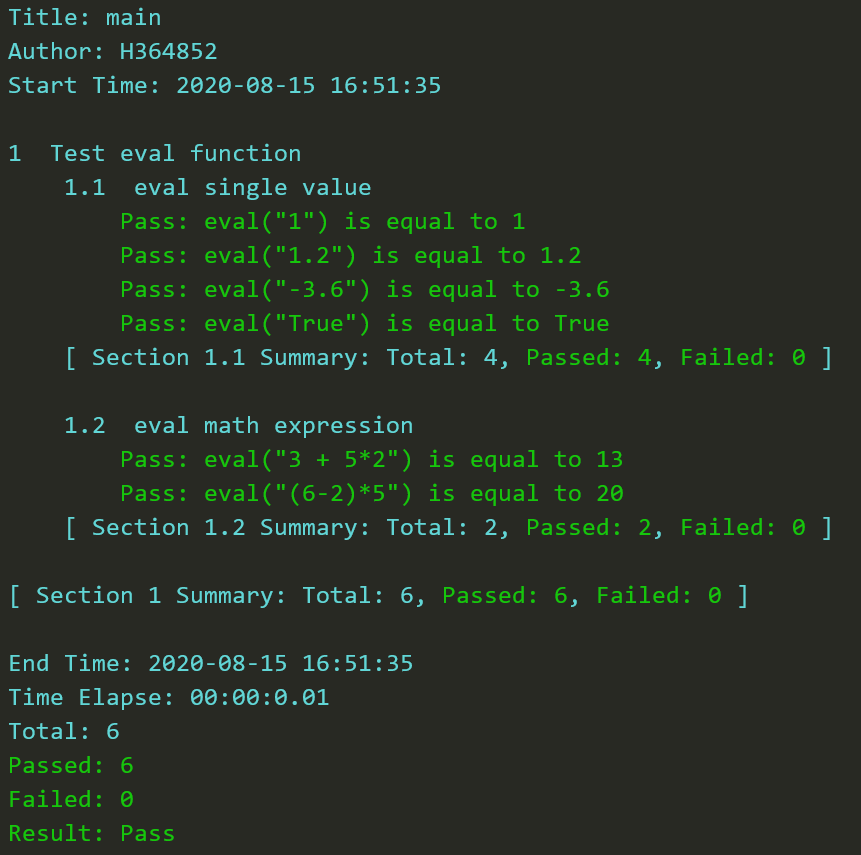
section("Test eval function")

section("eval single value", level = 2)
should_be_equal(eval("1"), 1)
should_be_equal(eval("1.2"), 1.2)
should_be_equal(eval("-3.6"), -3.6)
should_be_equal(eval("True"), True)

section("eval math expression", level = 2)
should_be_equal(eval("3 + 5*2"), 13)
should_be_equal(eval("(6-2)*5"), 20)
Above code will have following output:
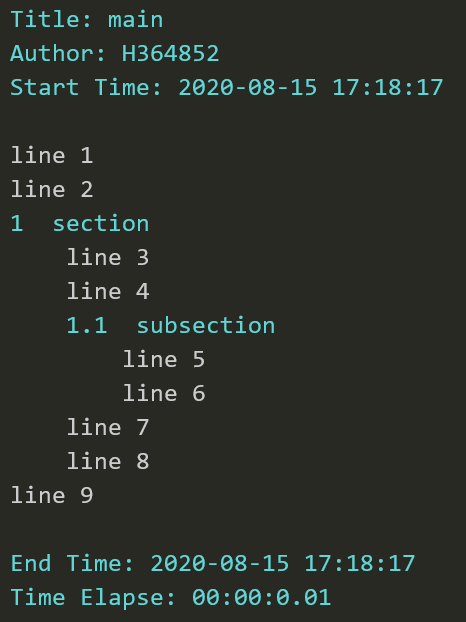
subsection(name): Same assection(name, level = 2)subsubsection(name): Same assection(name, level = 3)subsubsubsection(name): Same assection(name, level = 4)subsubsubsubsection(name): Same assection(name, level = 5)end_section(): Will go back one level indent for following log. For example:
log("line 1")
log("line 2")

section("section")
log("line 3")
log("line 4")
subsection("subsection")
log("line 5")
log("line 6")
end_section()
log("line 7")
log("line 8")
end_section()
log("line 9")
Above code will have following output. You can see that after end_section(), line 7 and following log go back one level's indent, line 9 and following log also go back one level's indent.
Also, you can use leveled section using class Section. For above example, you can rewrite in this way:
log("line 1")
log("line 2")

with Section("section"):
    log("line 3")
    log("line 4")
    with Section("subsection")
        log("line 5")
        log("line 6")
    log("line 7")
    log("line 8")
log("line 9")
It can also generate the same result as above figure. This is the recommanded way to use leveled section. Because result out log will have the same indent layout with the source code.
In a test report, following figure shows the header and tailer information position:
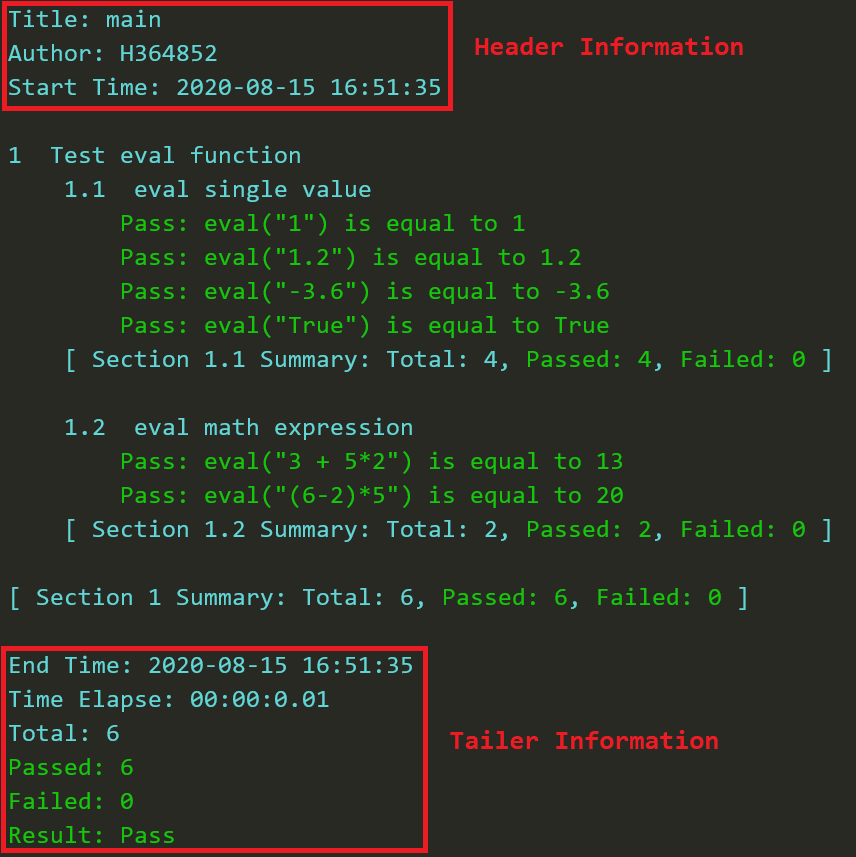
You can use following functions to control the output of Header/Tailer information:
title(name): to specify title in header information. If it is not used, title message in header information will use script base name.author(name): to specify test author in header information. If it is not used, author will use your system user name.version(name): Specify production version in header information.url(link): Specify url in header information.header_info[key] = value: You can log more other "<key>: <value>" liked items in header information. For example:
header_info["Reviewer"] = "Eason"
tailer_info[key] = value: In the same way, you can usetailer_infoto log more "<key>: <value>" liked tailer information.
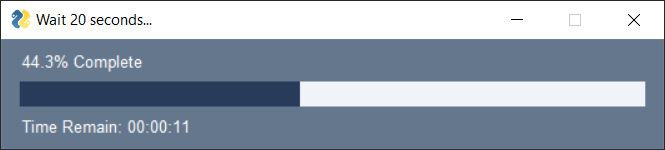
Pass(message): Same aslog("Pass:", message, color="green", style="highlight")Fail(message): Same aslog("Fail:", message, color="red", style="highlight")Skip(message): Same aslog("Skip:", message, color="green", style="highlight")wait(duration): Waitdurationseconds. Ifgui_on()is called before anddurationis greater than 10, The progress bar will pop out to indicate progress and time remain. Just like following figure:
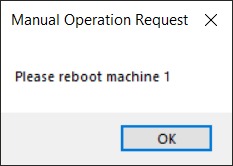
wait_until(expression, timeout=480, interval=0.1, must=False): Wait until<expression>becomes True. If time waited more thantimeout, it will stop waiting.intervalindicate the time interval between two timesevalof<expression>. Ifmustis True, it will raise anAssertionErrorwhen timeout is reached.wait_until_not(expression, timeout=480, interval=0.1, must=False): Similar withwait_until. Just to wait<expression>become False.wait_until_raise(expression, exception=None, timeout=480, interval=0.1, must=False): Wait until<expression>raiseexception.wait_until_not_raise(expression, timeout=480, interval=0.1, must=False): Wait until<expression>not raise any exceptions.please(do_something): Ifgui_on()is called before, it will pop up a message box to indicate you to do some manual operation. For example:
please("reboot machine 1")Then it will pop up following message box and wait you finish manual operation then click OK button.
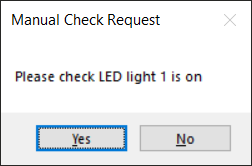
please_check(something): Ifgui_on()is called before, it will pop up a message box to indicate you to do some manual check. This window will have two buttons:YesandNo:- If you click
Yes, it will log "Pass: (<somthing>) is True". - If you click
No, it will log "Fail: (<something>) is False".
- If you click
say(message): Ifvoid_on()is called before, you can usesayto speak out message.
color_on(): To turn on coloring console output. If your console out is just like following figure:

that means your console not support ASCII escape characters. Please use color_off() to turn off color. The default coloring print status is enabled.
color_off(): To turn off coloring console output.voice_on(): To turn on voice. If voice is enable:- a voice will say "Fail" when assertion failed;
- a voice will say out Exception Type when an internal exception is raised;
- a voice will say "Please <do something>" when
pleaseis called; - a voice will say "Please check <something>" when
please_checkis called.
voice_off(): To turn off voice. If voice is disable, nothing will speak out only except you usesayfunction. The voice default status is disabled.gui_on(): To turn on gui. If gui is enable:- a message box will pop up when
pleaseorplease_checkis called; - a progressbar will pop up when
waitorshould/must_keep_true/falseis called;
- a message box will pop up when
If you import PySimpleTest, you can use some terminal arguments to configure some thing. The terminal arguments formats is as following:
$ python <script>.py [--logfile <path>] [--infofile <path>] [--linfofile <path>] [--color {on|off}] [--voice {on|off}] [--gui {on|off}] [--title <name>] [--author <name>] [--version <name>] [--url <link>]
For example, when execute your script, use following command to log author name in log file:
$ python <script>.py --author Bruce
All supported arguments description are list here:
--logfile <path>: to specify log file store path.--infofile <path>: to specify info file store path.--linfofile <path>: to specify linfo file store path.--color {(on)|off}: to decide console coloring output is on or off. Just like usecolor_on()orcolor_off()inside script. Default option is color on.--voice {on|(off)}: to decide voice enable or disable. Just like usevoice_on()orvoice_off()inside script. Default option is voice off.--gui {on|(off)}: to decide gui enable or disable. Just like usegui_on()orgui_off()inside script. Default option is gui off.--title <name>: to specify test title logged in log file. Just like usetitle(name)inside script.--author <name>: to specify author name logged in log file. Just like useauthor(name)inside script.--version <ver>: to specify product version logged in log file. Just like useversion(ver)inside script.--url <link>: to specify url link logged in log file. Just like useurl(link)inside script.
In your console, Python program with PySimpleTest module will exit with 5 kind of exit code:
- exit code
0: All assertions passed. - exit code
1: Some assertions failed. - exit code
2: User killed withCtrl + C. - exit code
3: Inner exception raised. - exit code
5: No assertion.
After running a test script,
- On Windows, you can use
echo %errorlevel%to check the exit code in command window; - On Linux, you can use
echo $?to check the exit code in terminal.
A file with .linfo expand name is also generated. This file is same as .info file but with additional link information. So linfo is the abbreviation of "link info". The link information is just like <file_name>:<line_number>. It's used for double click then jump to script calling place. But this need external editor's support. This section will introduce how to implement double click jump in editor Sublime Text.
- Firstly please install
Log Highlightplugin in Sublime Text - Click Preferences->Package Settings->Log Highlight->Settings. Just like following figure

- Copy following code in
Log Highlight.sublime-settings -- Userfile then save:
See Code
{
    "context_menu": true,
    "auto_highlight" : true,
    "auto_highlight_output_panel": ["exec"],

    "log_list" :
    {
        "PySimpleTest_log_info" :
        {
            "type"         : "compile",
            "extension"    : [ "*.log", "*.info" ],
            "output.panel" : [ "" ],
            "use_link"     : true,
            "search_base":
            {
                "enable"        : true,
                "ignore_dir"    : [""],
                "max_scan_path" : 1000,
            },
            "bookmark" :
            {
                "enable"     : true,
                "goto_error" : false,
            },
            "severity" :
            {
                "fail" :
                {
                    "enable"  : true,
                    "pattern" : [[ "^\\s*Fail: ", "[\\r\\n]" ]],
                    "color" : {"base"  : ["#F92672", ""]}
                },
                "failed" :
                {
                    "enable"  : true,
                    "pattern" : [[ "^Failed: [1-9]", "[\\r\\n]" ]],
                    "color" : {"base"  : ["#F92672", ""]}
                },
                "failed0" :
                {
                    "enable"  : true,
                    "pattern" : [[ "^Failed: 0", "[\\r\\n]" ]],
                    "color" : {"base"  : ["#A6E22C", ""]}
                },
                "pass" :
                {
                    "enable"  : true,
                    "pattern" :
                    [
                        [ "^\\s*Pass: ", "[\\r\\n]" ],
                        [ "^\\s*Skip: ", "[\\r\\n]" ]
                    ],
                    "color" : {"base"  : ["#A6E22C", ""]}
                },
                "passed" :
                {
                    "enable"  : true,
                    "pattern" :[[ "^Passed: [1-9]", "[\\r\\n]" ]],
                    "color" : {"base"  : ["#A6E22C", ""]}
                },
                "passed0" :
                {
                    "enable"  : true,
                    "pattern" :[[ "^Passed: 0", "[\\r\\n]" ]],
                    "color" : {"base"  : ["#F92672", ""]}
                },
                "info" :
                {
                    "enable"  : true,
                    "pattern" :
                    [
                        [ "^\\S.*(?<!Pass|Fail|Summary|Total|Passed|Failed|Result): \\S", "[\\r\\n]" ],
                        [ "^\\s*([0-9])+(.([0-9])+)*  \\S", "[\\r\\n]" ],
                        [ "^\\s*Section ([0-9])+(.([0-9])+)*", "[\\r\\n]" ],
                        [ "^\\s*\\[ ", " \\]" ],
                    ],
                    "color" : {"base"  : ["#67D8EF", ""]}
                },
                "sum" :
                {
                    "enable"  : true,
                    "pattern" :[[ "^Total: [0-9]?", "[\\r\\n]" ]],
                    "color" : {"base"  : ["#67D8EF", ""]}
                },
                "result_pass":
                {
                    "enable"  : true,
                    "pattern" :[[ "^Result: Pass", "[\\r\\n]" ]],
                    "color" : {"base"  : ["#A6E22C", ""]}
                },
                "result_fail":
                {
                    "enable"  : true,
                    "pattern" :[[ "^Result: (Fail|Error)", "[\\r\\n]" ]],
                    "color" : {"base"  : ["#F92672", ""]}
                }
            },
            "theme":
            {
                "foreground"      : "#F8F8F2",
                "background"      : "#282923",
                "caret"           : "#F8F8F2",
                "selection"       : "#48473D",
                "selectionBorder" : "#181E26",
                "lineHighlight"   : "#3A392F"
            }
        },

        "PySimpleTest_linfo" :
        {
            "type"         : "compile",
            "extension"    : [ "*.linfo" ],
            "output.panel" : [ "" ],
            "use_link"     : true,
            "search_base":
            {
                "enable"        : true,
                "ignore_dir"    : [""],
                "max_scan_path" : 1000,
            },
            "bookmark" :
            {
                "enable"     : true,
                "goto_error" : false,
            },
            "severity" :
            {
                "link":
                {
                    "enable"  : true,
                    "pattern" :[[ "^{{{LINK}}}", " " ]],
                    "color" : {"base"  : ["#AC80FF", ""]}
                },
                "fail" :
                {
                    "enable"  : true,
                    "pattern" :[[ "\\|   *Fail: ", "[\\r\\n]" ]],
                    "color" : {"base"  : ["#F92672", ""]}
                },
                "failed" :
                {
                    "enable"  : true,
                    "pattern" :[[ "\\|  Failed: [1-9]", "[\\r\\n]" ]],
                    "color" : {"base"  : ["#F92672", ""]}
                },
                "failed0" :
                {
                    "enable"  : true,
                    "pattern" :[[ "\\|  Failed: 0", "[\\r\\n]" ]],
                    "color" : {"base"  : ["#A6E22C", ""]}
                },
                "pass" :
                {
                    "enable"  : true,
                    "pattern" :
                    [
                        [ "\\|   *Pass: ", "[\\r\\n]" ],
                        [ "\\|   *Skip: ", "[\\r\\n]" ]
                    ],
                    "color" : {"base"  : ["#A6E22C", ""]}
                },
                "passed" :
                {
                    "enable"  : true,
                    "pattern" :[[ "\\|  Passed: [1-9]", "[\\r\\n]" ]],
                    "color" : {"base"  : ["#A6E22C", ""]}
                },
                "passed0" :
                {
                    "enable"  : true,
                    "pattern" :[[ "\\|  Passed: 0", "[\\r\\n]" ]],
                    "color" : {"base"  : ["#F92672", ""]}
                },
                "info" :
                {
                    "enable"  : true,
                    "pattern" :
                    [
                        [ "\\|  \\S.*(?<!Pass|Fail|Summary|Total|Passed|Failed|Result): \\S", "[\\r\\n]" ],
                        [ "\\|   *Section ([0-9])+(.([0-9])+)*", "[\\r\\n]" ],
                        [ "\\|   *([0-9])+(.([0-9])+)*  \\S", "[\\r\\n]" ],
                        [ "\\|   *\\[ ", " \\]" ],
                    ],
                    "color" : {"base"  : ["#67D8EF", ""]}
                },
                "sum" :
                {
                    "enable"  : true,
                    "pattern" : [[ "\\|  Total: [0-9]?", "[\\r\\n]" ]],
                    "color" : {"base"  : ["#67D8EF", ""]}
                },
                "result_pass":
                {
                    "enable"  : true,
                    "pattern" : [[ "\\|  Result: Pass$", "[\\r\\n]" ]],
                    "color" : {"base"  : ["#A6E22C", ""]}
                },
                "result_fail":
                {
                    "enable"  : true,
                    "pattern" : [[ "\\|  Result: (Fail|Error)$", "[\\r\\n]" ]],
                    "color" : {"base"  : ["#F92672", ""]}
                }
            },
            "theme":
            {
                "foreground"      : "#F8F8F2",
                "background"      : "#282923",
                "caret"           : "#F8F8F2",
                "selection"       : "#48473D",
                "selectionBorder" : "#181E26",
                "lineHighlight"   : "#3A392F"
            }
        }
    }
}Ctrl+Shift+Pin Sublime, inputLog Highlightin panel.- Click
Log Highlight: Generate Syntax & Theme - Restart Sublime Text.
- Open a
*.linfofile with Sublime Text. - Double click a line, then it will jump to calling place. Just like following gif:
