


My name is Maxime Coutté. I’m 16 years old and I live in a small village in France where I’m the only teenager. With my best friends, Jonas Ceccon and Gabriel Combe, and my math teacher Jerome Dieudonne (we call him Sensei) we built our own VR headset for $100.
I started programming when I was 13, thanks to Sensei when he created a robotics club. On the first day we were 12 students, the next week we were 3 - yep, you guessed it, the other two were Gabriel and Jonas. I fell in love with VR because of an anime called SAO, but the problem was that the Oculus Rift was way too expensive for me. I talked about this with Gabriel and we both agreed that we should build our own VR headset. That got us into the math and physics behind VR (quaternions, proper acceleration, antiderivatives…). Then we bought the cheapest components we could and we reinvented VR. Now using FastVR and Relativ you can build your VR headset too.
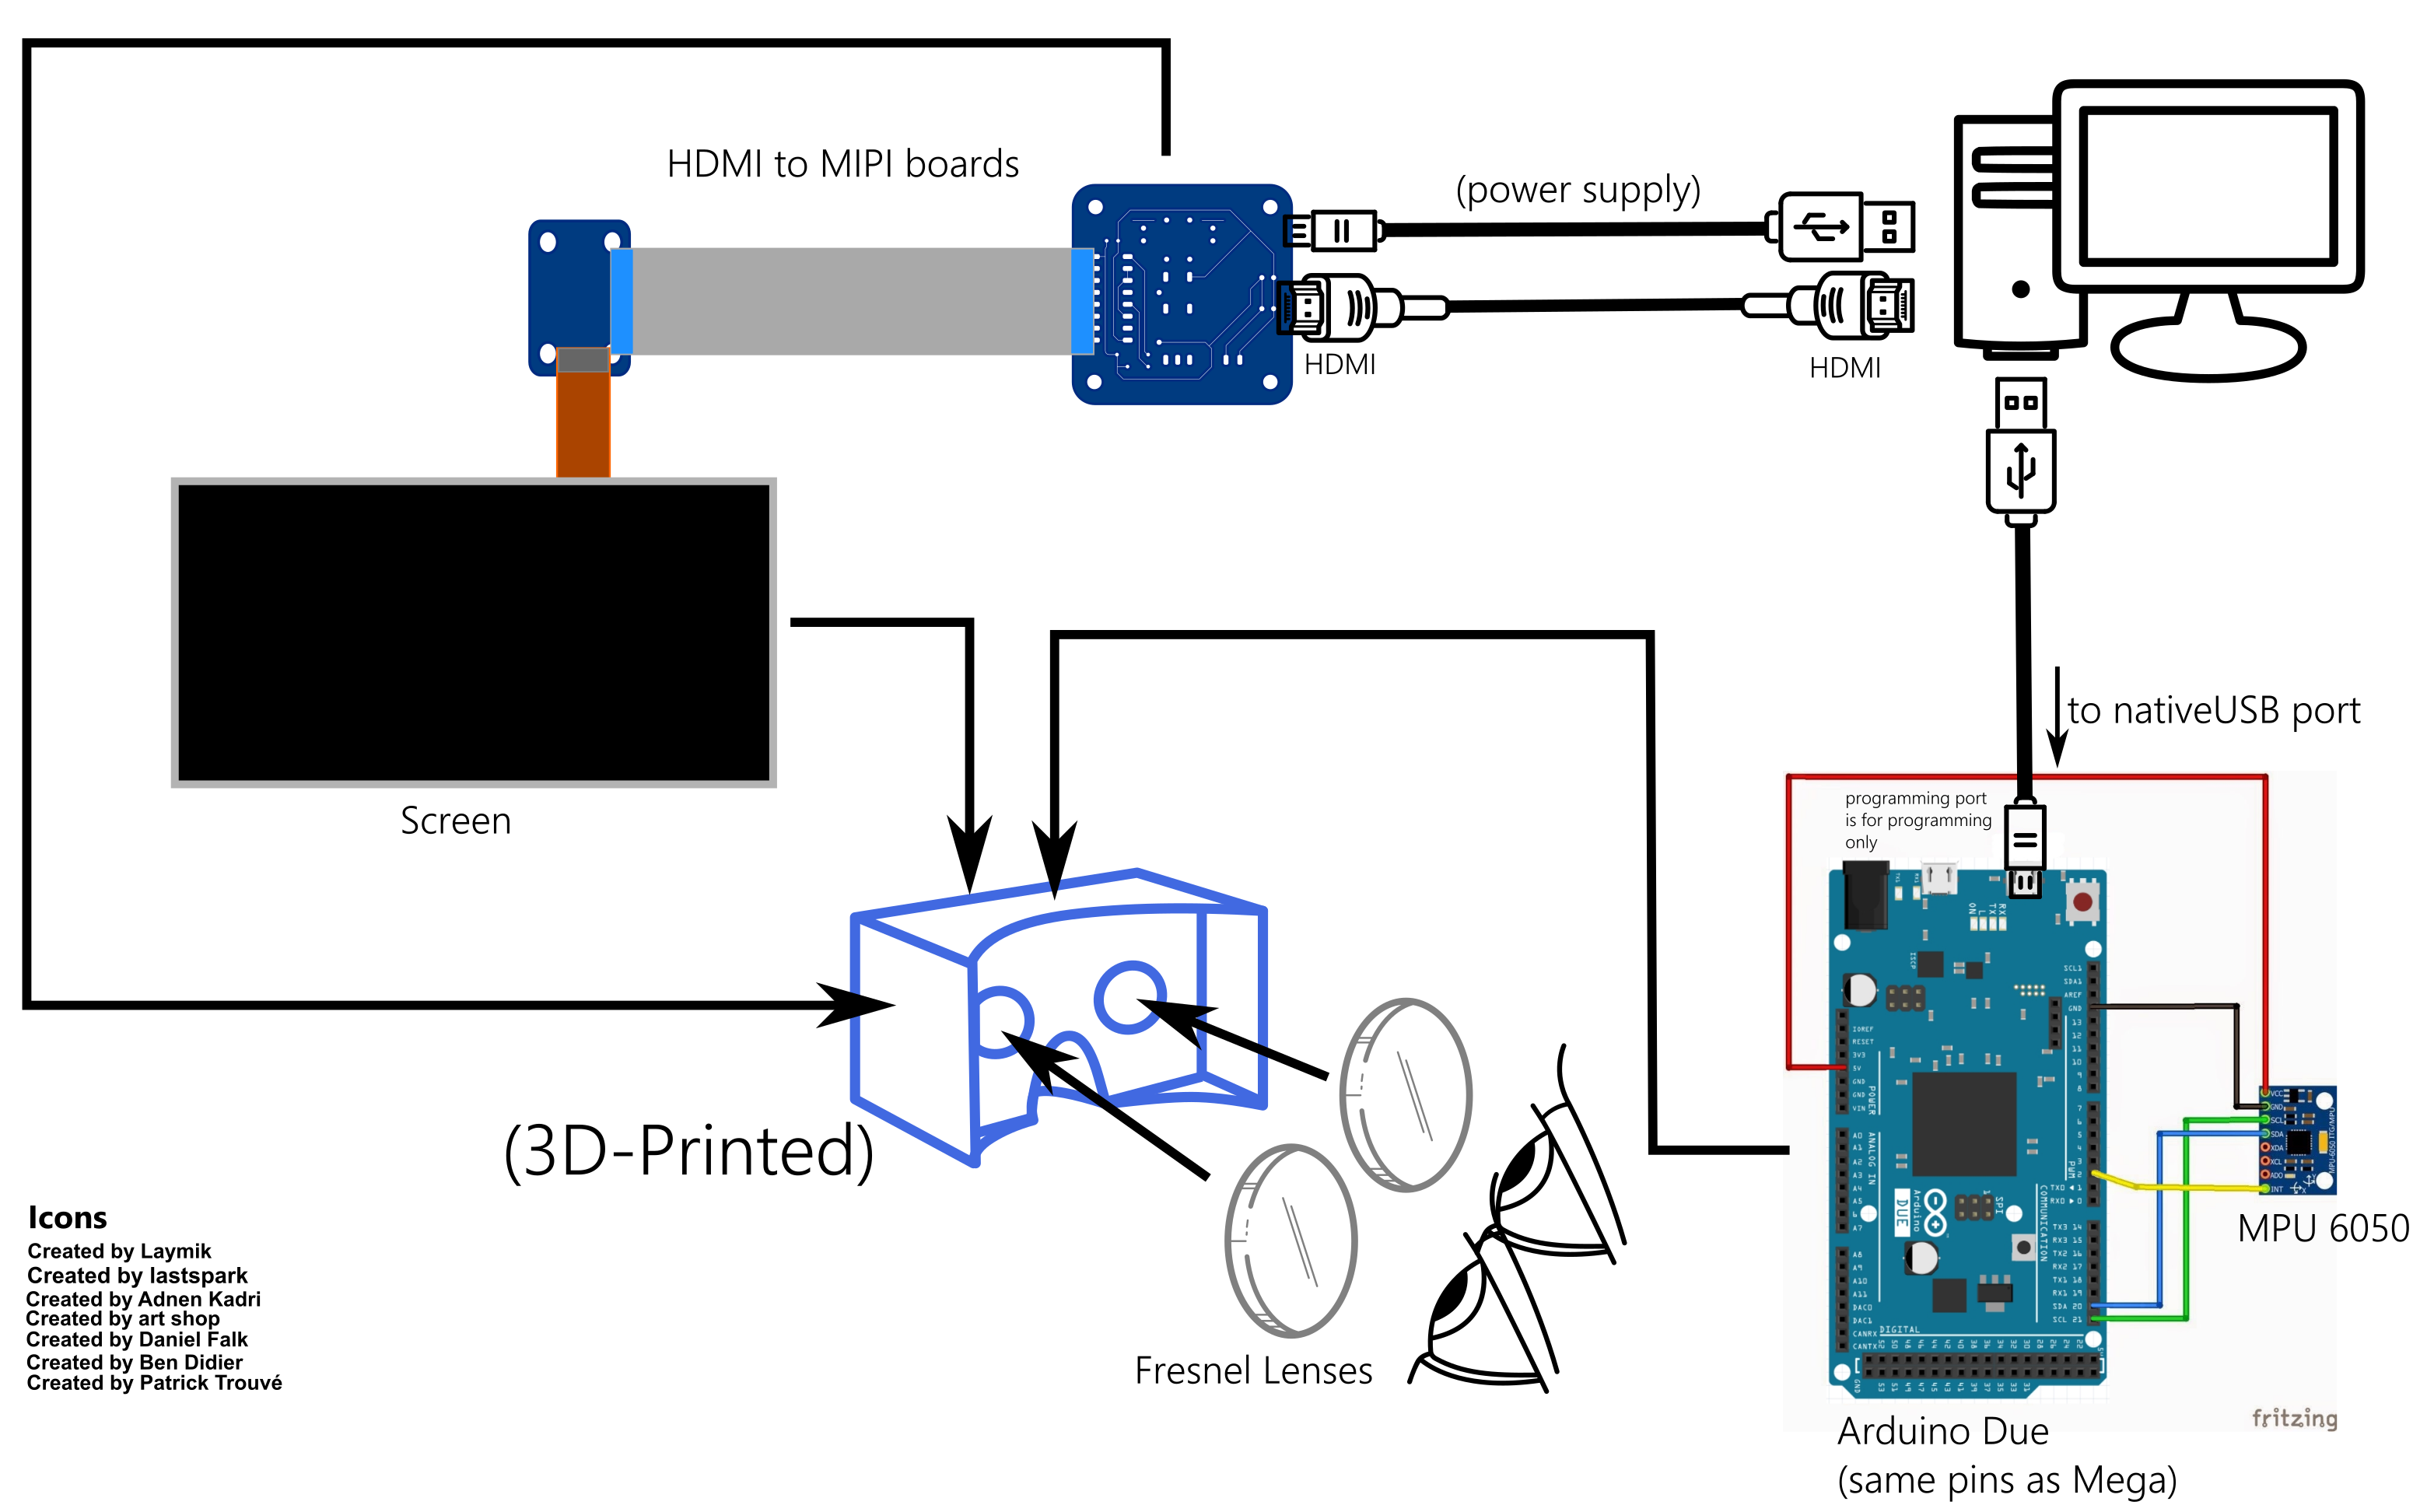
Here's a schematic by TheYxxy to give you an overview of the project:

Gabriel: I work on optics for FastVR, 3D conception with Maxime and cheap tracking for the next big update.

Maxime: I created WRMHL and with Gabriel we created FastVR. I'm also behind the code for the hardware.

Jonas: I convinced a Chinese factory to sell us premium components at low prices and I'm working on a Master Guide for Relativ.

Sensei: I'm the theoretician of the team. I teach them math and I help them to solve algorithm issues.
Thanks to this project I’ve had the incredible fortune to meet amazing people, including the chief architect at Oculus, Atman Binstock. He gave me a precious piece of advice: "open source it". I deleted all the code I had, and started rewriting it all from scratch, better. And I convinced my two friends and our math teacher to open source the project

Relativ is based on WRMHL and FastVR.
There are now two variants of Relativ. The original design by the founders and new version by TheYxxy based on a on a model from Horizon Lab. Shoutout to them for making this possible and allowing their design to be modified!
- Arduino Due, $34 for the official one or $10 for a Chinese clone
- GY-521 MPU-6050, $1
- 5.5 inch 2560*1440 2K LCD Screen HDMI to MIPI, up to 100€ on AliExpress (recommended)
⚠️ Price may vary a lot - Face foam, about $4, see here
- Fresnel lens Focal Length 80mm, $3 (recommended)
- Biconvex lens, Focal length 37mm, 45mm diameter recommended
- 4 M3 Screws and 2 M2 screws, both with nuts, $3 - alternatively you can use hot glue if M2 screws are not available
- TPU 95 filament is recommended in addition to the normal PLA, and a printer which supports printing it
- A screen which has a cable with a 90 degree bend just like the recommended one. For the direction: it should go up behind the screen when the small non-screen part is on the right while looking at the screen.

You can either install it using Git or direct Download. Or from the command line:
# Clone this repository
$ git clone https://github.com/relativty/Relativ
Copy all folders in Relativ/src/libraries and past them in your Arduino Libraries folder: Documents\Arduino\libraries. You're now ready to build the headset!
Now what you need to do is 3D-print the hardware; if needed you can change any models with provided Source Files. You will need to print the following for the original design:
- Relativ_headset_structure.STL x1
- box_Arduino_DUE.stl x1
- box_lens_1.STL x2
⚠️ - box_lens_2.STL x2
⚠️ - box_mpu6050.STL x1
- box_screen_adaptor.STL x1
- box_screen_controller.STL x1
- box_screen_spherical.STL x1 OR box_screen.STL x1
⚠️ - support_lens.STL x1
And the following for the new design:
- (1x): Part 1, Part 2a, Part 2b, Part 3, Part 3a, Part 4, Part 5
- (2x): Part 2c, Part 2d, Part 3b
- (1x) Part 6: Use of Flexible filament with 10% to 50% infill density
- (3x) Part 7: Use of Flexible filament with 10% to 50% infill density
- (1x) Part 8: Use of Flexible filament with 5% infill density (it makes it like a sponge)
- If you uses the the short straps (190mm, because the large ones don't fit in your printer for example), there are extensions (part 9) that should be printed aswell (2x).
Additional build information can be found in the build manuals in the 3D-Models folders.
Make sure you have all the libraries needed installed and upload the following program to the Arduino:

You can now play with your headset by downloading some cool demos by clicking here. Or build your own game in a minute using the Relativty sdk, learn more by clicking here .
I would love to hear about what you’ve experienced building the headset or help if you have any questions. Ping me at [email protected] or @maximecoutte.
😍🤙 You can now chat with me and the Fellowship https://discord.gg/W9VKbjU
<> with ❤️, [email protected]