
👍GOOD TO KNOW:🤗
=> GIT is a free and open source distributed version control system (TOOL) designed to handle everything from small to very large projects.
=> Terminal is an electronic hardware device that can be used for entering data (transcribing data) from a computer or a computing system. It's an interface on our computer to type in text commands (command lines).
- In Visual Studio Code you can either click on "Terminal" > "New Terminal" (CTRL + SHIFT + ö) to OPEN A NEW TERMINAL OR...
- You can right-click on your explorer file and OPEN IN INTEGRATED TERMINAL (that means you open a terminal with the desired path)
=> CLI is known as Command Line Interface. Some programs require to interact with them via text commands (typing in some explicit text to run or make changes to the application).
=> GITHUB is a network-based version management service (WEBSITE TO HOST) for software development projects. It was named after the version management system Git.
=> VERSION CONTROL is basically what we do with GIT. We track our code changes as programmer and save an initial code in GIT until we update or undo some changes to it. After all we can control and see the whole history of changes.
=> .git stores all of the files that saves the history of your project from commit to commit. It's a hidden folder in your project folder.
=> .gitignore is a file that tells Git which files (or patterns) it should ignore. It's a hidden file in your project folder. With "$ ls -la" you can see all the hidden files and folders in your project folder. Create a new file called .gitignore and write in the files you want to ignore.
=> Q cleans the actual command of the terminal while CTRL + C stops the process and $ git clear clears the terminal from all the text.
=> TAB is your friend! If you type in a command and press TAB, it will autocomplete the command for you. If you press TAB twice, it will show you all the possible commands that start with the letters you typed in.
GIT BASH (for Windows) - INSTALLATION:
- (BASIC variant to pull, add, commit, push and merge code to your projects)
- https://gitforwindows.org/
GITHUB DESKTOP (for Windows) - INSTALLATION:
- (SIMPLIFIED variant to pull, add, commit, push and merge code to your projects)
- Explenations futher down below!
- https://desktop.github.com/
GITHUB COPILOT (for Windows) - INSTALLATION:
- (AI pair programmer which uses OpenAI Codex to suggest code and entire functions)
- You can use natural language (either write it directly or describe it as a comment) to compile it
- https://github.com/features/copilot (download)
- https://docs.github.com/en/copilot (documentations)

| STEP | COMMAND | EFFECT |
|---|---|---|
| 1 | https://github.com/ | Create repository > Add description and tags > Copy HTTPS of your repo (#) |
| 2 | Create Folder | Open with VSC to start working > Open your Terminal by clicking "Terminal" > "New Terminal" (look that it says "BASH") |
| 2.1 | $ pwd | OPTIONAL: Shows you the path of your current folder |
| 2.2 | $ ls | OPTIONAL: Shows you all the files and folders in your current folder |
| 3 | $ git init | Initialize git in the terminal (click the arrow beside the + to see if "BASH" is default) |
| 4 | $ git config user.name "" | OPTIONAL: configurate the terminal with your name (useful if you work on different computers) |
| 5 | $ git config user.email "" | OPTIONAL: configurate the terminal with your email (useful if you work on different computers) |
| 6 | readme.md | Write a readme.md in your explorer of VSC as a first commit to make |
| 7 | $ git add readme.md | ADD your change to the git (ready to track in GIT) - Stages the changes to your index |
| 8 | $ git commit -m "first commit" | COMMIT your first change |
| 8.1 | $ git branch -m main | OPTIONAL: Change the branch name from master to main |
| 9 | $ git remote add origin (#) | REMOTE them with the github HTTPS link |
| 10 | $ git push -u origin master | PUSH your changes - (If you did step 9, master would be main) -u means "set upstream" |
| 11 | $ git status | STATUS check to make sure everything went right (shows what was updated, deleted etc but havent been saved in a commit yet) |
| 12 | $ git log | LOG shows your structure (list of done commits) |
| 13 | Now its time to make some changes: | (...) |
| STEP | COMMAND | EFFECT |
|---|---|---|
| 1 | FOLDER CHECK | Check if you are in the right output folder where git has been initialized. If not, you can either click in VSC on "Terminal" > "New Terminal" or use the cd prompts |
| 2 | $ cd .. OR cd OR drag and drop | CHANGE Directory one step backwards (..) or forwards without the double points or DRAG AND DROP a folder from your explorer in your command line so it should automatically direct you to this folder |
| 3 | $ git pull | CHECK of undone changes (conflicts) and decide which change you want to make if necessary. A pull request will synchronise your remote data (code review before we merge changes in) |
| 4 | $ git add . | ADD what you changed (ready to track in GIT) The "." means "ADD ALL FILES", but you can also name an exact file from the explorer if you wish like "add index.html" |
| 5 | $ git commit -m "" | COMMIT a message to say what you changed (Write a desctiption between "", like what and why btw you can add a second one for the description) - It saves your files in GIT |
| 6 | $ git push -u origin master | PUSH your changes (means upload GIT commits to a remote repository like GITHUB) - (btw master if your branch is named "master", otherwhise say the right name) |
| 7 | $ git status | STATUS check to make sure everything went right |
| TERM | MEANING |
|---|---|
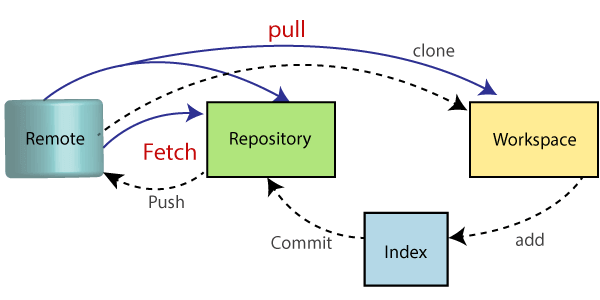
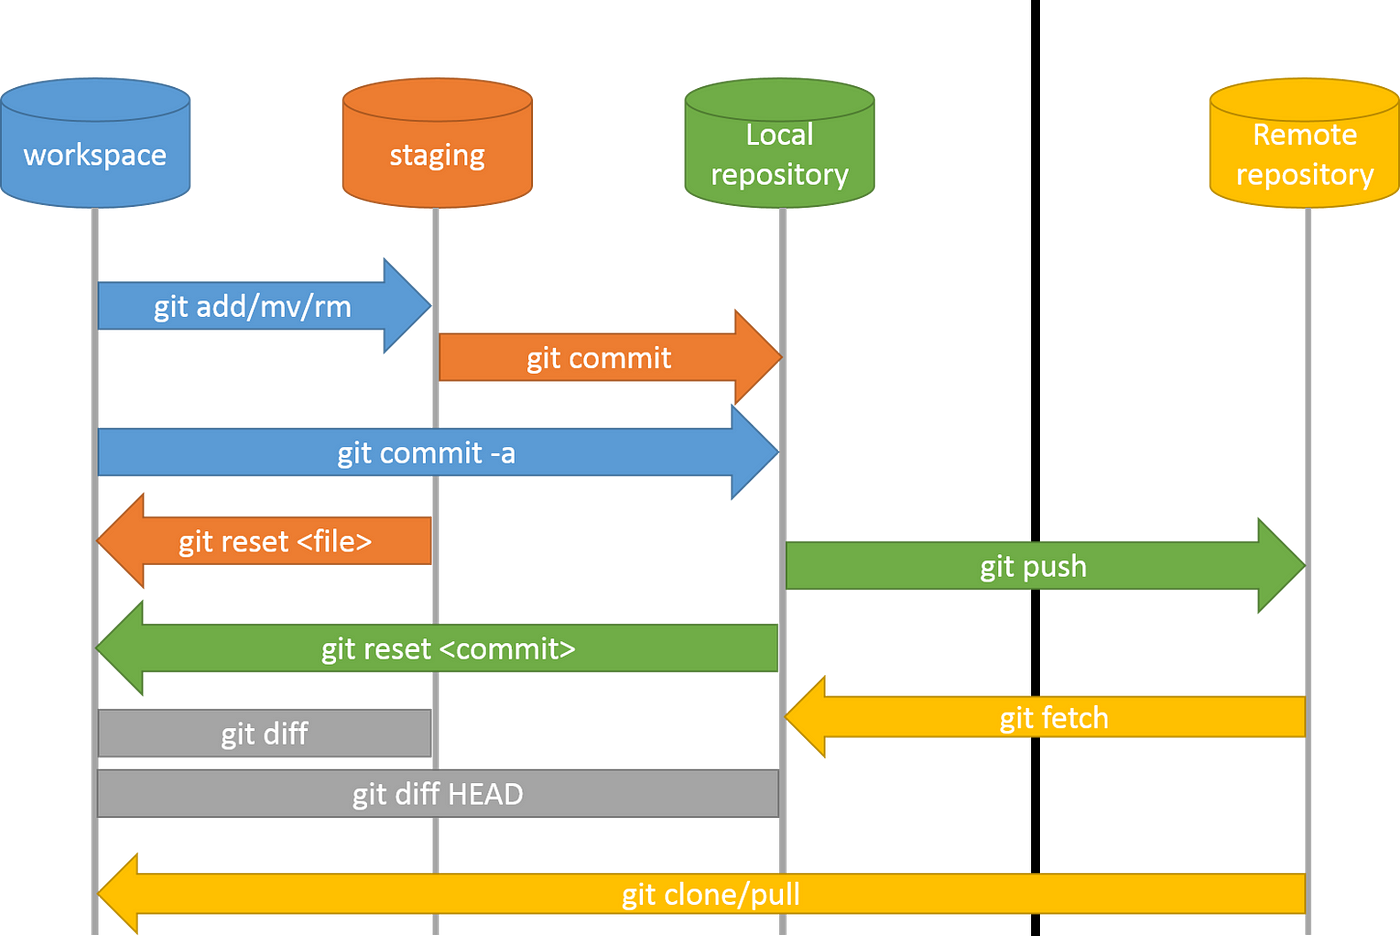
| Workspace | Your local computer |
| Index | Stages changes: The added changes will be stored in a personal index "lokaler Zwischenspeicher" to make it ready for tracking the changes to the Repo (your project). Each commit afterwards gets his own ID |
| Repository | Project Folder, place "Ablage bzw Schublade / Aufbewahrungsort" where your project is kept with lots of files |
| Remote | Remote Repository like GITHUB where your projects are hosted / placed on an external server (like Dropbox, but for Code) |
| - | -- |
| ADD | ADD a change to the index (stages changes) |
| PULL | "PULLING SOMETHING LIKE CHANGES IN FROM SOMEBODY or THE ACT OF RECEIVING SOMETHING FROM GITHUB", like: It COMPARES CHANGES: Download change from the REMOTE (Github) to your WORKSPACE (local machine) which is the opposite of push. A pull request will synchronise your remote data (code review before we merge changes in) |
| PUSH | "SENDING SOMETHING TO SOMEBODY or THE ACT OF SENDING SOMETHING TO GITHUB", like: Upload GIT commits from your REPOSITORY (Project) to a REMOTE (Github) which is the opposite of pull |
| CLONE | CLONE a repository (Project) from a REMOTE (hosted hub) to your WORKSPACE (local machine) |
| MERGE | JOINS ("zusammenführen") two or more development histories together. It is used by the git pull command to incorporate changes from a different repository and can be used by hand to resolve conflicts. |
| FORK | FORK a repository (Project) from a REMOTE (hosted hub from another guy) to your REMOTE (your hosted hub) |
💥 <1) Directly in the GITHUB Repository:
- No terminal needed
- IMPORTANT: To check if everything is working, you can click (in your repo) on the "Insights" tab and then on "Network" to see the branches and commits
| STEP | COMMAND | EFFECT |
|---|---|---|
| 1 | NEW branch | Click "<>Code" on your Repo > Click on the "master" button below > You see master branch or some more which have been created already > "View all branches" > "New branch" > Name it and hit "Create new branch" |
| 2 | SWITCH between Branches | Click on the left button next to the info of how many branches and tags you've ongoing > if its written "master", you are in the master branch, if there is another name you are obviously in a different branch |
| 3.1 | ADD a file | Click on "Add file" > "CREATE NEW FILE" > Name it and write some code > "Commit new file" OR click on "UPLOAD FILES" to add stuff to this branch |
| 3.2 | ADD changes | Click on a file in your repo > Do some changes > Click on the "Commit changes" button > Add some info in the "Commit Message"-input field > Commit directly into your actual branch or even create a new one for that |
| 4 | COMPARE branches | Click on the left button next to the info of how many branches and tags you've ongoing > Click on "Compare & pull request" |
| 4.1 | PULL REQUEST | (It takes some changes from a branch to another branch) - Take a look at the branches you want to compare (base: where the stuff is getting pulled from) and (compare: the branch of which we made the request to be able to merge) > Write something in the title > Hit the "CREATE PULL REQUEST"-button |
| 4.2 | REVIEW the opened PULL REQUEST | You can see the changes you made in the "FILES CHANGES"-tab OR on the other tabs the CHECKS (Security), an overview of the COMMITS as well as the conversation for the next step: |
| 4.3 | CONFLICTS check | It will be checked in the conversations tab, if there are any conflicts (like if you changed the same line of code in the same file) > If there are no conflicts, you can MERGE the changes into the master branch |
| 4.4 | (optional) RESOLVING conflicts | If there are conflicts, you can resolve them by clicking on the "Resolve conflicts"-button > You can see the changes you made in the "FILES CHANGES"-tab > You can choose which changes you want to keep by clicking on the "Accept both changes"-button > You can also edit the code directly in the WEB EDITOR or the COMMAND LINE > If you are done, click on the "Mark as resolved"-button |
| 5 | MERGE branch | Click on the "MERGE PULL REQUEST"-button > Confirm the merge by clicking on the "Confirm merge"-button |
| 6 | DELETE branch | Now it says "Merged" and you can safely delete this branch by clicking on the "Delete branch"-button |
💢 <2) Directly on your LOCAL WORKSPACE with COMMAND LINES in VSC TERMINAL:
- If you dont want to start from 0, clone a reposirotory from GITHUB to your local machine (workspace) with the command line: $ git clone and the # of the repository
| STEP | COMMAND | EFFECT |
|---|---|---|
| 1 | $ git branch | SHOWS how many branches are made in this project (green coloured branch name and *) |
| 2 | $ git pull (do that from your MASTER branch) | PULLS the changes from the remote (github) to your local machine (workspace) to make sure you pull all the possible changes towards your workspace to keep you up to date! |
| 2.1 | $ git status | SHOWS the status of your project (if there are any changes) |
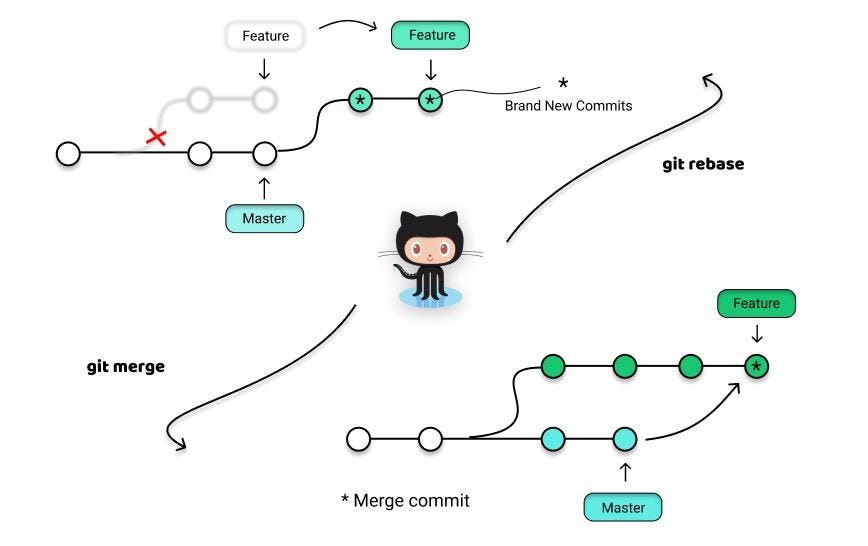
| 2.2 | $ git rebase (from your master branch) | OPT: REBASES your project (if there are any changes) * |
| 3 | $ git checkout -b feature | CREATES a new branch which is called "feature" and also CHECKOUTS to your new branch (you switch over from your master branch to your "feature" branch which is independant to your other branches) |
| 4 | $ git add . | ADD what you changed (. means ALL, but you can also name an exact file from the explorer) Note: your changes will be only added (and also SEEN) to your feature branch |
| 5 | $ git commit -m "" | COMMIT to say what you changed (Write a desctiption between "") Note: This will be ONLY commited and saved to your feature branch |
| 6 | $ git push -u origin feature OR "git push --set-upstream origin feature" | PUSH your desired changes from your repository to the remote (Github) / Thats actually the part where you synchronize everything together to be up todate on remote as well as on your workspace. The branch will now appear on your github repository |
| 6.1 | $ git diff master | SHOWS MASTER vs FEATURE changes: which files got a change, so basically what's new and what's old |
| - | -- | -- |
| - | -- | Now it's time to compare and merge your changes |
| - | -- | -- |
| 6 | $ git checkout master | Go back to your master branch. Now you'll stay there! |
| 7 | $ git merge feature | FAST FORWARD: JOIN the changes from the feature branch into master branch (merge = "zusammenführen: feature Inhalte in den Master") |
| 7.1 | Auto Merging Conflict Issue | If (only if) there are any conflicts (like if you changed the same line of code in the same file: VSC will ask you which line of code you rather want to keep > Adjust / delete the stuff manually and after the changes try to merge it again |
| 7.2 | $ git branch -d feature | OPTIONALLY: After a successful merge you can delete the feature branch if you wish / don't need anymore for further actions |
| 8 | $ git push origin :feature | OPTIONALLY but NEEDED if you also executed 7.1: Delete the feature branch on the remote (github) |
NOTE FOR "$ git REBASE":
Git Merge: Der Hauptunterschied zwischen git rebase und git merge besteht darin, dass git rebase einen neuen Satz von Commits erzeugt, die auf den Zielzweig angewendet werden, während git merge einen neuen Merge-Commit erzeugt, der die Änderungen aus beiden Zweigen kombiniert. Ermöglicht Benutzern das Zusammenführen von Zweigen in Git. Dies wird vom Master-Branch her getätigt.
NOTE FOR "STAGING":
If you have made changes to the same line of code in both the Feature Branch as well as the Master Branch, you can no longer switch from the Master Branch to the feauture branch! ADD and COMMIT on the master first > Checkout to your feature branch > check the changes with "git diff master" in feature branch and stay there > Keep your personal feature branch up to date by "$ git merge master" > Merge Conflict (current = changes from feature branch, the branch where you lastly checkouted btw VS Incoming changes from the master branch) > Then do add and commit again
-
MASTER BRANCH: Your main working tree. It's the default branch when you create a repository. You can think of it as the "production" branch. It's where you MERGE changes from other branches.
-
FEATURE BRANCH: A branch that you create to work on a new feature. It's where you ADD changes to your project. All changes are made, added, committed and pushed in a feature branch until you MERGE them into the master branch when they're ready.
-
MERGE: means to combine the changes from one branch into another branch. You can also think of it as a "release" branch. Usually you merge a feature branch (in this example its called "feature") into the master branch.
-
BUGFIX BRANCH: A branch that you create to fix a bug (like a hot fix) which is done seperately on its own branch. But GENERALLY this branch is not needed anymore and can be deleted.
SHOW COMMIT:
| STEP | COMMAND | EFFECT |
|---|---|---|
| 1 | $ git log | OVERVIEW of the commits which have been made in this branch |
| 2 | COPY the commit ID (First 7 letters) | commit 6ea139a009... = Each commit has its own ID (also shown in the GITHUB repo > commits) => Make a copy with ctrl + c of the first 7 letters |
| 3 | $ git show 6ea139a | SHOWS the changes which have been made in this commit |
FOLLOWING CASE:
- You have a repository on your local machine (workspace) BUT the branches are not up to date, for example the remote (Github) is far more ahead => So you have to fetch the branches from the remote (github) to your local machine (workspace) to make sure you have everything up to date!
| STEP | COMMAND | EFFECT |
|---|---|---|
| 0 | - | Start at your master branch in your local machine (workspace) |
| 1 | $ git branch | SHOWS to CHECK how many branches are made in this project (green coloured branch name and *) |
| 2 | $ git fetch origin | FETCHES the branches from the remote (github) to your local machine (workspace) to make sure you have everything up to date! |
| 3 | - | Now you can see that the remote branches are fetched to your local machine (workspace) and actually checkout to these branches |
- CHECK OUT the "commits" section in your github repo to get an overview of the amount of commits you've done in the chosen project. Each commit has its own ID-Number which is important for the upcomig process:
- 🔴-Lines show deleted content in this commit
- 🟢-Lines show added content in this commit
- ⚪-Lines show that these parts weren't changed through this commit
UNDO COMMIT:
| STEP | COMMAND | EFFECT |
|---|---|---|
| 0 | $ git revert HEAD~1 | UNDO this MERGE: Reverts to the last commit in your repository you've made (refers to the current state as it was right before) |
UNSTAGE TO A CERTAIN COMMIT STAGE BY USING HASHES:
| STEP | COMMAND | EFFECT |
|---|---|---|
| 0 | $ git log | LISTS all the recent commits whcih have been made so far |
| 1 | $ git revert a9fdeb5 | This command resets our repository TO THE STATE it was at in the a9fdeb5 commit on the master branch. NOTE: Use YOUR ID at step 2 |
| 2 | REPLACE a9fdeb5 with the ID | Github > Repository (of your project) > click "commits" > Copy the ID of the state you want > paste it at STEP 1 and hit ENTER - Now your repo is staged based on your selcted ID |
| 3 | Add > commit > push | Process as usual |
COMPLETELY REMOVE THE CHANGES TO A CERTAIN STATE BY USING A RESET:
| STEP | COMMAND | EFFECT |
|---|---|---|
| 0 | $ git log | LISTS all the recent commits whcih have been made so far |
| 1 | $ git reset a9fdeb5 | This command resets our repository TO THE STATE it was at in the a9fdeb5 commit on the master branch and DELETES EVERYTHING which happened until this commit. The staged commits before will remain as untouched |
| 2 | REPLACE a9fdeb5 with the ID | Github > Repository (of your project) > click "commits" > Copy the ID of the state you want > paste it at STEP 1 and hit ENTER - Now your repo is staged based on your selcted ID |
| 3 | Add > commit > push | Process as usual |
| STEP | COMMAND | EFFECT |
|---|---|---|
| 1 | $ git branch -d feature | CAREFUL: Deletes your "feature" branch |
-
If you want to get a copy of an existing Git repository — for example, a project you’d like to contribute to — the command you need is git clone.
-
Git receives a full copy of nearly all data that the server has. Every version of every file for the history of the project is pulled down by default when you run git clone.
-
In fact, if your server disk gets corrupted, you can often use nearly any of the clones on any client to set the server back to the state it was in when it was cloned
-
It is therefore not necessary to download the repository as a ZIP file, then unpack it and paste it into the code editor.
| STEP | COMMAND | EFFECT |
|---|---|---|
| 0 | First Step | Create a new folder > Open VSC > Open your Terminal |
| 1 | $ git clone (#) | (#) Copy the "https:Link" of the desired Repository when you click on the "code"-button (The third button beside "Go to file" and "Add file") and paste it behind the command. Dont put it into brackets (), just write it down right away |
What is that?
-
This is a file which is used to exclude certain files from being pushed to the repository. This is useful for example if you want to exclude the node_modules folder from being pushed to the repository because it is too big and not necessary for the project to work on another machine.
-
You have some images or passwords in your project which you don't want to be pushed to the repository? Then you can exclude them by using the .gitignore file.
| STEP | COMMAND | EFFECT |
|---|---|---|
| 0 | Write a file in VSC | Create a new file by naming it .gitignore |
| 1 | Comments | You can use comments by using the # symbol |
# ignores that specific file
filetoignore.html

# ignores the file in the specified folder of src
src/anotherfiletoignore.html

# ignores all files in this folder
images/*

# BUT it excludes a specific file in that folder, so this one wont be exluded
!images/keepme.jpg

# Ignores all files with the specified extension like .zip
*.zip
| STEP | COMMAND | EFFECT |
|---|---|---|
| 3 | add, commit, push | After the changes be sure to make the usual process of ADDING > COMITTING > PUSHING |
- Is the simplified version (desktop based as the name already reveals) of github beside the regular version on github.com
- Relies on simple click commands and drag and drop mechanisms instead of the usual commands via terminal
- Must be downloaded locally to your computer which is linked to the Github account. The projects and repositories are synchronized and retrieved from the Github server at any time.
Feel free to contact me if you've seen something wrong, found some errors or struggled on some mistakes! Always happy to have a clean sheet here! :)
0 Questions have been asked, 0 answers have been given, 0 changes have been made.
| Questions | Anwers | Changes |
|---|---|---|
| 0 | 0 | 0 |