Serial
UPDATE
We now have serial.huhn.me, an online serial terminal. A great alternative for which you don't need to install anything. You only need a compatible browser. Learn more: blog.spacehuhn.com/serial-terminal
- Open serial.huhn.me
- Click connect
- Plugin your ESP8266 board
- Select the port that pops up in the list and click connect
-
Connect the ESP8266 board to your computer.
-
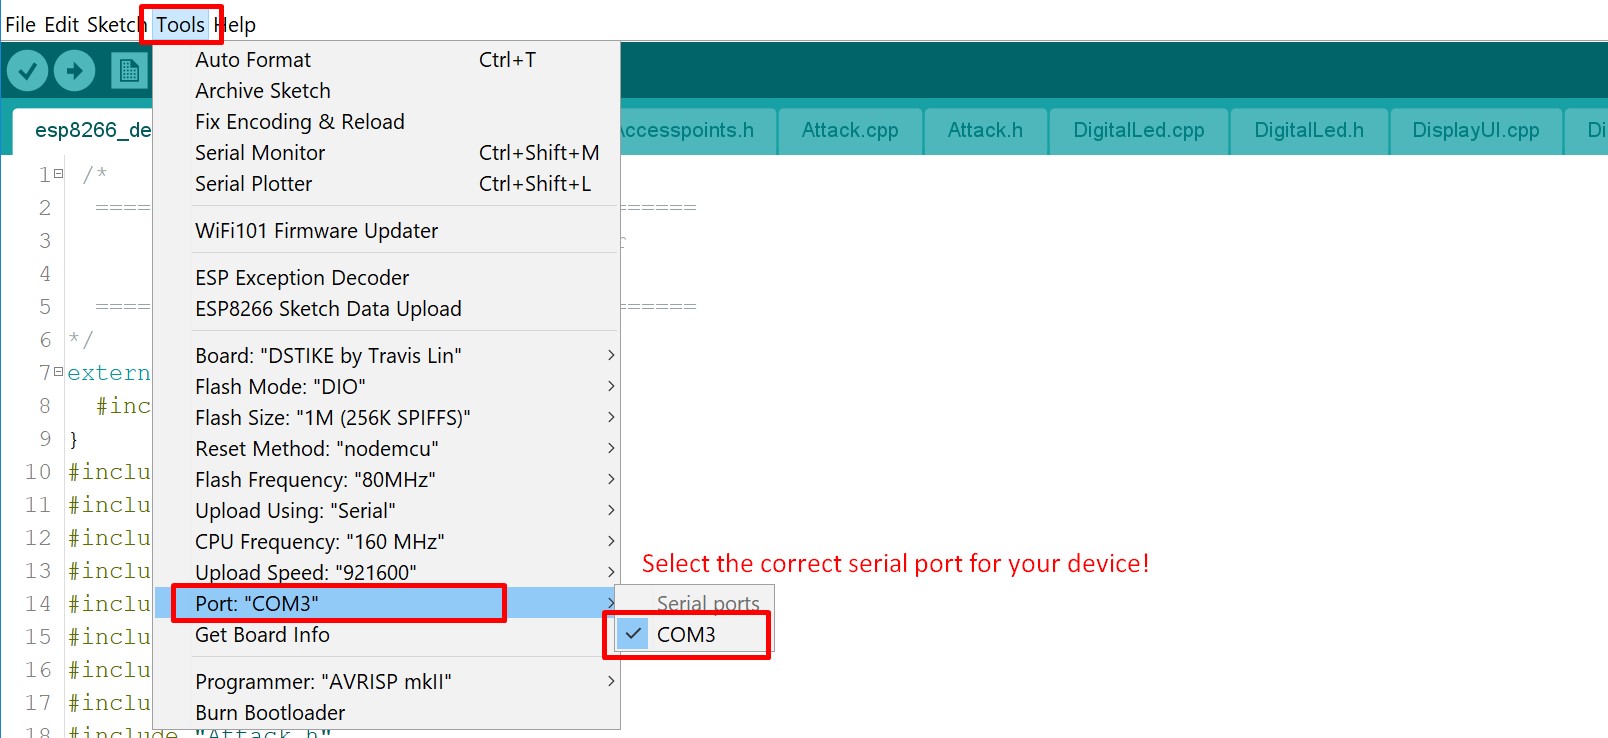
Open Arduino, go to
Tools->Portand select the correct serial port.
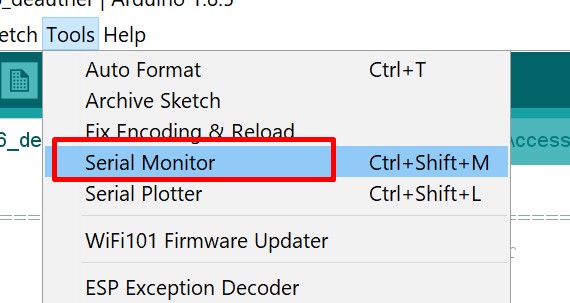
- Go to
Toolsand click onSerial Monitor
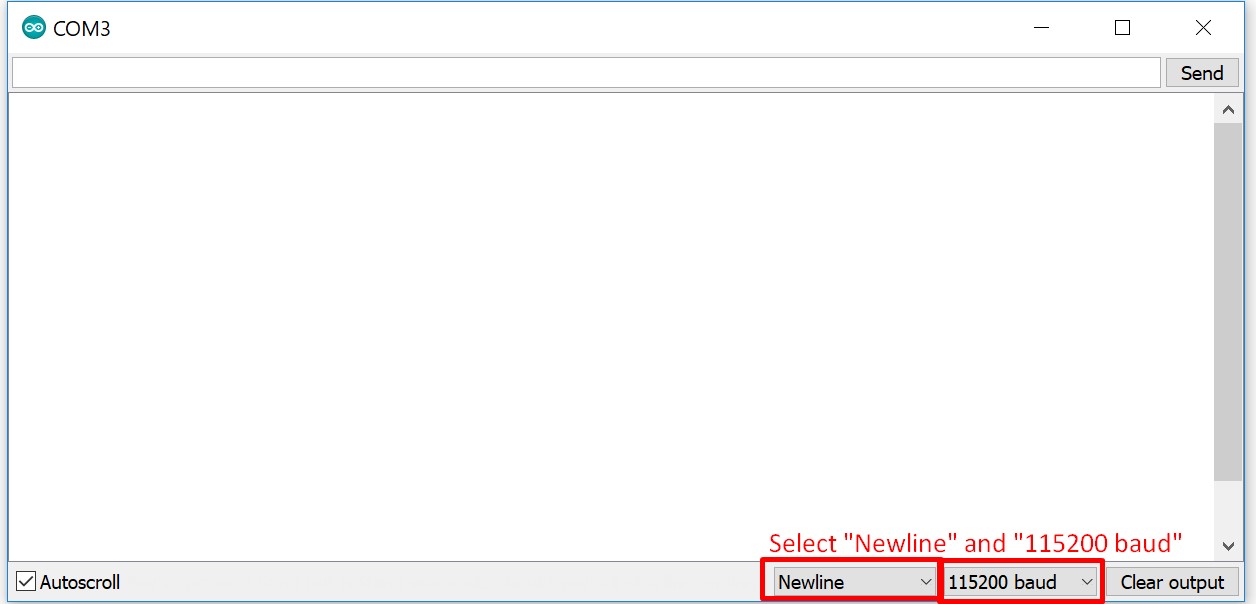
- Select
Newlineand115200as baudrate
- ...
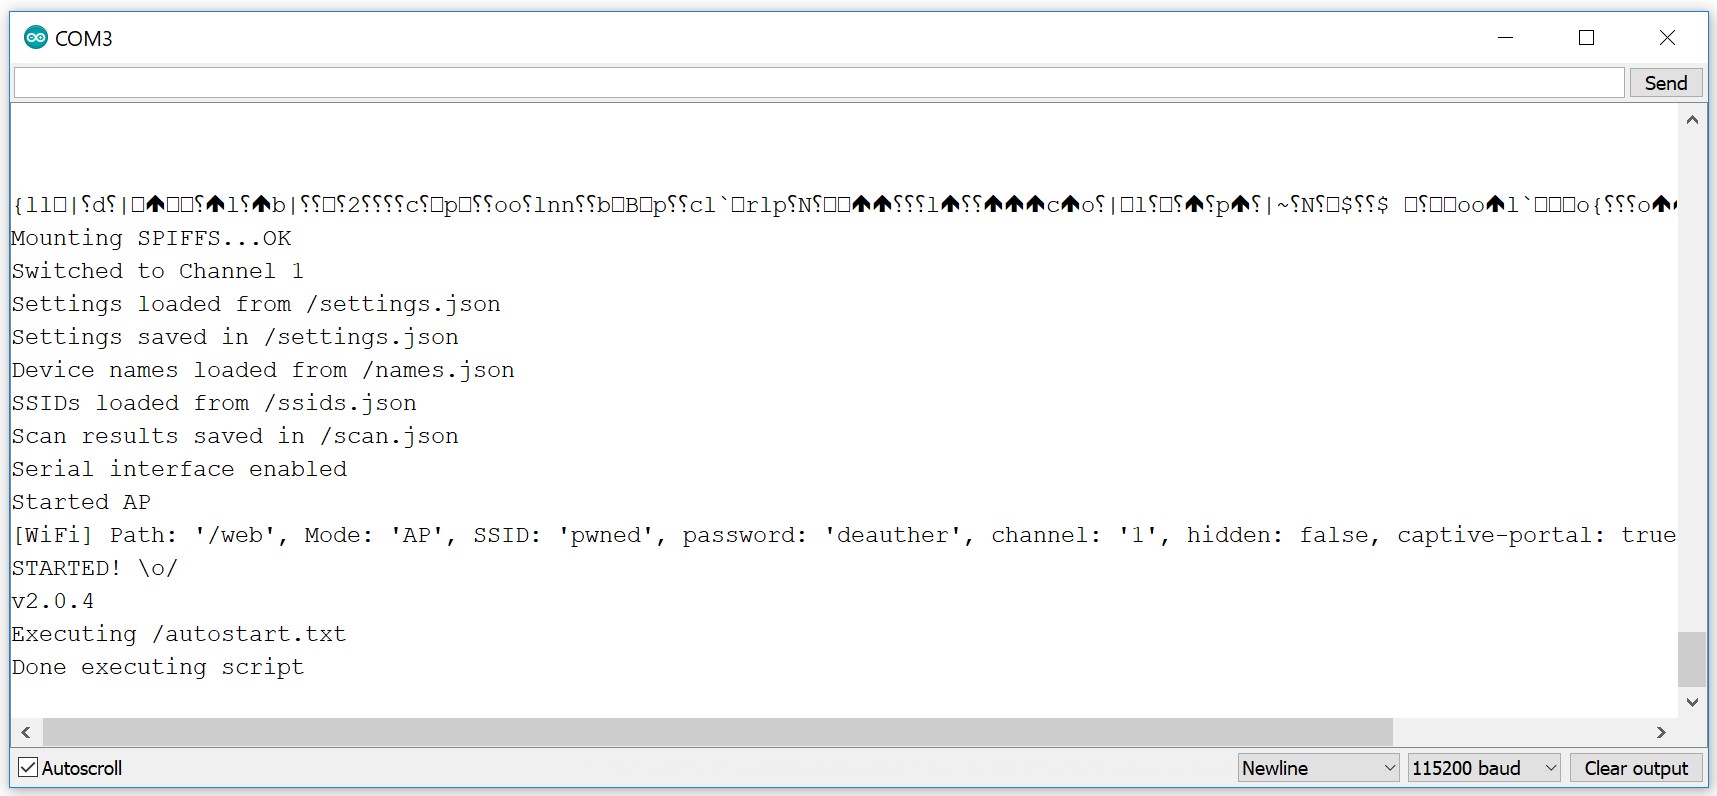
- Profit!
You can find a list with all serial commands here.
Here is collection of small descriptions, tips and tutorials on how to use the serial command line interface.
Overview
- Escaping spaces
- Deauth All
- Change Mac Address
- Attack Timeout
- Combine Serial Commands
- Random Mode
- Continuous Mode
- SPIFFS
- Load and Save
- Autostart Script
- Improve packet rate
- Upload Settings
- Upload to SPIFFS
- Finding COM Port
- Removing Deauther
In the serial interface, commands and parameters are divided by spaces.
Executing the command add ssid test would not be a problem, add ssid this is a test would be!
To escape these spaces, you can use a backslash \. For example: add ssid this\ is\ a\ better\ test.
To escape the backslash itself, use another backslash: add ssid IreallyWant\\backslashes.
You can also use double quotes ". For example add ssid "this is a even better test".
You can escape double quotes with the backslash.
Please only use the deauth feature responsibly and not to harm other people. Also note that due to technical reasons, the following attack methods cannot be used or added to the web interface.
One way is to select all access points, stations and saved device names via the select all command.
If you want to whitelist a device now, you have to deselect it with deselect, for example: deselect -ap 0 or deselect -st 2.
But keep in mind that if you have an access point selected, ALL the clients of this network will get disconnected because the ESP8266 sends the packets out as broadcast (to address everyone at once).
So, if you want to only kick out all client devices except one, do select all stations instead, and then deselect -st <id> with the device id you want to whitelist. This will prevent the whitelisted device from being attacked by the esp8266.
And be sure you don't have the access point selected (run show to see what you have currently selected).
Then, when you run attack -d it will start deauthing all of the selected devices.
Another way is to use deauth-all.
With attack -da you start a deauth attack against all devices that are in your access point, station, and names list.
Only devices in your names list that are selected will not be attacked, this is the reverse of how the above is set up. Again, devices you HAVE selected will not be attacked. However, as mentioned before, if you have an access point in your list, all clients that are connected to that will get deauthed because of the broadcast packets.
To prevent this, you have to save the access point to the name list, and select it!
You can add devices to the names list via the name command, for example, add name myrouter -ap 0 -s will add the AP with ID 0 with the name myrouter to the list and -s says that it will also be selected (you can see all APs with show aps).
If you want it to attack certain targets automatically as soon as they get in range, you can have a continuous scan running while attacking. That way, the AP and station list will always hold updated results.
You can do this by using the scan command with the -c parameter:
scan aps -c 1min will scan for access points, wait a minute, scan for access points again, wait a minute.... and so on.
Please note that while it is scanning, no packets can be sent out and ongoing attacks will pause until the scan is finished.
... you might ask.
Well first of all, we have very limited resources on the ESP8266 and most of them are already used of for the other features.
Adding a white and black list for easier management would not be worth it, while scanning and attacking simultaneously is just impossible, due to the single 2.4GHz radio and single core CPU.
The second reason is simplicity, you don't need an auto-deauth-all feature in most use cases, it would probably also be illegal.
Automated deauth all would come close to a real frequency jammer and probably fall under the same laws!
The problem is that the user no longer has an influence on which devices its attacking. It could block critical communications and cause danger to other people.
With this serial interface, the user has to read this tutorial first, and will understand why it's dangerous. The user also has to scan and see the results first, and if the user still continues with the attack, he/she does that on purpose with intent and is wholly responsible for their actions.
So, to keep this project running, and to get more people interested and aware of these issues, please do not publish an automated deauth all device/software. This project is already in a grey area, but it has to be somewhat challenging to use, otherwise the widespread use of a GUI client would be disastrous.
If you connect to a network with the ESP8266 or host a network (what you do if you use the web interface) then you might want to hide the original Espressif MAC address.
The ESP8266 has 2 MAC addresses, one for the access point mode (when it creates a network) and one for the station mode (when it connects to a network).
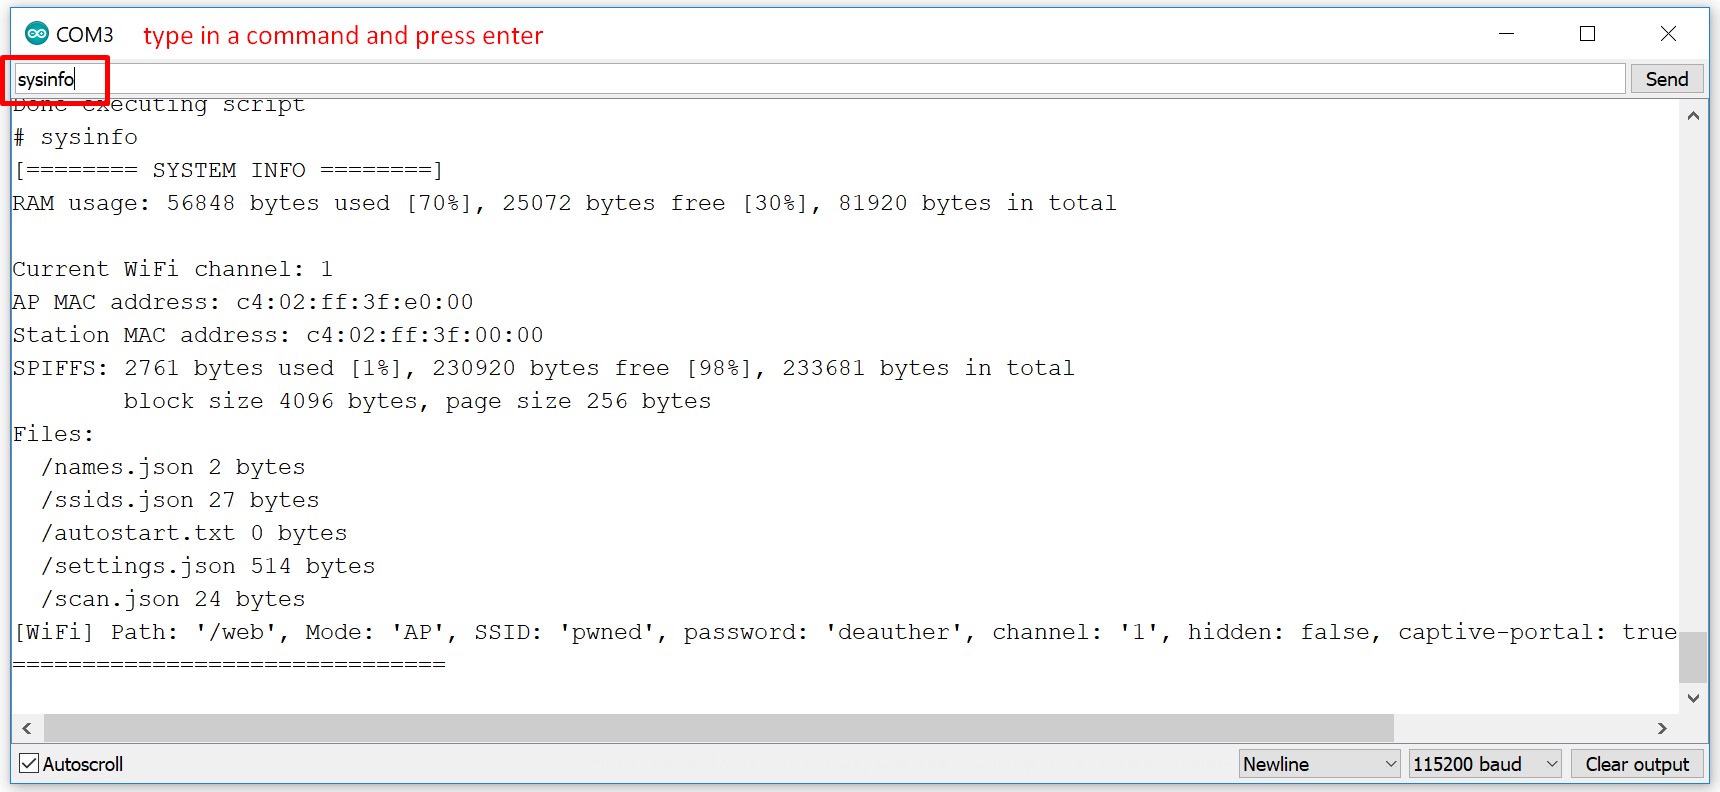
You can see the MAC addresses currently being used with sysinfo.
To change them you have to use the set command, for example set macap 0a:0b:0c:11:22:33 would change the mac address for the access point mode.
Change the station MAC address with set macst <your-mac-addr>.
You can also set a random MAC address with set macap random. To set both MAC addresses random, you can use set mac random.
To see the currently saved addresses run the command get mac, or get macap/get macst for a specific mac address.
Please be aware that you might still see the old, unchanged mac addresses with sysinfo, this is because sysinfo prints out the current internally set mac address.
To apply your changes in the settings, you have to activate the access point or station mode, by way of activating the web interface.
If the web interface is already running, you have to restart the device.
The settings contain the attack timeout value in seconds. You can see the value by running get attacktimeout.
If you start attacking, it will automatically stop after this amount of time.
To change it to for example 10 seconds, run set attacktimeout 10s or set attacktimeout 10min to set it to 10 minutes.
If you want to disable this feature, set the timeout to zero: set attacktimeout 0.
The serial interface usually takes one command at a time, but it can also take multiple commands if they are separated by two semicolons: ;;.
So for example sysinfo;;chicken will execute sysinfo and then chicken.
There is no limit on the number of commands you can combine with this feature, but there is a limit of 512 characters per input!
You can escape the delimiter using a backslash: \;;.
Some commands like scan work asynchronous and don't block. To combine those commands, you can make use of the DELAY command.
For example scan wifi -t 10s -ch 6;;DELAY 11s;;show stations will scan for 10 seconds on channel 6 and wait 11 seconds before printing the results out.
Note that it's always better to use a higher delay than you expect the previous command to run, because there might be other delays and time factors playing in.
With the random mode enabled, the SSID list will be completely overwritten with random generated SSIDs.
You can enable it with enable random <interval>, the interval says after which time the list will be regenerated.
So for example enable random 1min would enable the random mode and regenerate the list every minute.
This feature is particularly useful for the beacon and probe attacks. Since those attacks use the SSID list to generate the packets, you can spam constantly
new generated SSIDs instead of fixed ones.
With the command scan [<all/aps/stations>] [-t <time>] [-c <continue-time>] [-ch <channel>] you get a option called continue or -c.
This option enables to run a scan continuously.
So scan aps -c 10s starts a new scan just for access points and enables the continues mode with 10 seconds.
Now when the scan is finished it will restart after the set amount of time, so 10 seconds in this example.
The ESP8266 has an external flash chip with usually 1 or 4 MB of storage. The program itself is saved on it together with some other configs, and there is a reserved space for the SPIFFS.
SPIFFS stands for SPI Flash File System and it's a small simplistic file system on the flash chip itself. It's particularly useful to store and access data that doesn't fit into the RAM.
Here for example, its used to store the settings. You can see how much space of the SPIFFS is being used what files are currently in the SPIFFS with the command sysinfo.
Sometimes the file system get corrupted and you will see errors like ERROR: saving /settings.json. If that happens, it's recommended to clear the memory using format.
You can also see the contents of a file using print <path_to_file> and delete it using delete <path_to_file>.
For more information about the SPIFFS click here.
With the commands load and save you can reload and save the current values of the settings, the ssid list and the device name list.
You can also load/save a specific file, for example: load settings will only reload the settings,
and save settings /customSettings.json will save the settings file to /customSettings.json.
This can be quite useful if you want to store multiple configurations or make multiple SSID lists and name lists!
It's recommended to disable autosave with set autosave false if you switch between different files, because the autosave (or the save command without file parameter)
will save and override to the default file path!
If you ever run sysinfo you might notice that there is a /autostart.txt file.
Each line in that script will be executed just like a command you type in over serial.
There is no limit on the number of commands and you can also use the delimiter to combine commands into a single line.
Just remember that there is a limit of 512 characters per line!
To upload your own script, you have to upload it to the SPIFFS which is explained here.
YOU CANNOT RUN OTHER SCRIPTS FROM AUTOSTART
You might notice that sometimes the ESP8266 isn't able to sent out all the packets.
One reason could be that the WiFi channel is busy and it has to wait until the packet can successfully been send out.
When you perform a deauthentication attack against multiple targets it also has to change the channel for every target and that takes time.
Following settings influence the packet rate performance (see settings.md for more details):
beaconChannelbeaconIntervalforcePackets
Those are the recommended upload/compile settings for Arduino:
Board: Generic ESP8266 Module
Flash Mode DIO
Flash Frequency: 40 MHZ
CPU Frequency: 160 MHz
Flash Size: 1M (256K SPIFFS)
Reset Method: ck
Upload Speed: 115200
Port: com port of your device
Most NodeMCUs and other development boards have 4MB Flash so you can set the Flash Size to 4M (3M SPIFFS) or select NodeMCU 1.0 as the board.
Changing the Flash size can give you more SPIFFS for saving data, scripts or other files.
If you have a board with the ESP-07 (the one with the connector for an external antenna) it probably only has 1MB of flash, so keep the recommended settings above.
Putting the Upload Speed to 921600 or changing the Flash Frequency to 80MHz gives you higher upload speeds but doesn't always work.
Will be added soon
The best way to find the correct port is to open the Arduino IDE and see what ports are listed there. This looks for every OS, inlcuding linux. On windows, COM1 is never the correct port.
The best way to remove the deauther (or any other program running on the ESP8266) is by uploading a blank sketch to the board using the Arduino IDE. First, select the board in the boards menu. Then Select the correct port (see finding com port). Then you just hit upload using that blank sketch. That's it, the deauther code is now gone. Maybe the SSID pwned persists, that's because the WiFi settings are usually not overwritten and you have to upload a program that overwrites it. You can use the WiFiAccessPoint example in Arduino for that.
If you're having problems, you should try erasing the flash with esptool or the method above. On esptool.py, the command to erase the flash is esptool.py --port /dev/ttyUSB1 erase_flash, where ttyUSB1 is the port your ESP is on.