The purpose of this document is to walk you through and give you an understanding of the things we do here on EVT's telemetry database team.
By the end of rampup you will have:
- Created a new React project.
- Connected a front-end application to back-end logic.
- Implemented a RestAPI to standardize interactions between front and back-end components.
- Dissected .MF4 files using .DBC files (Don't worry I don't know what they stand for either)
- Manipulated data from Controller Area Network (CAN) messages (it is less scary than it sounds I promise)
This is a basic idea of the things we do here and after you have completed the tasks described below you should be ready for anything the DB team throws at you.
Or at least equally as ready as anyone else...
Part 1 of rampup is all about setting up your environment.
First we have to install a bunch of dependencies. This is painful and not fun and usually the part I hate most about projects (because it is boring.) Just bare with me and we will get through it together.
The first step is to install Node JS if you do not already have it installed.
For Windows computers, execute the following commands:
winget install Schniz.fnm
You will need to close and reopen your terminal before executing the rest
fnm env --use-on-cd | Out-String | Invoke-Expression
fnm use --install-if-missing 20
For Mac and Linux, execute the following commands:
curl -o- https://raw.githubusercontent.com/nvm-sh/nvm/v0.40.0/install.sh | bash
You will need to close and reopen your terminal before executing the rest
nvm install 20
Verify your install on any platform by running:
node -v
npm -v
You can chose to follow what is written on this page or you can follow the official reactstrap guide.
- Create a new folder somewhere in your files for us to clone a repository into name it Rampup.
- To start open the IDE of your choice (we typically use Visual Studio Code but if you have a different preferred one be my guest.)
- Open up a terminal/command line and navigate to the folder we just made. If you are unfamiliar with the terminal or command line take a look at this. You are looking for information on directory navigation.
- Now that we are in the proper folder we can clone the project. In your github create a new repository. We are making a classic ToDo list so name it thusly.
- I recommend making this project public as recruiters love to see project history. I also recommend using a personal email for this as you will not want your school email hooked up to your personal git repo forever (I made this mistake and it makes me sad).
- Navigate to the main page of the github repo and click the green button that says "< > Code". Make sure the middle option "SSH" is picked.
- Click the copy button and return to your command line.
- In the cmd write the following:
git clonethen paste the copied text and hit enter. - Congrats you have cloned the repo. At this point it is customary to stand up, raise your hands above your head and say "I have cloned the repo!"
- Before we go any further, lets setup your local branch.
- In your console, type
git branch my_special_project. This creates a local branch on your computer. - One more step, type
git checkout my_special_project.
- In your console, type
- Now create and enter a folder named rampup. If you do not do this it will definitely break things... (You can make this wherever you want, but I would recommend entering the Rampup folder first)
- Run the following command
npx create-react-app rampup-client. This will create a new react folder called rampup-client and should take a little while sit back and chat with your neighbor if they don't smell too bad. - In the cmd write the following:
npm install reactstrap react react-domThis will install the npm dependencies we use for development. This can take a while. When it tells you we have vulnerabilities... no we don't (don't worry about it these are expected). - Next run this command
npm install --save bootstrap. - In the new rampup-client folder navigate to the index.js file and add this to the top with the other imports
import 'bootstrap/dist/css/bootstrap.min.css' - You have officially set up your react project, great job! Similar to before you may now stand up, raise both hands once more and say "I have finished Part 1 of rampup!" and someone will come over to check your work.
ReactStrap is the love child of two popular front-end development tools: React, and Bootstrap. Experience with either of these is helpful but certainly not needed.
For Part 2 we will be creating some very simple front end code to familiarize you with ReactStrap please refer to the ReactStrap documentation here.
To begin we will be making a simple tv color screen using Rows and Cols your screen should look like this:
To do this we will edit the code in App.js. Remove all of the code in there between the parent divs. Create a grid of Cols and Rows then style them to change their sizing and background colors. Don't worry too much about exact coloring we just want something that is recognizable.

To run your site run the command npm start. The libraries we use are super cool and allow us to make changes to our sites live simply make the changes in your code. This is a very helpful thing to keep in mind when making changes to get it "just right."
Once you have made something that you feel is good call a senior member over and they will review what you made and let you know how to proceed.
Now we will be making that planner I was talking about earlier.
- Create a new folder in the base directory of your project (navigate until you are in the Rampup folder you made at the beginning of this).
- We are going to repeat the process from steps 10 - 15. Just use different names for the folders and project names. This is where the ToDo list will be so name it accordingly.
- You are welcome to style this in any way you want so long as you meet these requirements:
- TODO items are displayed in an organized manner with a title, description, and a checkbox that allows you to select it.
- There is a method by which to Add, Edit, Complete, and Delete TODOs.
- I do not expect the changes to perpetuate when you reload the page we will make that happen when we hook up the backend.
- Bonus points if you can reorder the TODOs but this is not required.
- If you want to follow a more standardized template you can make your page look like this:

- This section may take a while especially if you have not used React before, we are happy to help so ask questions and break things. Front-end involves a lot of experimentation and niche messaging boards from 6+ years ago where someone had the same problem you did, solved it, then did not explain further.
- Once you have something that meets the requirements call over a senior member and we will take a look.
A lot of our work on the database team is backend engineering. The front end is important as it provides a means to interact with things but since only EVT members will be looking we aren't too concerned with if it looks beautiful. (This is a cry for help, if you like front-end please make our site look pretty).
For the backend section we will be continuing work on the front-end project we began in Part 2. We will be completing the following:
- Setting up a local hosted MongoDB server (sounds scarier than it is)
- Migrating the TODOs to be stored in the local hosted MongoDB
- Use RestAPI calls to manage TODOs in the database (this can be scary but is so so cool)
Before we get started lets do some learning time:
What is a database? If you ask most mechies, they will say a google drive with files named bike_run_test_201831.mf4. This is in fact NOT a database and is also the reason we exist as a team.
A database is a place where we can (usually remotely) store data in an organized manner such that any number of people can access and manage it.
There are two major types of databases: Relational and Non-Relational.
Historically, relational DBs have been very popular but recently have been overtaken by Non-Relational DBs
A relational database typically correlates a series of values with an object. For instance a student in a school database might have information about their grade, name, and student id. These values would be stored in a table and each student would be given an assigned (and hopefully single value) for each field.
Relational databases require structured data schemas and will break if you do not follow them this makes them very fast at the expense of flexibility.
A non-relational database is a little different instead of tables, data is stored in "documents". A document is a fancy way of saying a (or many) massive json files.
At EVT we use non-relational databases because of our unique data structure and need for flexibility.
Non-relational DBs are used for large amounts of either unstructured or unpredictable data (we tend to fall in the unpredictable group).
If you are interested in learning more about these DB structures I recommend reading this post by MongoDB.
Admittedly, a non-relational DB is probably a terrible method to manage TODO lists as they are predictable and usually well structured but this is the rampup for EVT so we want you to learn what we do and how.
- To start this off you will need to install MongoDB on your computer. Do so at this link
- You will also want to install Studio 3T, a program used to view and manage non-relational DBs. Install that at this link. Make sure to enable cookies because they will not let you breathe on that website without them.
- Now that the things we need are installed we need to create the server side of our application. Make a new folder at the same level as the client folder and name it server.
- Within the server folder create a file and name it server.py. In the Rampup folder of the EVT github there is is a file also called server.py. You can copy paste that into your new file.
- You will also need to copy the requirements.txt from the Rampup folder into your own then in the terminal run
pip install -r requirements.txt. If you run into problems with this it is likely a versioning issue with your Python. You may need to manually callpip install <library name here> - Your server logic will have one endpoint but with 4 methods "GET", "PUT", "POST", "DELETE". Some wack jobs will tell you to add "PATCH", the proper response is to smile, wave, nod your head and pretend to listen. They are in enough pain as is, no reason to make it worse.
- Each of these methods maps to a different general goal
- GET is focused on retrieving data from the server but not modifying it in any way. THERE ARE NO BODIES IN A GET CALL 💀. (Terrifying out of context)
- PUT allows us to modify data in the server/DB
- POST is used to send new data objects to the server/DB
- DELETE is used to remove data objects from the server/DB
- Note, there is literally nothing holding you to upkeeping these rules but I BEG you to follow them lest yee be judged harshly
- Lets start by making our endpoint:
- Take a look at the sample endpoint that was provided ours will look very similar
- Create a new endpoint, following the design of the sample but name it "todo_manager" and with the 4 methods listed above in the methods array
- Your function name SHOULD match the endpoint name and you will want to include the if statements to check each of the methods.
- Now comes the actual logic. We will start with the GET.
- To turn your server on, cd into the folder with sever.py and run
python .\server.py
As stated above, a get request needs to get data (duh), so for our purposes we're going to use it to get all the events the user currently has to do.
To save yourself a headache later, I would recommend setting up a way to test your queries outside of a server (test.py) so you can easily print the results. To actually establish a connection to the db, checkout create_db_connection() in server.py
- Make the get request (follow format in the example server.py)
- Build your query. Check out this link for help building a query. You may also want to familiarize yourself with how collections work
- Return all data found in the collection along with code 200 (See this link for http response code info)
- As of now, don't worry to much about how the front end receives the data, we'll work on that in a minute
Now that we have a get endpoint, lets make a POST endpoint. To make this simple, we're going to make each new task be its own document.
- Create the POST endpoint if statement in server.py
- Read incoming data. For this, we're going to use something called request, which is a feature of Flask
- Format the data how you want it (I would highly recommend some key: pair system)
- Submit the data to the db
- Return the new event to the frontend with code 201
We have reached the point where we now want to modify an existing element.
Per normal comp sci practices, we almost always want to keep all data we are given, so rather than removing a task when the user finish it, we're just going to give it a flag of "Complete". How you actually do this is up to you (but please use a boolean)
- Create the endpoint in code (you're going to be doing this a lot)
- Figure out how to identify individual tasks in the db. There are two main ways to do this. Create some id property for each task or use the id number each document has in mongodb.
- Add a flag to the task
- Save task and return 200 code
For this part, we are going to violate the comp sci practice we followed above and actually delete data from the database.
We're doing this since you should know how to delete something from a mongo db, but pls pls pls, don't just delete data from our db 😨
- Create endpoint (last time for now)
- Identify target for deletion
- Delete element
- Return code 204
CONGRATULATIONS
You have officially built an api!
Unfortunately, the work isn't done yet. You still have the fun experience of integrating it with the frontend!
This process is often as enjoyable as a 8 am math lecture, but it has to be done
On the frontend, we need to start making some fetch calls to the backend for data. As part of this, you will have to process each request and decide what to do.
If you don't know what a fetch call is, please refer to this website for more info.
From here, all you have to do is set it up so the frontend so it will make the correct request to the backend!
This is often the part when you have to completely rewrite your api (Oh JOY)!
But once this is all done, you should have a todo web app that fully functions and can save user information! (Now go post it on linkedin like ever other web dev)
Ok, now that you have a basic idea of how to build a web app and an api, lets move on to how we do our main job... decoding CAN messages!
Controller Area Network (CAN) is a communication protocol used by most automotive vehicles, including ours.
Before CAN, each electric component was connect to each other via individual wires and used different communications protocols. Picture a spaghetti of wires that is different for every vehicle. PURE CHAOS!
Now picture the beauty of CAN, one high wire and one low wire connecting all the devices onto one network!
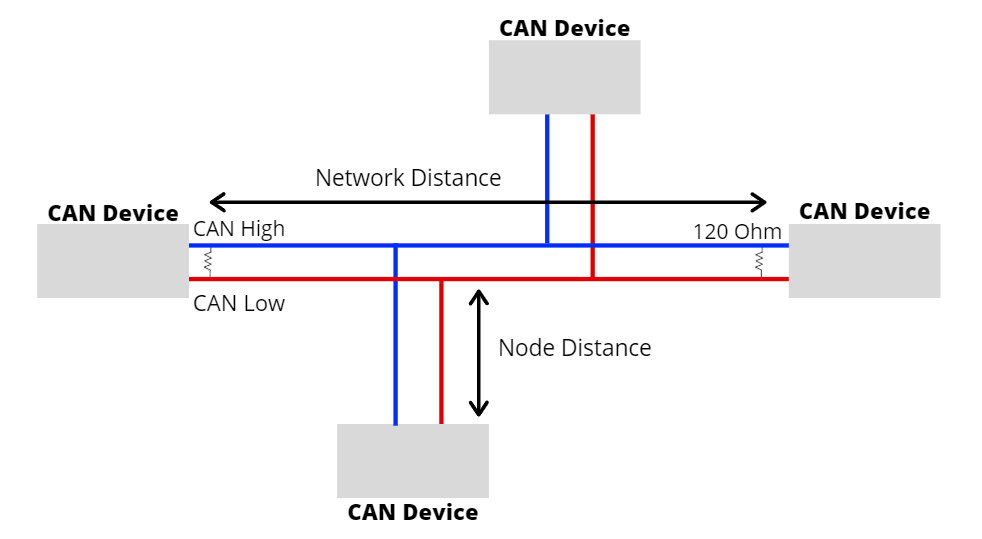
Don't worry why there is a 120 Ohm resistor, no one knows why it exists. It just does.
So CAN allows for communication, but how does it actually function?
In the case of our bikes, we use CAN to communicate between our boards. Since you are a part of our database team, you should be familiar with the boards we are collecting data on. As of writing this documentation, we have 5 (6?) things we are collecting data from (you'll understand the 6 in a second).
-
BMS - Battery Management System
Controls the battery and reports voltage data -
TMS - Thermal Management System
Controls our cooling loop and temperature monitors -
TMU - Thermocouple Measurement Unit
Reporting temperature data from thermocouples around the bike -
PVC - Powertrain Voltage Controller
Controls high voltage discharge from battery (ON/OFF) -
MC - Motor Controller
Controls the motor (duh) and describes power draw and torque output. -
IMU - Inertial Management Unit (?)
Measures things like acceleration and rotation. Some of our bikes have it and some don't. As a team, we may remove it as well
To communicate, each board sends a CAN frame, which sounds fancy, but its just a special order of bits (Don't worry, you won't need to interact with these directly). All CAN frames are saved by our bike and are exported to a .mf4 file for us to read after
We only care about a few sections of the CAN frame.
- Time
How many seconds have passed since the bike started - Signal
Name of the message/type (Pack_1_Voltage, Pack_1_Temp, etc) - CanId
Unique id for each message type - Data
Value sent. Each can message can send up to 8 bytes/64 bits of data
This sounds super simple right? Well, you're partially right. There is another piece to this puzzle that we haven't talked about yet.
A DBC file is a fancy little file that tells both the bike and people how to decode different CAN frames. As part of making CAN frames more efficient, they can patrician parts of the bits of their data for certain things. For example, the TMU will send one message, where the first 2 bytes are Temp_0, second 2 bytes are Temp_1, third 2 bytes are Temp_2, and fourth 2 bytes are Temp_3.
The DBC files describes how each CAN frame is formatted, whether the data is signed or unsigned, and which board is sending the message.
The good news is, this process is made fairly simple for us. We'll talk about how we do this in the next section
If I were really evil, I would make you do what we originally did at the beginning of the life of this db. You'd have to decode a mf4 file by looking at the individual bits of data, figure out how to organize them for a SQL database (this was the original plan), and how to decode the DBC file.
BUT...
Why would we do that when there is a perfectly good python library to do it for us!
asammdf is the industry standard for doing anything with automotive measurement data and cantools is my personal preference for decoding the dbc file
I would recommend looking at .database.load_file from cantools and MDF from asammdf.
Once you have figured out how to read data, now we get to play with it.
This section is short (I promise).
For your challenge, I want you to use the decoded data you generated, and parse the list of messages in the form:
{

    "time": xxx,

    "signal": xxx,

    "canID": xxx,

    "data": xxx,

    "board": xxx,

},
Save the result to a json file and show a member of the database team.
Remember, some CAN messages send multiple pieces of data in a single CAN message and some data is unsigned, so you need to account for that. If you want more information about what this means, talk to the super cool lead of the Database team for more info.
And with that, you have finished the rampup!
It is now customary to walk up to the current head of the club (Magee) and give him a big hug! It is heavily preferred that he's busy when you do this, so don't worry if it looks like he's in an important meeting.
Just make sure you get checkoff and you're officially ready to start adding your own special touch to our beautiful database.