The QuickBlox UIKit for iOS is a comprehensive user interface kit specifically designed for building chat applications. It provides a collection of pre-built components, modules, and utilities that simplify the process of creating chat applications.
The main goal of the QuickBlox UIKit for iOS is to offer developers a streamlined and efficient way to implement chat functionality within their iOS applications.
The QuickBlox UIKit for iOS offers modules that encapsulate complex chat functionalities, such as dialogs and chat management and real-time updates. These modules provide a simplified interface for integrating chat features into applications without the need for extensive knowledge of the underlying protocols or server-side infrastructure.
- QuickBlox UIKit for iOS provides next functionality:
- List of dialogs
- Create dialog(Private or Group)
- Dialog screen
- Send text, image, video, audio, file messages
- Dialog info screen
- List, invite, remove members
The QuickBlox UIKit for iOS comprises a collection of pre-assembled UI components that enable effortless creation of an in-app chat equipped with all the necessary messaging functionalities. Our development kit encompasses light and dark themes, colors, and various other features. These components can be personalized to fashion an engaging messaging interface that reflects your brand's distinct identity.
The QuickBlox UIKit fully supports both private and group dialogs. To initiate the process of sending a message from the ground up using Java or Kotlin, please refer to the instructions provided in the guide below.
The minimum requirements for QuickBlox UIKit for iOS are:
- iOS 15.0
- Xcode 14
Register a new account following this link. Type in your email and password to sign in. You can also sign in with your Google or Github accounts. Create the app clicking New app button. Configure the app. Type in the information about your organization into corresponding fields and click Add button. Go to Dashboard => YOUR_APP => Overview section and copy your Application ID, Authorization Key, Authorization Secret, and Account Key .
To add QuickBlox UIKit to your project using SPM, you can follow these steps:
Open your Xcode project and navigate to File > Swift Packages > Add Package Dependency. In the search bar, enter the QuickBlox UIKit repository URL: https://github.com/QuickBlox/ios-ui-kit.git and click Add Package. Xcode will then fetch the SDK and you can add it to your project by clicking Add Package. You can then import QuickBloxUIKit modules into your code and use its API.
import QuickBloxUIKit
To init QuickBlox SDK you need to pass Application ID, Authorization Key, Authorization Secret, and Account Key to the initWithApplicationId() method.
Quickblox.initWithApplicationId(92, authKey: "wJHdOcQSxXQGWx5", authSecret: "BTFsj7Rtt27DAmT", accountKey: "7yvNe17TnjNUqDoPwfqp")
Before sending your first message you need to authenticate users in the QuickBlox system. You can read more about different ways of authentication by this link. In our example we show how to authenticate user with login and password.
QBRequest.logIn(withUserLogin: "userLogin", password: "userPassword", successBlock: { (response, user) in
    // Navigate user to the UIKit
}, errorBlock: { (response) in

})
struct ShowQuickBlox: View {
    var body: some View {
        QuickBloxUIKit.dialogsView()
    }
}
The QuickBlox UIKit for iOS allows you to create your own unique view of the UIKit.
The QuickBlox UIKit for iOS by default supports Light and Dark themes, which theme will be applied depending on device settings.
You can create and use your own color theme. To do this you need to create class that implements QuickBloxUIKit.ThemeColorProtocol
class CustomThemeColor: QuickBloxUIKit.ThemeColorProtocol {
    var mainElements: Color = Color("MainElements")
    var secondaryElements: Color = Color("SecondaryElements")
    var tertiaryElements: Color = Color("TertiaryElements")
    var disabledElements: Color = Color("DisabledElements")
    var mainText: Color = Color("MainText")
    var secondaryText: Color = Color("SecondaryText")
    var caption: Color = Color("Caption")
    var mainBackground: Color = Color("MainBackground")
    var secondaryBackground: Color = Color("SecondaryBackground")
    var tertiaryBackground: Color = Color("TertiaryBackground")
    var incomingBackground: Color = Color("IncomingBackground")
    var outgoingBackground: Color = Color("OutgoingBackground")
    var dropdownBackground: Color = Color("DropdownBackground")
    var inputBackground: Color = Color("InputBackground")
    var divider: Color = Color("Divider")
    var error: Color = Color("Error")
    var success: Color = Color("Success")
    var highLight: Color = Color("HighLight")
    var system: Color = Color("System")

    init() {}
}
You can create and use your own string theme. To do this you need to create class that implements QuickBloxUIKit.ThemeStringProtocol
"dialog.items.empty" = "There are no dialogs";
"dialog.members.empty" = "You don’t have any users.";
"dialog.messages.empty" = "You don’t have any messages.";
"dialog.type.private" = "Private";
"dialog.type.group" = "Group";
"dialog.type.public" = "Public";
"dialog.typing.one" = " is typing...";
"dialog.typing.two" = " are typing...";
"dialog.typing.four" = " and 2 others are typing...";
"dialog.name.hint" = "Use alphanumeric characters and spaces in a range from 3 to 60. Cannot contain more than one space in a row.";
"dialog.name.create" = "Create";
"dialog.name.next" = "Next";
"dialog.name.search" = "Search";
"dialog.name.cancel" = "Cancel";
"dialog.info.edit" = "Edit";
"dialog.info.members" = "Members";
"dialog.info.notification" = "Notification";
"dialog.info.searchInDialog" = "Search in dialog";
"dialog.info.leaveDialog" = "Leave dialog";
"dialog.info.you" = " (You)";
"dialog.info.admin" = "Admin";
"dialog.action.typeMessage" = "Type message";

"screen.title.dialogs" = "Dialogs";
"screen.title.dialog" = "Dialog";
"screen.title.dialogType" = "Dialog type";
"screen.title.newDialog" = "New Dialog";
"screen.title.createDialog" = "Create Dialog";
"screen.title.addMembers" = "Add Members";
"screen.title.dialogInformation" = "Dialog information";

"alert.actions.add" = "Add";
"alert.actions.dialogName" = "Dialog name";
"alert.actions.enterName" = "Enter name";
"alert.actions.changeImage" = "Change image";
"alert.actions.changeDialogName" = "Change dialog name";
"alert.actions.photo" = "Photo";
"alert.actions.removePhoto" = "Remove photo";
"alert.actions.camera" = "Camera";
"alert.actions.gallery" = "Gallery";
"alert.actions.file" = "File";
"alert.actions.remove" = "Remove";
"alert.actions.cancel" = "Cancel";
"alert.actions.ok" = "Ok";
"alert.message.removeUser" = "Are you sure you want to remove ";
"alert.message.questionMark" = "?";
"alert.message.errorValidation" = "Error Validation";
"alert.message.addUser" = "Are you sure you want to add ";
"alert.message.toDialog" = " to this dialog?";
"alert.message.noResults" = "No results found";
"alert.message.noMembers" = "There are no members";
"alert.message.invalidAI" = "The [AI Answer Assist feature](https://docs.quickblox.com/docs/ios-uikit-ai-features#assist-answer) is currently not configured. To enable this functionality, you must set either the **.openAIAPIKey** or **.proxyServerURLPath** properties for QuickBloxUIKit.feature.ai.assistAnswer. To disable the feature, simply set QuickBloxUIKit.feature.ai.assistAnswer.enable = false.";

"attachment.maxSize.title" = "The uploaded file exceeds maximum file size (10MB)";
"attachment.maxSize.hint" = "Please select a smaller attachment.";
"attachment.title.file" = "file";
"attachment.title.gif" = "GIF";

"ai.translate.showOriginal" = "Show original";
"ai.translate.showTranslation" = "Show translation";
"ai.answerAssist.title" = "AI Answer Assist";

"permission.camera.title" = "Camera error";
"permission.camera.message" = "The app doesn't have access to the camera, please go to settings and enable it.";
"permission.microphone.title" = "Microphone error";
"permission.microphone.message" = "The app doesn't have access to the microphone, please go to settings and enable it.";
"permission.actions.cancel" = "Cancel";
"permission.actions.settings" = "Settings";

"utils.string.createdGroupChat" = "created the group chat";
"utils.string.dialogRenamedByUser" = "The dialog renamed by user";
"utils.string.avatarWasChanged" = "The avatar was changed";
"utils.string.addedBy" = "added by";
"utils.string.removedBy" = "removed by";
"utils.string.hasLeft" = "has left";
For custom localization, customize your application by adding the necessary localization files. You can learn more about how to do this at the Apple Documentation.
- Copy and add to the localization file in your project the necessary string constants from QuickBlox iOS UI Kit. If you do not have a localization file yet, then create it following the guide from Apple Documentation.
- Customize these constants as you need for your purposes.
- Create and add the necessary localization files to your project
For example, add a localization file for Spanish to your project:
"dialog.items.empty" = "No tiene ningún cuadro de canal.";
"dialog.members.empty" = "No tiene ningún usuario.";
"dialog.messages.empty" = "No tiene ningún mensaje.";
"dialog.type.private" = "Privado";
"dialog.type.group" = "Grupo";
"dialog.type.public" = "Público";
"dialog.typing.one" = " está escribiendo...";
"dialog.typing.two" = " están escribiendo...";
"dialog.typing.four" = " y otros 2 están escribiendo...";
"dialog.name.hint" = "Use caracteres alfanuméricos y espacios en un rango de 3 a 60. No puede contener más de un espacio en una fila.";
"dialog.name.create" = "Crear";
"dialog.name.next" = "Siguiente";
"dialog.name.search" = "Buscar";
"dialog.name.cancel" = "Cancelar";
"dialog.info.edit" = "Editar";
"dialog.info.members" = "Miembros";
"dialog.info.notification" = "Notificación";
"dialog.info.searchInDialog" = "Buscar en canal";
"dialog.info.leaveDialog" = "Salir del cuadro de canal";
"dialog.info.you" = " (usted)";
"dialog.info.admin" = "Admin";
"dialog.action.typeMessage" = "Escribir mensaje";

"screen.title.dialogs" = "Canales";
"screen.title.dialog" = "Canal";
"screen.title.dialogType" = "Tipo de canal";
"screen.title.newDialog" = "Canal nuevo";
"screen.title.createDialog" = "Crear canal";
"screen.title.addMembers" = "Agregar miembros";
"screen.title.dialogInformation" = "Información de canal";

"alert.actions.add" = "Agregar";
"alert.actions.dialogName" = "Nombre del canal";
"alert.actions.enterName" = "Ingrese el nombre";
"alert.actions.changeImage" = "Cambiar imagen";
"alert.actions.changeDialogName" = "Cambiar nombre de canal";
"alert.actions.photo" = "Foto";
"alert.actions.removePhoto" = "Eliminar foto";
"alert.actions.camera" = "Cámara";
"alert.actions.gallery" = "Galería";
"alert.actions.file" = "Archivo";
"alert.actions.remove" = "Eliminar";
"alert.actions.cancel" = "Cancelar";
"alert.actions.ok" = "Ok";
"alert.message.removeUser" = "¿Está seguro de que desea eliminar ";
"alert.message.questionMark" = "?";
"alert.message.errorValidation" = "Error de validación";
"alert.message.addUser" = "¿Está seguro de que desea agregar ";
"alert.message.toDialog" = "¿a este cuadro de canal?";
"alert.message.noResults" = "No results found";
"alert.message.noMembers" = "There are no members";
"alert.message.invalidAI" = "La [función AI Assist Answer](https://docs.quickblox.com/docs/ios-uikit-ai-features#assist-answer) no está configurada actualmente. Para habilitar esta función, debe configurar ** Propiedades .openAIAPIKey** o **.proxyServerURLPath** para QuickBloxUIKit.feature.ai.assistAnswer. Para deshabilitar la función, simplemente establezca QuickBloxUIKit.feature.ai.assistAnswer.enable = false.";

"attachment.maxSize.title" = "El archivo cargado supera el tamaño máximo de archivo (10 MB)";
"attachment.maxSize.hint" = "Seleccione un archivo adjunto más pequeño.";
"attachment.title.file" = "archivo";
"attachment.title.gif" = "GIF";

"ai.translate.showOriginal" = "Mostrar original";
"ai.translate.showTranslation" = "Mostrar traducción";
"ai.answerAssist.title" = "Asistente de respuesta AI";

"permission.camera.title" = "Error de cámara";
"permission.camera.message" = "La aplicación no tiene acceso a la cámara, vaya a configuración y habilítela.";
"permission.microphone.title" = "Error de micrófono";
"permission.microphone.message" = "La aplicación no tiene acceso al micrófono, vaya a configuración y habilítelo.";
"permission.actions.cancel" = "Cancelar";
"permission.actions.settings" = "Configuración";

"utils.string.createdGroupChat" = "creó el chat grupal";
"utils.string.dialogRenamedByUser" = "El diálogo renombrado por el usuario";
"utils.string.avatarWasChanged" = "El avatar fue cambiado";
"utils.string.addedBy" = "agregado por";
"utils.string.removedBy" = "eliminado por";
"utils.string.hasLeft" = "se ha ido";
And use it later to create your own theme
var customTheme: CustomTheme = CustomTheme(color: CustomThemeColor(),
                                      font: QuickBloxUIKit.ThemeFont(),
                                      image: QuickBloxUIKit.ThemeImage(),
                                      string: CustomThemeString())

QuickBloxUIKit.settings.theme = customTheme
QuickBloxUIKit comes with a range of AI features that enhance the capabilities of your chat application. These AI features leverage cutting-edge technologies to assist users, translate messages, summarize content, and more.
| Feature | Group Dialog | Private Dialog |
|---|---|---|
| Assist Answer | ✓ | ✓ |
| Translate | ✓ | ✓ |
| Rephrase | ✓ | ✓ |
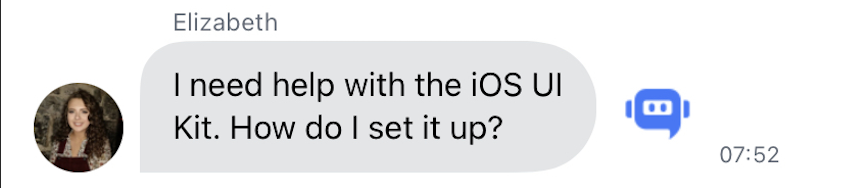
The AI Assist Answer feature in QuickBloxUIKit allows you to generate answers in a chat based on the chat history using the QBAIAnswerAssistant Swift package. This feature leverages the OpenAI API key or proxy server to generate responses more securely and efficiently.
[block:image] { "images": [ { "image": [ "https://files.readme.io/735a346-ios-ai-assist-answer-robot-light.gif", "", "" ], "align": "center", "border": true } ] } [/block]
To use the AI Assist Answer feature in your QuickBloxUIKit project, follow these steps:
- Enable the AI Assist Answer feature:
QuickBloxUIKit.feature.ai.assistAnswer.enable = true
If enabled, a button will appear next to each incoming message in the chat interface.
[block:image] { "images": [ { "image": [ "https://files.readme.io/741c88d-robot-little-not-touch.png", "", "" ], "align": "center", "sizing": "400px" } ] } [/block]
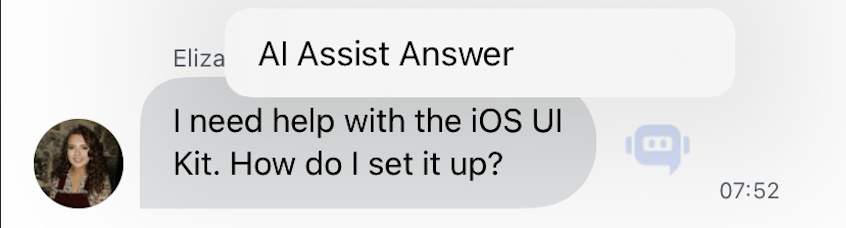
When the button is clicked, the Assist Answer feature will be launched, and a response will be generated based on the chat history.
[block:image] { "images": [ { "image": [ "https://files.readme.io/4373421-robot-little-touch.png", "", "" ], "align": "center", "sizing": "400px" } ] } [/block]
-
Set up the AI settings by providing either the OpenAI API key:
QuickBloxUIKit.feature.ai.assistAnswer.openAIAPIKey = "YOUR_OPENAI_API_KEY"
Or set up with a proxy server:
QuickBloxUIKit.feature.ai.assistAnswer.proxyServerURLPath = "https://your-proxy-server-url"👍 We recommend using a proxy server like the QuickBlox AI Assistant Proxy Server offers significant benefits in terms of security and functionality:
- When making direct requests to the OpenAI API from the client-side, sensitive information like API keys may be exposed. By using a proxy server, the API keys are securely stored on the server-side, reducing the risk of unauthorized access or potential breaches.
- The proxy server can implement access control mechanisms, ensuring that only authenticated and authorized users with valid QuickBlox user tokens can access the OpenAI API. This adds an extra layer of security to the communication.
The AI Translate feature in QuickBloxUIKit empowers you to seamlessly integrate AI translation capabilities into your chat-based application using the QBAITranslate Swift package. This feature leverages the OpenAI API key or proxy server to generate responses more securely and efficiently.
[block:image] { "images": [ { "image": [ "https://files.readme.io/ee71cb8-ios-ai-translate.gif", "", "" ], "align": "center", "sizing": "350px", "border": true } ] } [/block]
To use the AI Translate feature in your QuickBloxUIKit project, adhere to the following steps:
- Enable the AI Translate feature:
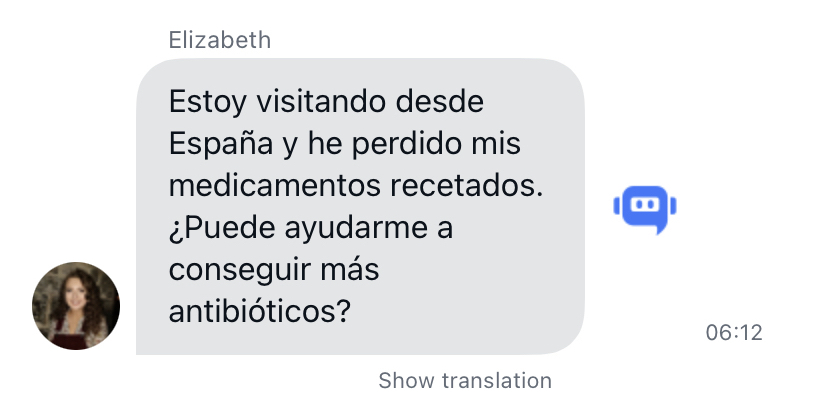
QuickBloxUIKit.feature.ai.translate.enable = trueIf this option is enabled, the "Show translation" button will be displayed at the bottom of every incoming message in the chat interface.
[block:image] { "images": [ { "image": [ "https://files.readme.io/dd2fa91-IMG_1164.jpeg", null, "Translation Button" ], "align": "center", "sizing": "600px", "border": true } ] } [/block]
When you click on it, this message will be translated into the language set for translation, and the "Show original" button will be displayed, when clicked, the text of the message will immediately take the original version.
[block:image] { "images": [ { "image": [ "https://files.readme.io/d7eabca-File.jpg", "", "" ], "align": "center", "sizing": "600px", "border": true } ] } [/block]
-
Set up the AI settings by providing either the OpenAI API key:
QuickBloxUIKit.feature.ai.translate.openAIAPIKey = "YOUR_OPENAI_API_KEY"
Or set up with a proxy server:
QuickBloxUIKit.feature.ai.translate.proxyServerURLPath = "https://your-proxy-server-url"- Set the translation language (default is English):
QuickBloxUIKit.feature.ai.translate.setCustom(language: .spanish)Incorporate AI Translate into your iOS chat application seamlessly using the QBAITranslate Swift package. Unlock the potential of AI-driven interactions and provide your users with real-time translation capabilities, enhancing user communication and experience.
For additional resources, explore the QuickBlox AI Assistant Proxy Server and the QBAITranslate Swift package repositories.
Resources:
The AI Rephrase feature in QuickBloxUIKit empowers you to seamlessly integrate AI Rephrase capabilities into your chat-based application using the QBAIRephrase Swift package. This feature leverages the OpenAI API key or proxy server to generate responses more securely and efficiently.
[block:image] { "images": [ { "image": [ "https://files.readme.io/d40175f-IMG_1221.PNG", "", "" ], "align": "center", "sizing": "400px", "border": true } ] } [/block]
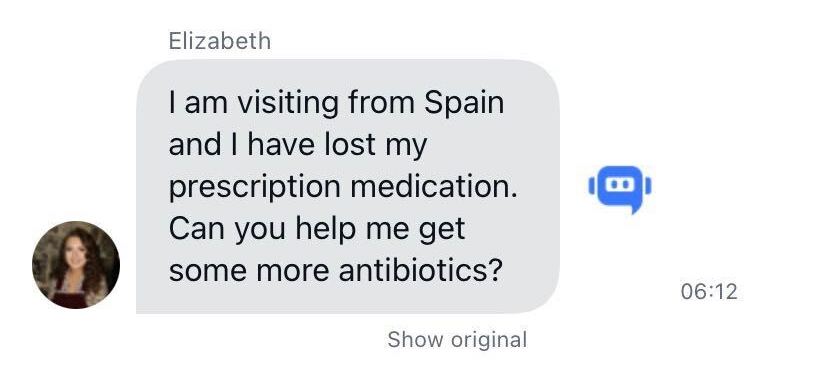
The AI Rephrase library allows you to rephrase a message using different tones so that the user can communicate effectively in different situations.
To use the AI Rephrase feature in your QuickBloxUIKit project, follow these steps:
- Enable the AI Rephrase feature:
QuickBloxUIKit.feature.ai.rephrase.enable = trueIf this option is enabled, the user interface provides a clear option or menu that allows the user to select the desired tone.
[block:image] { "images": [ { "image": [ "https://files.readme.io/05dd773-IMG_1221.jpeg", "", "" ], "align": "center", "sizing": "400px", "border": true } ] } [/block]
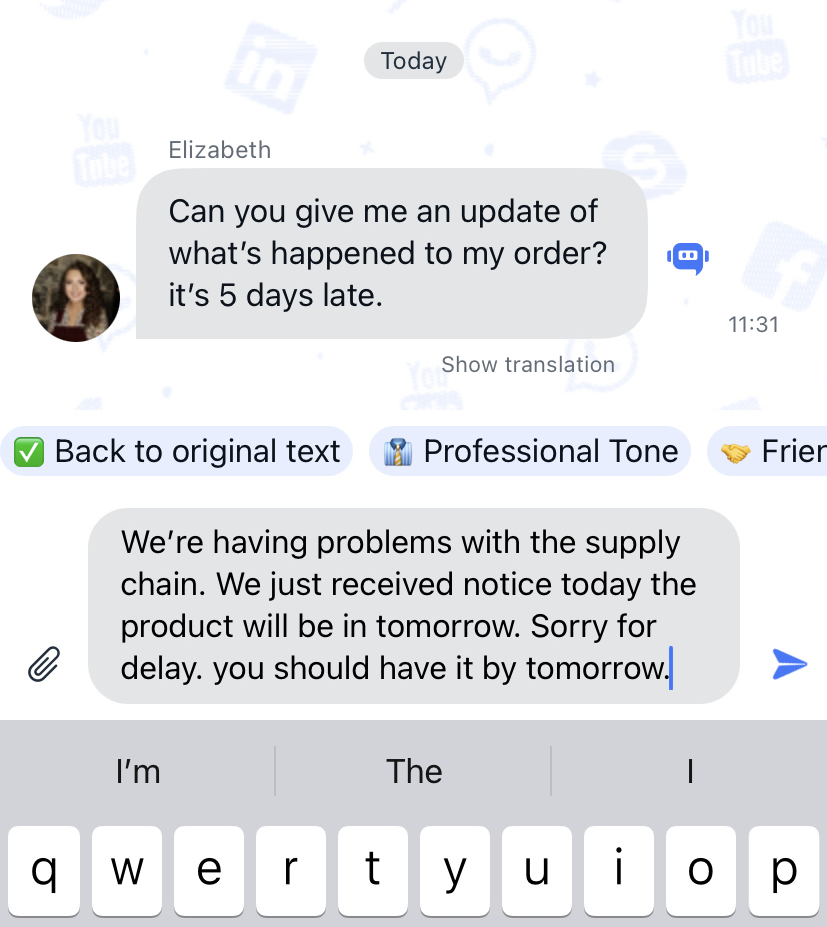
Once a tone is selected, the message is rephrased to reflect the characteristics of the selected tone.
A paraphrased message retains the main purpose of the original message.
[block:image] { "images": [ { "image": [ "https://files.readme.io/14de923-IMG_1222.jpeg", "", "" ], "align": "center", "sizing": "400px", "border": true } ] } [/block]
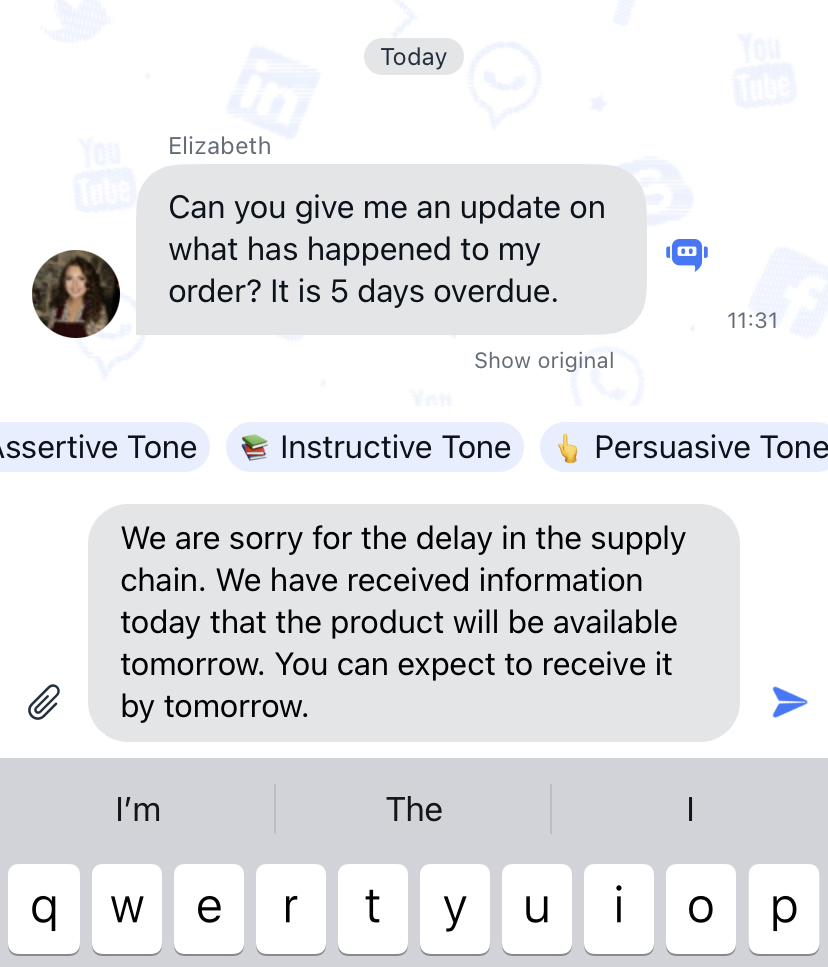
Users have the ability to seamlessly switch between different tones without having to rewrite the original message.
[block:image] { "images": [ { "image": [ "https://files.readme.io/a48525c-IMG_1223.jpeg", "", "" ], "align": "center", "sizing": "400px", "border": true } ] } [/block]
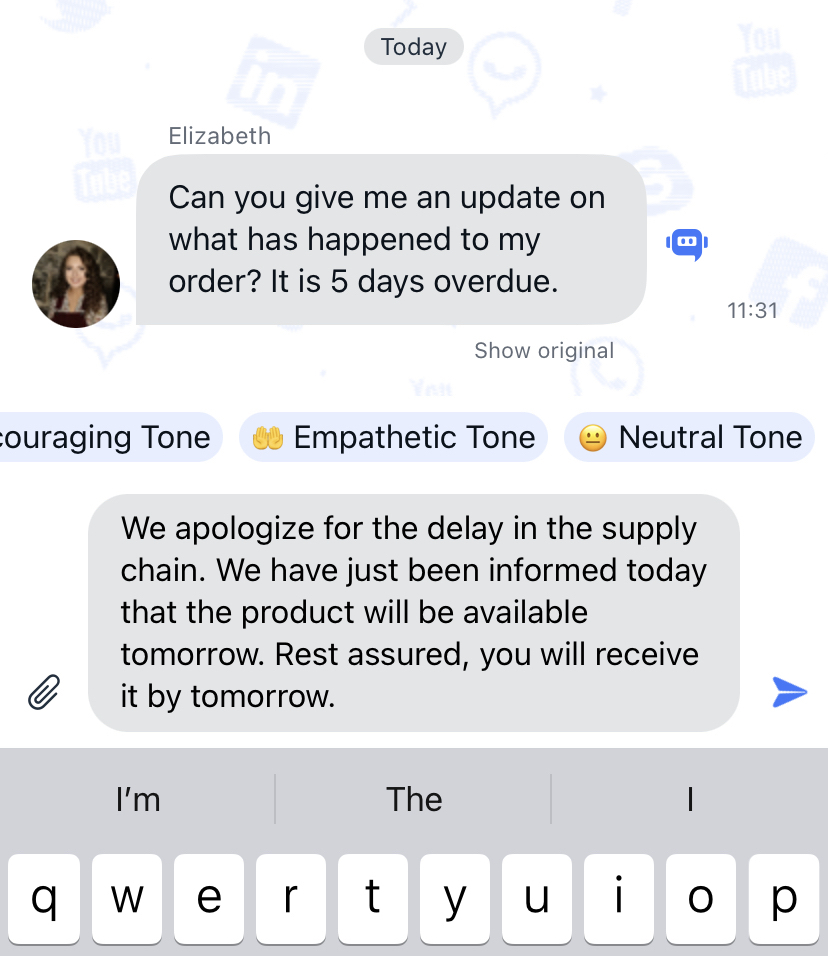
After rephrasing a message, the user is given an easily accessible option to return to the original.
Clicking on this "Back to original" option will instantly restore the message to its original state.
[block:image] { "images": [ { "image": [ "https://files.readme.io/c254562-IMG_1221.jpeg", "", "" ], "align": "center", "sizing": "400px", "border": true } ] } [/block]
-
Set up the AI settings by providing either the OpenAI API key:
QuickBloxUIKit.feature.ai.translate.openAIAPIKey = "YOUR_OPENAI_API_KEY"
Or set up with a proxy server:
QuickBloxUIKit.feature.ai.translate.proxyServerURLPath = "https://your-proxy-server-url"👍 We recommend using a proxy server like the QuickBlox AI Assistant Proxy Server offers significant benefits in terms of security and functionality:
- When making direct requests to the OpenAI API from the client-side, sensitive information like API keys may be exposed. By using a proxy server, the API keys are securely stored on the server-side, reducing the risk of unauthorized access or potential breaches.
- The proxy server can implement access control mechanisms, ensuring that only authenticated and authorized users with valid QuickBlox user tokens can access the OpenAI API. This adds an extra layer of security to the communication.
- A developer using the AI Rephrase library has the ability to add custom ringtones to provide a more personalized experience for users. The developer will be able to define the name and behavior of a custom tone.
let customTone = QBAIRephrase.ToneInfo(name: "Custom Tone", behavior: "Custom behavior", icon: "🦊")
QuickBloxUIKit.feature.ai.rephrase.append(tone: customTone)
Custom tone, if selected, rephrases messages according to the specified behavior.
- A developer using the AI Rephrase library has the ability to remove tones to tailor the user interface for their application.
QuickBloxUIKit.feature.ai.rephrase.remove(tone: QBAIRephrase.ToneInfo.sarcastic)Once removed, the default tone will no longer be available to end users.
Incorporate AI Rephrase into your iOS chat application seamlessly using the QBAIRephrase Swift package. Unlock the potential of AI-driven interactions and provide your users with real-time translation capabilities, enhancing user communication and experience.
For additional resources, explore the QuickBlox AI Assistant Proxy Server and the QBAIRephrase Swift package repositories.
Resources:
- Professional tone: This will allow you to edit messages to sound more formal, using technical language, clear sentence structures, and maintaining a respectful tone. This would avoid colloquial language and ensure appropriate greetings and signatures.
- Friendly Tone: This will allow you to tailor your messages to reflect a casual, friendly tone. It will include casual language, use emoticons, exclamation points and other informal elements to make the message seem more friendly and approachable.
- Encouraging tone: This tone will be useful for motivation and encouragement. It will include positive words, affirmations and express support and faith in the recipient.
- Empathic Tone: This tone will be used to show understanding and empathy. This will require softer language, acknowledgment of feelings, and demonstrations of compassion and support.
- Neutral Tone: For when you want to maintain an even, impartial and objective tone. He will avoid harsh statements and emotional words, preferring clear and direct communication.
- Assertive Tone: This tone is useful for making a clear statement, asserting a position, or in negotiations. He uses direct speech, is confident and does not soften his words.
- Instructive Tone: This tone would be useful for tutorials, guides, or other teaching and learning materials. It is clear, concise and logically guides the reader through the steps or processes.
- Persuasive Tone: This tone can be used when trying to convince someone or to argue your point. He uses persuasive language, strong words and logical reasoning.
- Sarcastic/Ironic Tone: This tone can make the communication more humorous or convey an ironic attitude. It is more difficult to implement because it requires the AI to understand the nuances of the language and may not always be perceived by the reader as intended.
- Poetic Tone: This will add an artistic touch to messages by using figurative language, rhyme, and rhythm to create more expressive text.