- Introduction
- Create new API User to get tokens
- Set permissions and roles
- Install AWS CLI
- Push simple Docker with Flask API to ECR Service
- Code customization
- Running tests
- About
In this repository, it will be explained how simple Docker in ECS with AWS Fargate can be created using Python3 and Boto3 also a new API user using IAM will be created, finally it will be used AWS CLI to push our Docker to ECR, all this explained easiest way using steps points and images. I hope you find it useful.
- AWS Amazon Elastic Container Service (ECS) is a highly scalable, high performance container management service that supports Docker containers and allows you to easily run applications on a managed cluster of Amazon EC2 instances.
- Amazon Fargate is a serverless container execution solution offered to customers who dont want to choose server types, scale clusters, or optimize them. https://docs.aws.amazon.com/AmazonECS/latest/userguide/what-is-fargate.html
- Boto3 is the Amazon Web Services (AWS) Software Development Kit (SDK) for Python3.
- AWS Identity and Access Management (IAM) is a web service that helps you securely control access to AWS resources. You use IAM to control who is authenticated (signed in) and authorized (has permissions) to use resources. ... Instead, adhere to the best practice of using the root user only to create your first IAM user.
- AWS Command Line Interface (AWS CLI) is an open source tool that enables you to interact with AWS services using commands in your command-line shell. With minimal configuration, the AWS CLI enables you to start running commands that implement functionality equivalent to that provided by the browser-based AWS Management Console from the command prompt in your terminal program:
- Amazon Elastic Container Registry (ECR) is a fully managed container registry that makes it easy to store, manage, share, and deploy your container images and artifacts anywhere.
More information
- The region for default us-east-1 will be used in this example.
Click the link https://console.aws.amazon.com/iam/home?region=us-east-1#/users and follow the next steps to create your own API user.
- Step 1
- Step 2
- Step 3 Important: Add all ECS Polices and AmazonEC2ContainerRegistryFullAccess
- Step 4 Finally: Save the Access Key ID and Secret Access Key
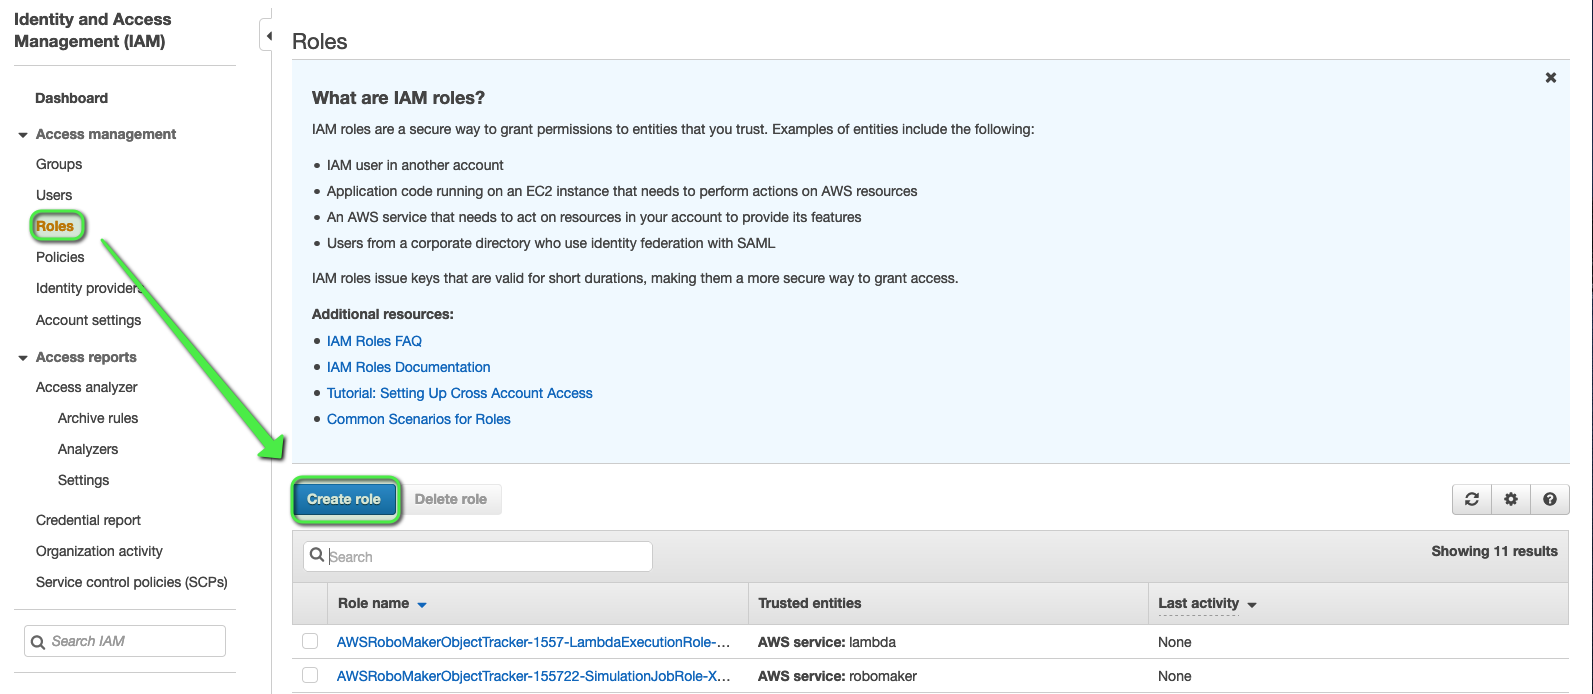
- Step 1 In the same page will be selected Roles
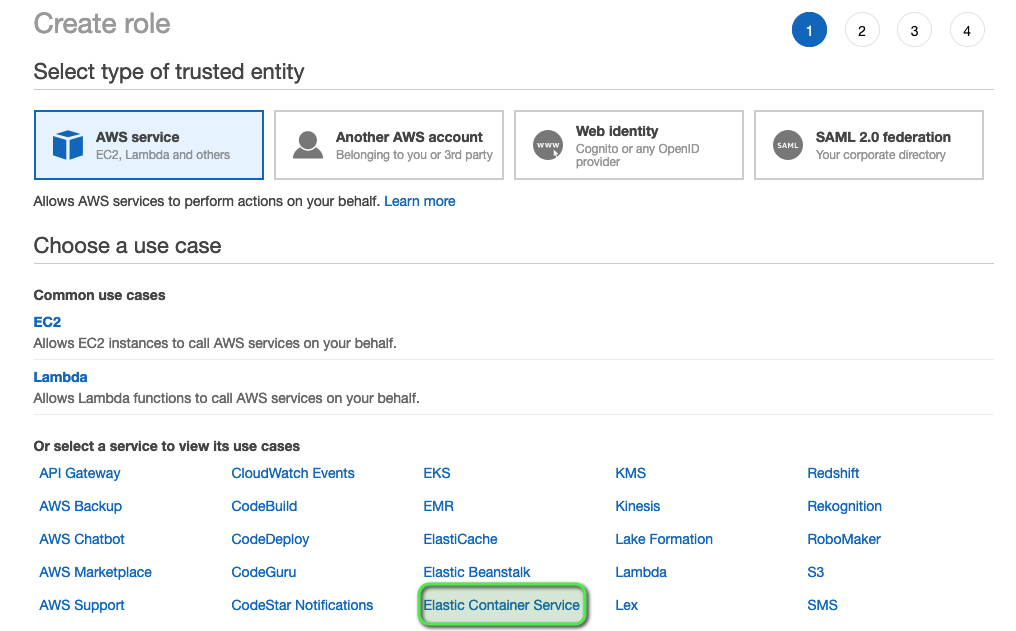
- Step 2
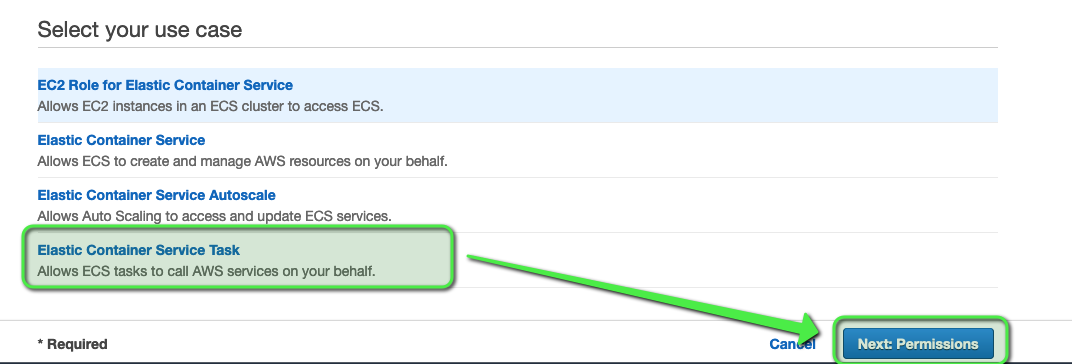
- Step 3
- Step 4
- Step 5 Important: The role name must be called ECSTaskExecutionRole
Click the link https://docs.aws.amazon.com/cli/latest/userguide/install-cliv2.html to install AWS CLI version 2.
After that you can use the command aws configure to configure (follow the steps)
Great, ready to using the AWS CLI with you API User credentials
In this repository a sample docker has been shared that creates a Flask API service on port 80 and it return a simple "OK".
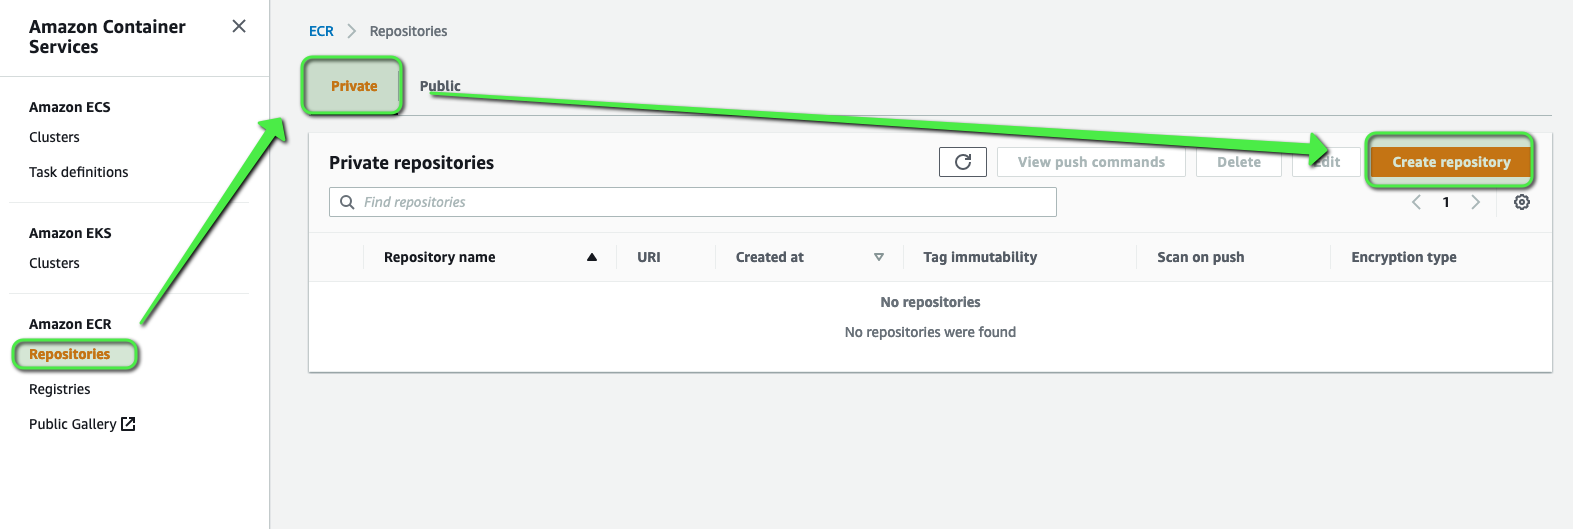
Click the link https://us-east-1.console.aws.amazon.com/ecr/repositories?region=us-east-1 to going to ECR service page
- Step 1
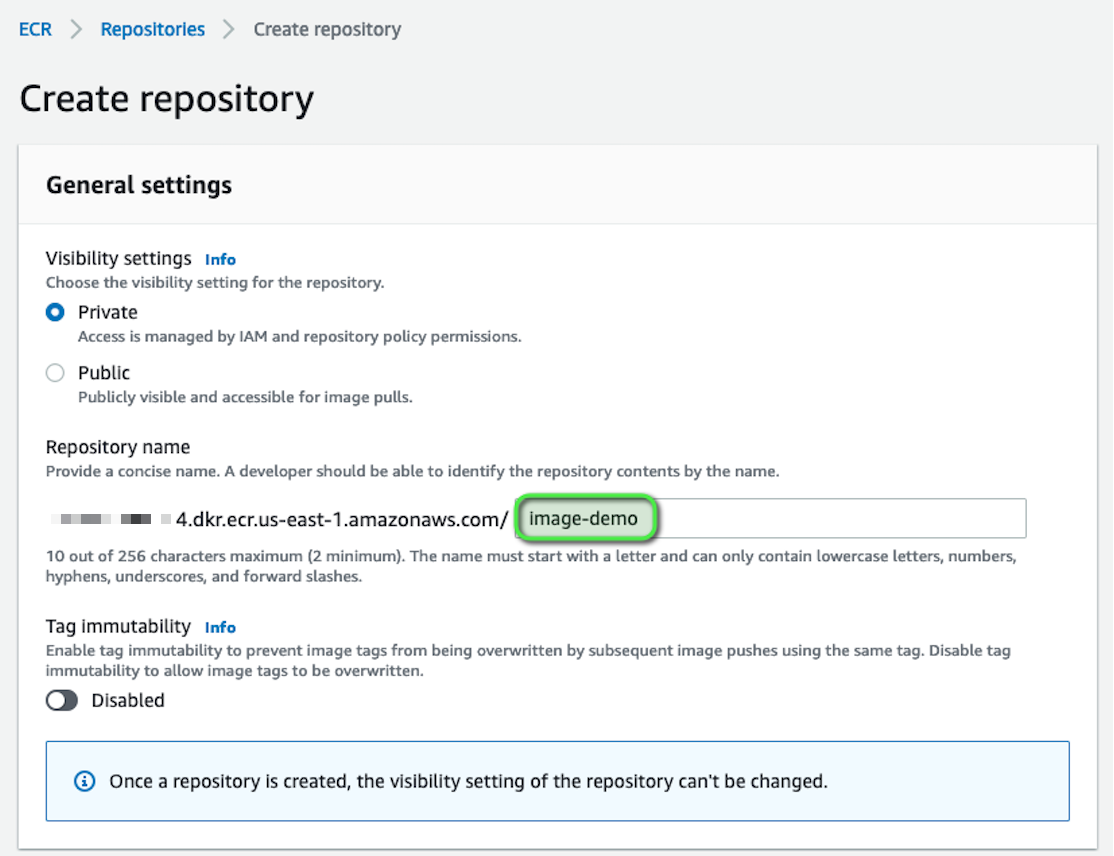
- Step 2 For this example it will be leaved all the default values, just add the Repository name
- Step 3
- Step 4
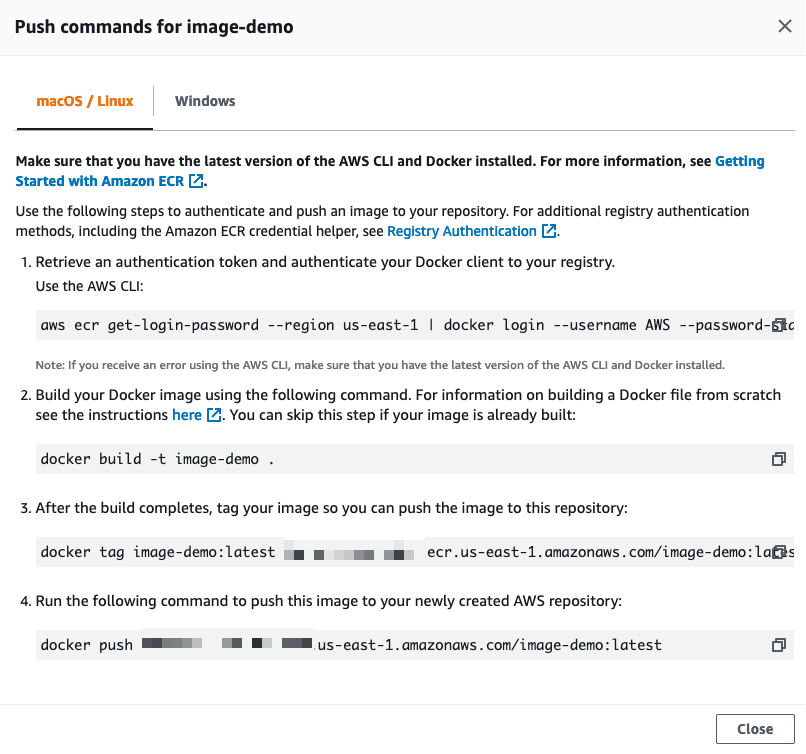
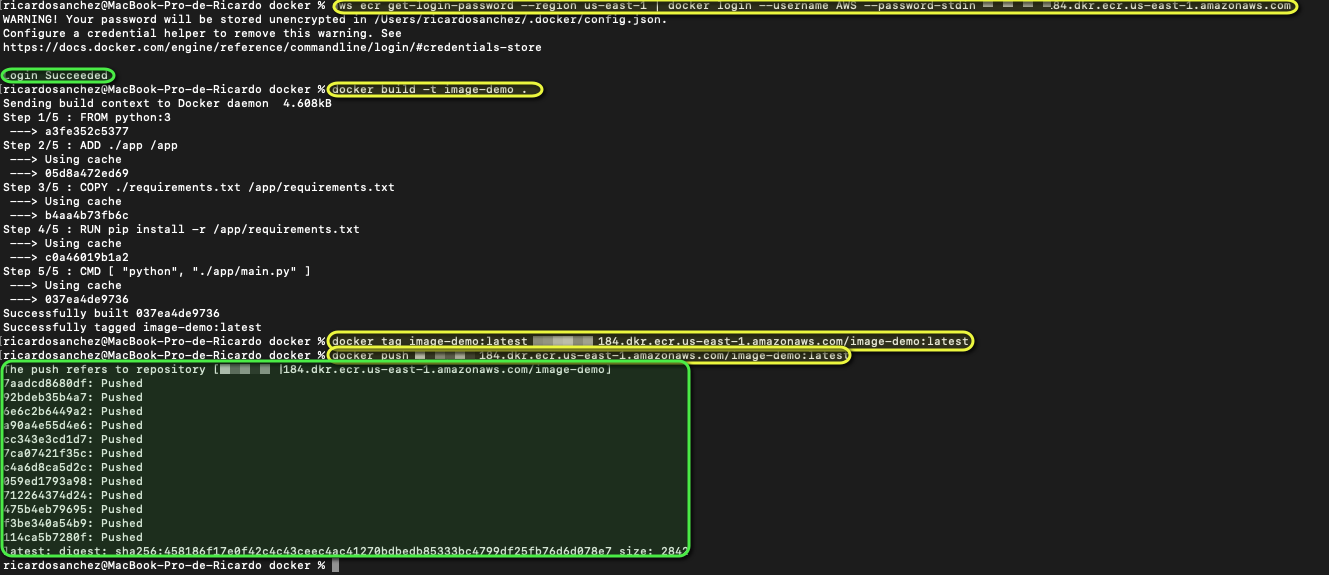
- Step 5 Execute this commands one by one from Docker repository folder
- Step 6 If everything works fine we will have our Docker into AWS ECR service
- Step 7 Don't forget copy and save the Image URI, example: XXXXXXXXXXXXX.dkr.ecr.us-east-1.amazonaws.com/image-demo:latest
If you want optimize the RAM or CPU you can change it inside code:
Supported task CPU and memory values for Fargate tasks are as follows:
| CPU value | Memory value (MiB) |
|---|---|
| 256 (.25 vCPU) | 512 (0.5GB), 1024 (1GB), 2048 (2GB) |
| 512 (.5 vCPU) | 1024 (1GB), 2048 (2GB), 3072 (3GB), 4096 (4GB) |
| 1024 (1 vCPU) | 2048 (2GB), 3072 (3GB), 4096 (4GB), 5120 (5GB), 6144 (6GB), 7168 (7GB), 8192 (8GB) |
| 2048 (2 vCPU) | Between 4096 (4GB) and 16384 (16GB) in increments of 1024 (1GB) |
| 4096 (4 vCPU) | Between 8192 (8GB) and 30720 (30GB) in increments of 1024 (1GB) |
*Show the pricing https://aws.amazon.com/fargate/pricing/?nc1=h_ls
You must change the parametres values accessKey, secretKey and image for yours.
Also change subnets and securityGroups with anyone from your VPC.
-
Step 1 Run
pip3 install -r requirements.txtto install boto3. -
Step 2 Run
ecs.pywith Python3
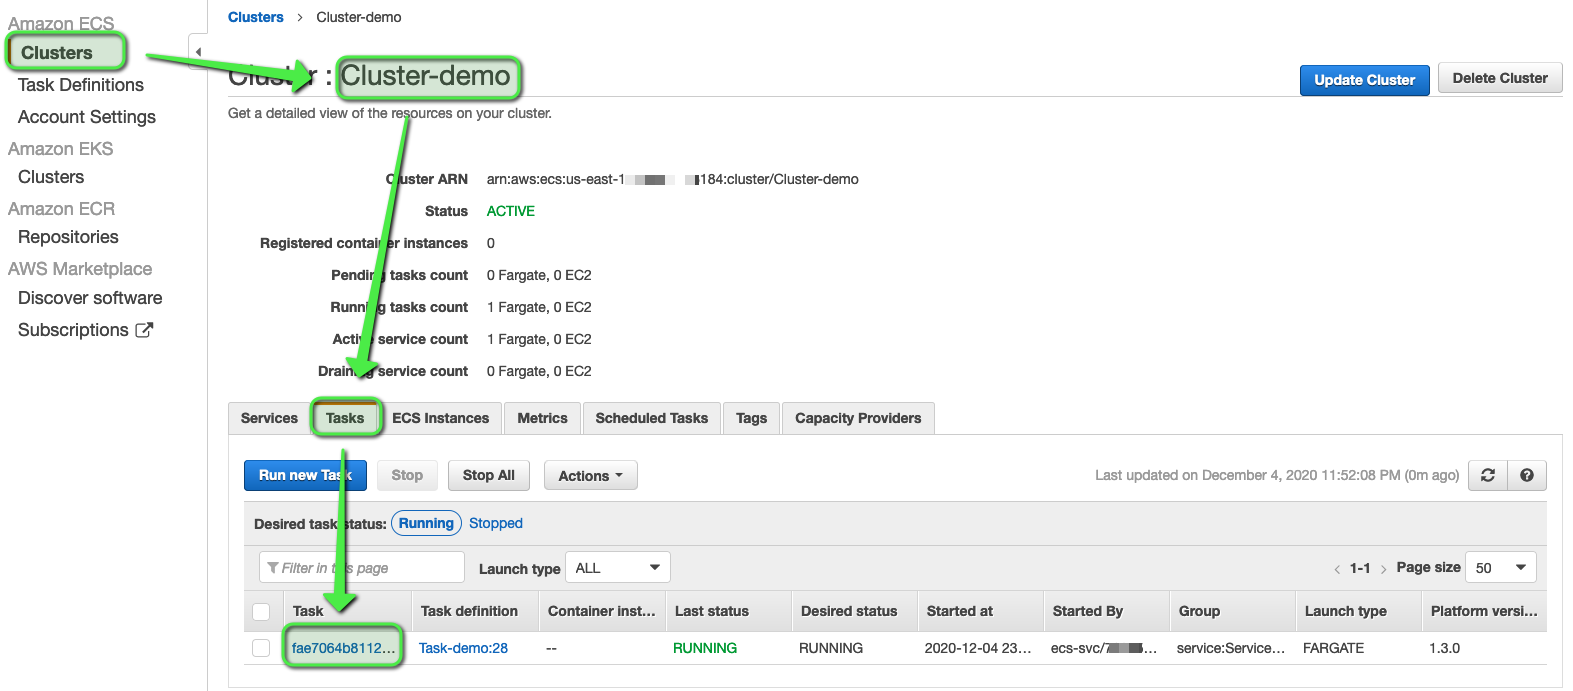
- Step 3 Click the link https://us-east-1.console.aws.amazon.com/ecs/home?region=us-east-1#/clusters to go your cluster and get task information
- Step 4 The task information shows us the Docker public IP
- Step 5 Go to that IP in your browser to check if the Docker is running well
Ricardo Sánchez
Copyright © 2020, Ricardo Sánchez. Released under the MIT license.


