Personal assistants in Discord that will help make your guild a better place.


Add App · Switch Languages · Status · Improve Translation · Rate It
Your best personal assistants will help your guild look more lively. She can do so many things that you can easily see detailed information on all commands by typing /help.
- Worked on Discord.js v14
- Easy to read, easy to use and highly effective
- You can customize many things you want
- Contains all commands including 100+ available subcommands
- Can play music both from YouTube, Spotify, SoundCloud and 900+ more Website along with an automatic music playback system
- Supports multiple languages. You can check the supported languages from the Language File of this repository.
- Tier system (Level and experience)
- Support for customizing server notifications
- You can talk by typing
@Shiorufollowed by the message you want to communicate - Supports working on Shards or supports working in various guilds
- You can use application commands (
/) - Simulate the database system for testing.
And many other interesting features...
- Node.js v18.0.0 or higher
- Firebase Tools (requires Java v11.0.0 or higher)
- Build Tools (requires Python v3.12.0 or higher)
- FFmpeg
- Git
Install Build tools by running the following command according to your operating system.
-
For Linux and MacOS operating systems
sudo apt update
sudo apt install build-essential
-
For Windows operating system
npm install --global --production --add-python-to-path windows-build-tools
Tip
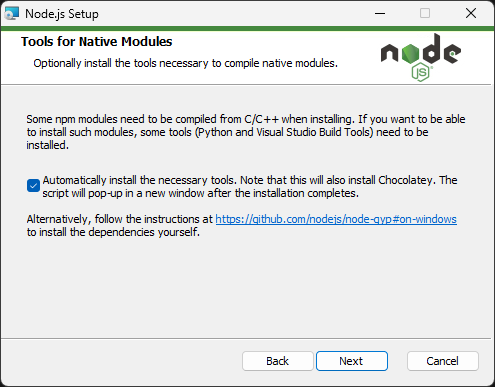
You can skip this step by checking the Automatically install the necessary tools option through the Node.js installer as shown in the following image.
- Launch a terminal and run the following command.
git clone https://github.com/Maseshi/Shioru.git cd Shioru npm install - Change the file name
.env.exampleto.envand enter all required values.
Note
You can edit some data in config at ./source/configs/data.js.
- Go to Discord Developer Portal
- Click "New Application" and name your bot and accept the Discord policy rules.
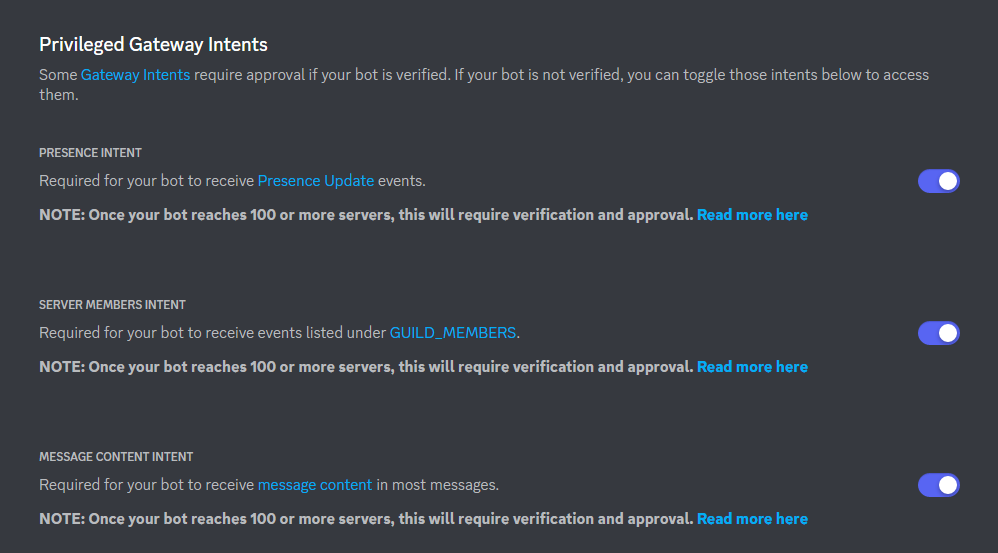
- Go to the "Bot" page and enable all options in the Privileged Gateway Intent section.
- Invite your bot to the server by going to the OAuth2 > URL Generator page, selecting
botandapplications.commands, selectingAdministrator, then copy the link and paste it in the browser address bar. Your sir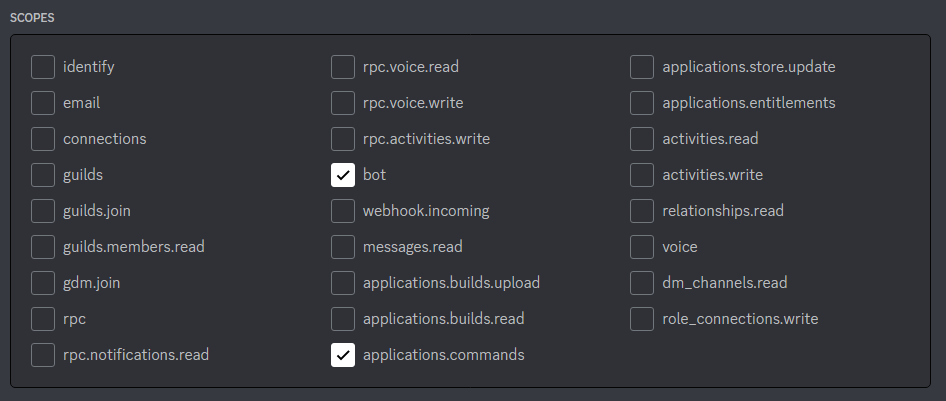
- Go to https://firebase.google.com/ and start setting up the project.
- Add a new project and follow the steps.
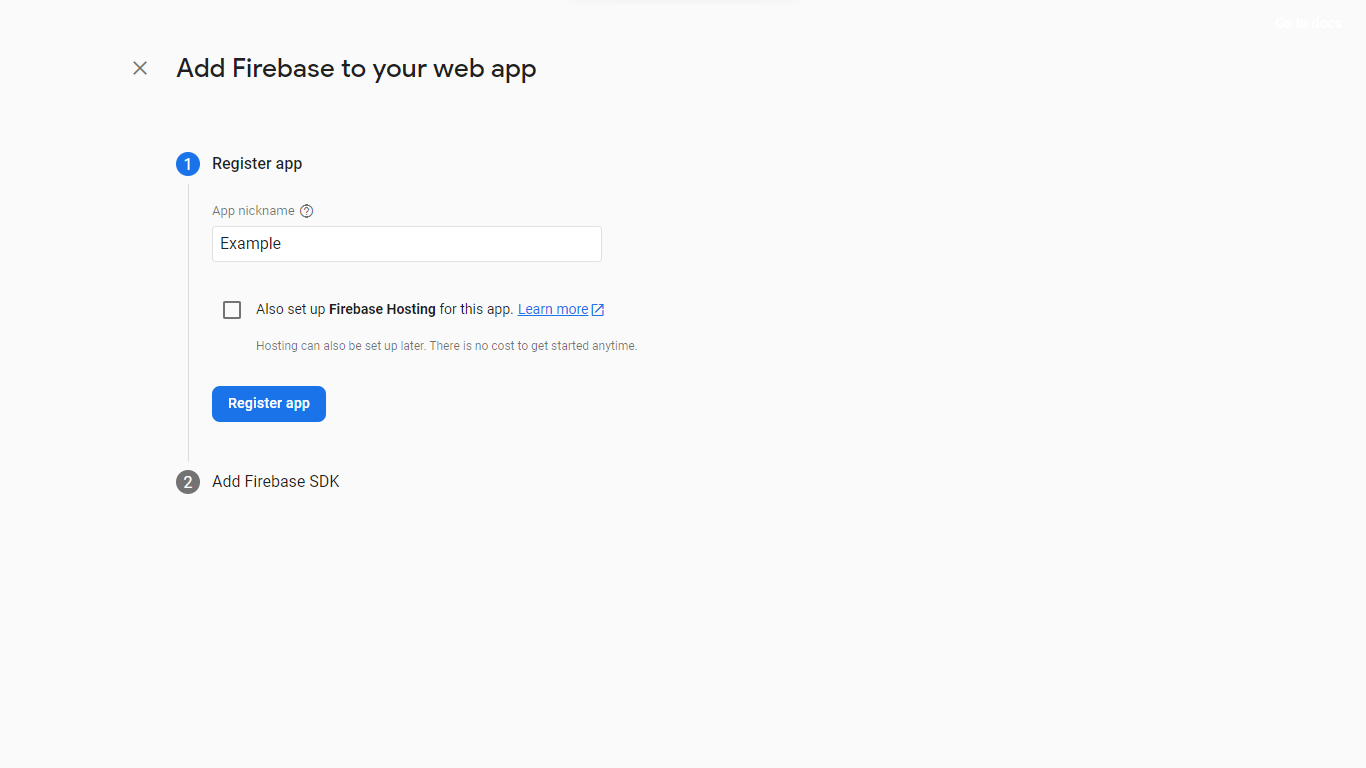
- Add your first application with Website Name your app without needing to select the "Also set up Firebase Hosting for this app." option and register the app.
- Firebase will provide you with information about its configuration. Apply these values to the file.
.env - Go to Build > Realtime Database to create a database for storing data.
There are several options available. If you are using Visual Studio Code, you can choose your method directly via the Run and Debug tab (Ctrl + Shift + D). For other operations, see Tasks (Ctrl + Shift + B and Ctrl + Shift + P type >Tasks: Run Task)
- Open a terminal and run the command
npm run dev.
Test the actual use by performing tasks similar to real use. The system will automatically calculate the split of the work fraction according to the number of guilds.
- Open the terminal and add all the necessary environmental variables.
- For Windows, use commands
set variable=example - For Linux or MacOS, use the command
export variable=example
- For Windows, use commands
- Run the command
npm run serve.
Note
You will enter automatic development mode because it is a real use. All data will not be recorded.
For actual use, the prepared command or set of commands can be used normally as follows:
-
On Linux or MacOS
sh start.sh || sudo sh start.sh

# or

npm start
-
On Windows
./start.bat

@REM or

npm start
This operation requires Docker
- Open the terminal and add all the necessary environmental variables.
- For Windows, use commands
set variable=example - For Linux or MacOS, use the command
export variable=example
- For Windows, use commands
- Create an image using the command
npm run docker:buildornpm run docker:build:servefor the serve mode and wait until the process is finished. - After creating the images successfully, run by using the command
npm run docker:buildornpm run docker:build:servefor the serve mode.
Learn more about commands Docker
-
gyp ERR! stack Error: not found: makeThis problem may be caused by Build tools being installed incorrectly or may not have been installed yet. This problem can be solved by looking at the installation section.
You can help us translate existing languages or languages that are not currently available on Crowdin.
If you encounter any problems from your current job You can let us know through the tab. issue of this repository.