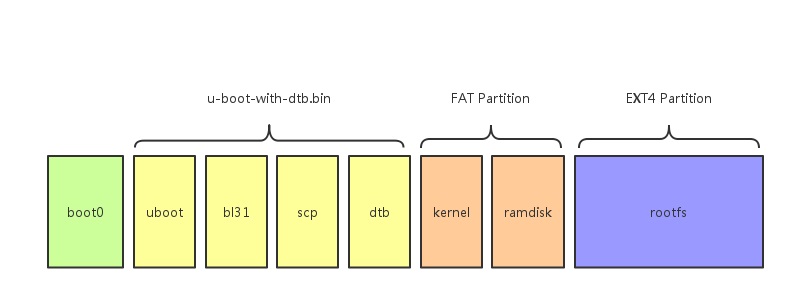
###A64的镜像分区示意图
boot0.bin:是由全志提供的,没有开源
uboot由四个组成部分,其中scp.bin是由全志提供的。bl31.bin由于从https://github.com/apritzel/arm-trusted-firmware.git
编译出来的镜像不能启动板子,所以现在用的是A64 BSP里的bl31.bin。dtb文件是用dtc编译DTS板级文件得到的,
DTS则是从BSP固件用fdtdump反编译出来的。
kernel的话有两种选择,一种是mainline kernel,版本是4.6以上,这个kernel会缺少lcd、camera等驱动; 另一种是BSP kernel,驱动都比较齐全,版本是3.10。
ramdisk是用busybox制作的,主要用来挂载rootfs并且执行位于rootfs下的/sbin/init程序
kernel和ramdisk都以文件的形式放置在FAT分区内,同时放在FAT分区内的还有dtb文件 (注意,dtb是uboot和kernel都会用到的,所以一个合并到uboot里,另一个放置于FAT分区内方便修改)
rootfs:这里主要是ubuntu或者debian的系统文件,以ext4分区的形式存在
###A64镜像各部分分步编译
虽然最后会有脚本一键完成各个镜像的编译,这里还是要分步解释一下各个编译步骤:
- uboot的编译
首先是需要安装gcc-arm-linux-gnueabihf
sudo apt-get install gcc-arm-linux-gnueabihf
然后执行下面命令
git clone --depth 1 --branch pine64-hacks --single-branch https://github.com/longsleep/u-boot-pine64.git u-boot-pine64

cd u-boot-pine64
make ARCH=arm CROSS_COMPILE=arm-linux-gnueabihf- sun50iw1p1_config
make ARCH=arm CROSS_COMPILE=arm-linux-gnueabihf-
- bl31.bin的编译
这一步不是必须的,因为github上的ARM Trust Firmware在Pine A64上还有点问题
首先是需要安装gcc-aarch64-linux-gnu,推荐用5.2以上的版本
sudo apt-get install gcc-aarch64-linux-gnu
然后执行以下命令
git clone --depth 1 --branch allwinner --single-branch https://github.com/apritzel/arm-trusted-firmware.git arm-trusted-firmware-pine64

cd arm-trusted-firmware-pine64
make clean
make ARCH=arm CROSS_COMPILE=aarch64-linux-gnu- PLAT=sun50iw1p1 bl31
- 安装全志打包工具
这里安装用来把uboot.bin、bl31.bin、scp.bin、dtb打包成u-boot-with-dtb.bin的工具
git clone https://github.com/longsleep/sunxi-pack-tools.git sunxi-pack-tools
make -C sunxi-pack-tools
- kernel的编译
BSP kernel的编译
git clone --depth 1 --branch pine64-hacks-1.2 --single-branch https://github.com/longsleep/linux-pine64.git linux-pine64

cd linux-pine64
make ARCH=arm64 CROSS_COMPILE=aarch64-linux-gnu- sun50iw1p1smp_linux_defconfig
make ARCH=arm64 CROSS_COMPILE=aarch64-linux-gnu- LOCALVERSION= clean
make ARCH=arm64 CROSS_COMPILE=aarch64-linux-gnu- -j4 LOCALVERSION= Image
make ARCH=arm64 CROSS_COMPILE=aarch64-linux-gnu- -j4 LOCALVERSION= modules

cd modules/gpu
LICHEE_KDIR=$(pwd)/../..
LICHEE_PLATFORM=Pine64
make build
Mainline kernel的编译
git clone --depth 1 --branch a64-v4 --single-branch https://github.com/apritzel/linux.git linux-a64

cd linux-pine64
make ARCH=arm64 CROSS_COMPILE=aarch64-linux-gnu- defconfig
make ARCH=arm64 CROSS_COMPILE=aarch64-linux-gnu- clean
make ARCH=arm64 CROSS_COMPILE=aarch64-linux-gnu- -j4 Image
make ARCH=arm64 CROSS_COMPILE=aarch64-linux-gnu- -j4 modules
make ARCH=arm64 CROSS_COMPILE=aarch64-linux-gnu- -j4 dtbs
- busybox的编译
git clone --depth 1 --branch 1_24_stable --single-branch git://git.busybox.net/busybox busybox

cd busybox
make ARCH=arm64 CROSS_COMPILE=aarch64-linux-gnu- -j4 oldconfig
make ARCH=arm64 CROSS_COMPILE=aarch64-linux-gnu- -j4
- rootfs的制作
下面以debian 8.0为例,记录rootfs的制作。主要使用的命令就是debootstrap
a) 安装debootstrap
注意,推荐安装1.0.78或者以上版本的debootstrap。因为要确保/usr/share/debootstrap/scripts/
目录下有比较新的debian或者ubuntu系统的安装脚本
apt-get install debootstrap
debootstrap的安装rootfs分为两个phase,phase-1是在host上下载必要的文件, phase-2则是chroot到rootfs里之后,用qemu来模拟执行target系统里的一些命令来做必要的配置, 或者安装所需的包
phase-1:
targetdir=rootfs

#jessie是debian 8.0的代号,同理如果想装ubuntu 16.06,这里设置成xenial即可
distro=jessie
mkdir $targetdir

#pine A64是arm64指令集架构的soc

sudo debootstrap --arch=arm64 --foreign $distro $targetdir

#拷贝用于模拟执行target系统程序的qemu程序,给chroot用
sudo cp /usr/bin/qemu-aarch64-static $targetdir/usr/bin/
sudo cp /etc/resolv.conf $targetdir/etc
sudo chroot $targetdir
phase-2:
#chroot到target系统后,在host里的环境变量没了,这里重新设置一下
distro=jessie
export LANG=C
/debootstrap/debootstrap --second-stage


#这里更新一下源
cat <<EOT > /etc/apt/sources.list
deb http://ftp.uk.debian.org/debian $distro main contrib non-free
deb-src http://ftp.uk.debian.org/debian $distro main contrib non-free
deb http://ftp.uk.debian.org/debian $distro-updates main contrib non-free
deb-src http://ftp.uk.debian.org/debian $distro-updates main contrib non-free<
deb http://security.debian.org/debian-security $distro/updates main contrib non-free
deb-src http://security.debian.org/debian-security $distro/updates main contrib non-free

EOT

apt-get update


#重新配置locale
apt-get install locales dialog sudo
dpkg-reconfigure locales

#设置sudo sticky属性,和man文件夹用户组
chmod u+s /usr/bin/sudo
chown -R man /var/cache/man

#这里安装一些需要的包,比如ssh server,这样刷机后,就可以远程登陆板子了
apt-get install openssh-server ntpdate

#设置一下root用户密码
passwd

#这里设置一下串口控制台
echo T0:2345:respawn:/sbin/getty -L ttyS0 -a root 115200 vt100 >> /etc/inittab
###使用脚本进行源码下载编译和镜像生成
- 下载源码
./download_source.sh
- 编译源码
./compile_source.sh
- 生成rootfs(这个只需要执行一次,完成后基本就不需要再重新生成了)
#再rootfs_base目录下debootstrap一个新debian系统,并对它进行配置
./make_rootfs.sh rootfs_base

#安装内核头文件到rootfs
./install_kernel_headers.sh rootfs_base

#安装内核模块到rootfs
./install_kernel_modules.sh rootfs_base
- 生成镜像
./make_image.sh test.img 2048
###挂载已有的镜像,并对个别文件进行更新
每次重新生成镜像的时间会比较久,如果只是相对单个文件进行更新, 只需要挂载已有镜像的rootfs分区,再更新就可以了
挂载已有镜像的rootfs分区
mkdir rootfs_tmp1
sudo losetup /dev/loop0 $1 -o $((143360 * 512))
sudo mount /dev/loop0 rootfs
对个别文件更新完毕,卸载挂载的分区
sudo umount rootfs
sudo losetup -d /dev/loop0
###刷写镜像
用Win32DiskImager这个工具即可
