The idea behind this project was to create an additive synthesizer in which the user has full control, in terms of amplitude and frequency, over all the sinusoidal waves that make up the sound. The user can play some notes on the keyboard and visualize, in a graphic way, amplitude and frequancy values of every harmonic.
If you have a MIDI keyboard, connect it to your PC using a MIDI interface. Otherwise, you can play using your PC keyboard.
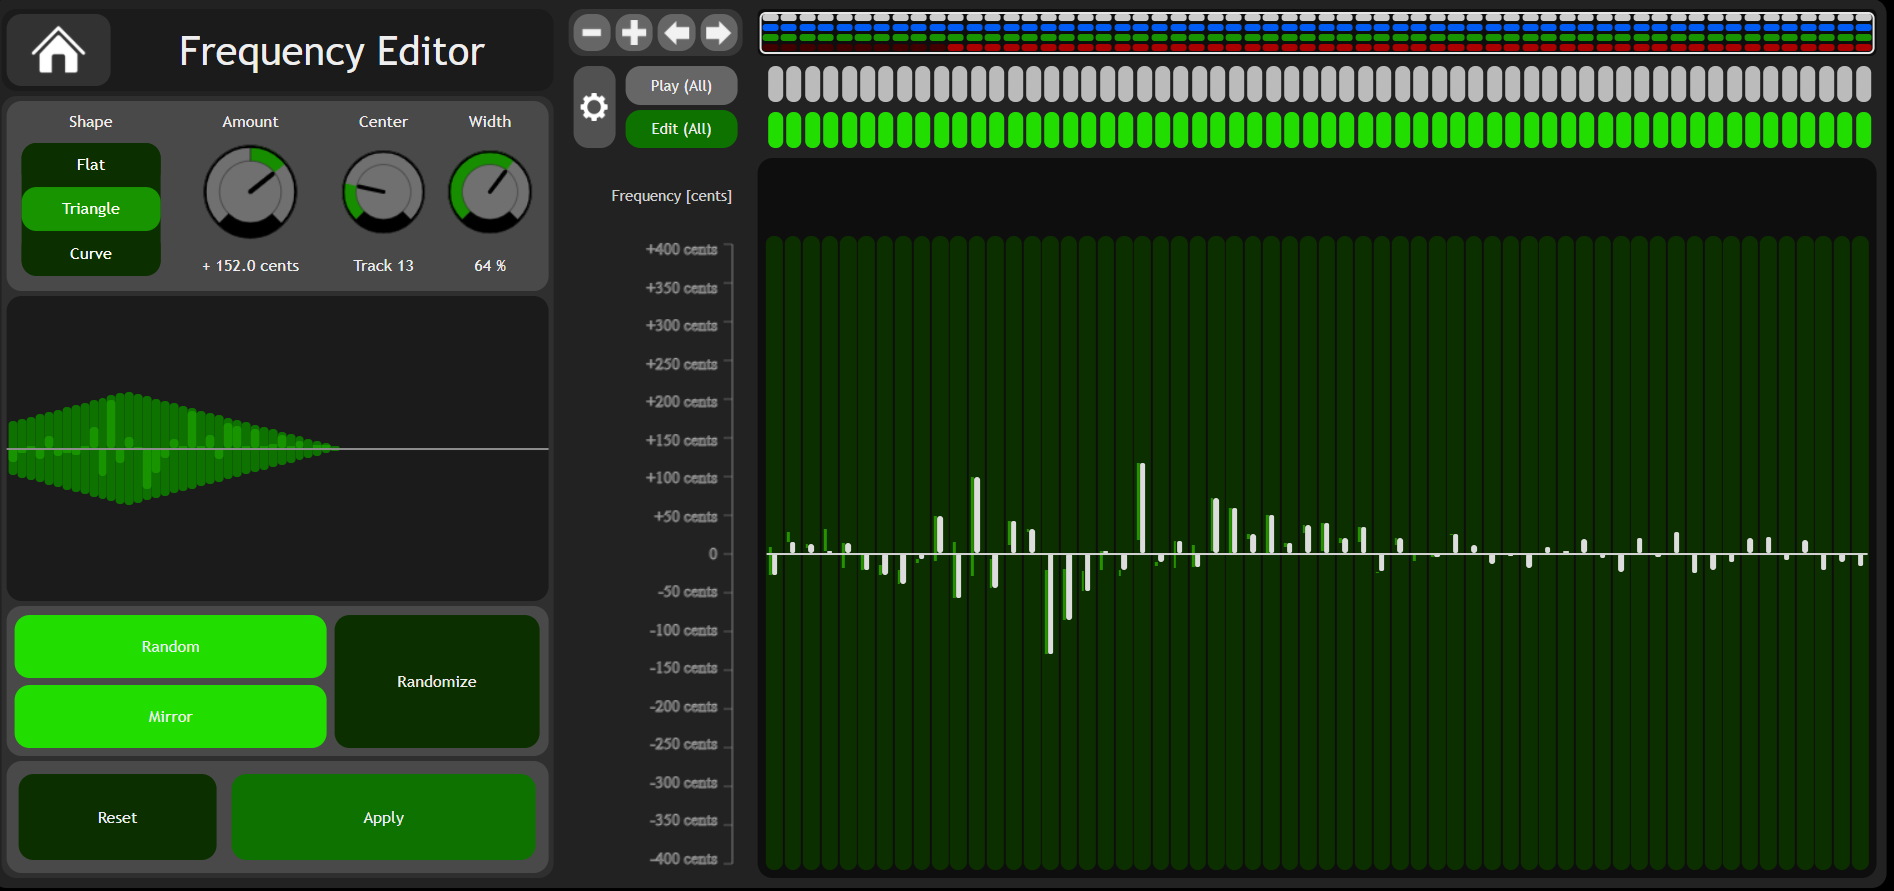
In the right part of the screen, the columns represent the sinusoidal overtones (here called tracks). Track 0 (on the left) is the fundamental frequency, track 1 is the first harmonic, track 2 is the second, and so on.
The section coloured in blue is related to the amplitude (in dB).
The green section is about frequency. If all the tracks are set to 0, they are at exact multiples of the fundamental frequency. The interval between the exact multiple and the actual frequency is measured in cents of semitone (eg. "+100 cents" means 1 semitone above).

- Drag the mouse on the tracks to change amplitude and frequency values.
- Hold CTRL while dragging the mouse to have more precision.
- Zoom in and out using the controls at the top or the mouse wheel. When you zoom in, at a certain level, you can see the track numbers, as well as amplitude and frequency values.
There are some buttons above amplitude visualizer:
- Play buttons (coloured in grey)
- Edit buttons (visible only in editors)

If you click on Play (All) you can toggle playback (mute and unmute) every track. Click on the single buttons to do it independently for each track or drag the mouse to toggle multiple tracks at the same time.
Clicking on the  button, some options are available.
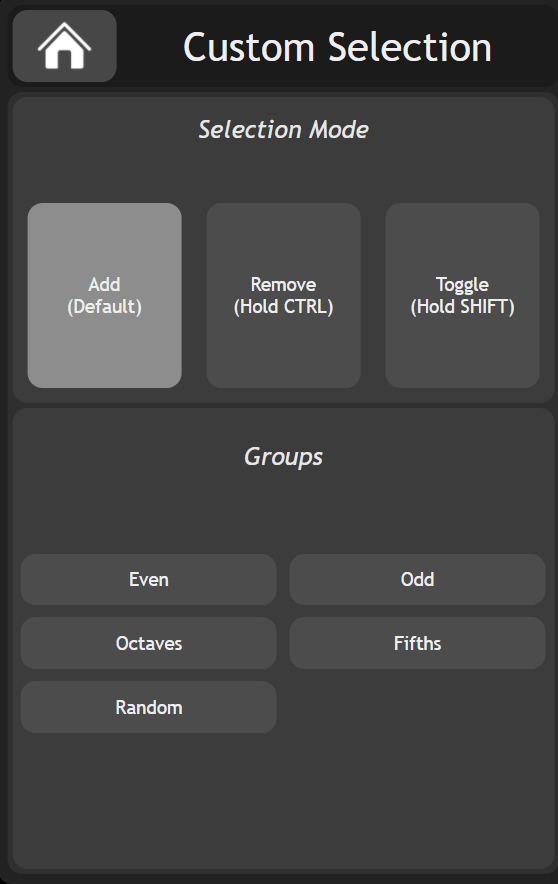
The Selection Mode changes the behaviour of the buttons:
- Add: default, adds elements (if all tracks are selected, it removes every track from selection)
- Remove: removes elements (hold CTRL)
- Toggle: toggles elements (hold SHIFT)
Groups are predefined groups of tracks (for example the ones with even/odd track number, or those with the same note as the fundamental).
While a group is selected you can select only the tracks that belong to that group.
Note: if a single button is clicked, it will always toggle from the previous value. Instead, selection mode and groups options work with the 'Play (All)' and 'Edit (All)' buttons or by selecting multiple tracks dragging the mouse.
In this section you can change the amplitude of multiple tracks at the same time, adding or subtracting a specific amount. You can choose the tracks you want to edit by using the edit buttons above the visualizer (the same as for playback). You can give a shape to the tracks, choosing between:
- Flat: all tracks with the same amount
- Triangle: a sort of bandpass filter. Use the Center and Width knobs to control the triangle's position and shape
- Curve: same as triangle, but with a gaussian shape
In the graph you can visualize the amplitude amount for every track. The blue lines that appear in the visualizer resemble these amounts.
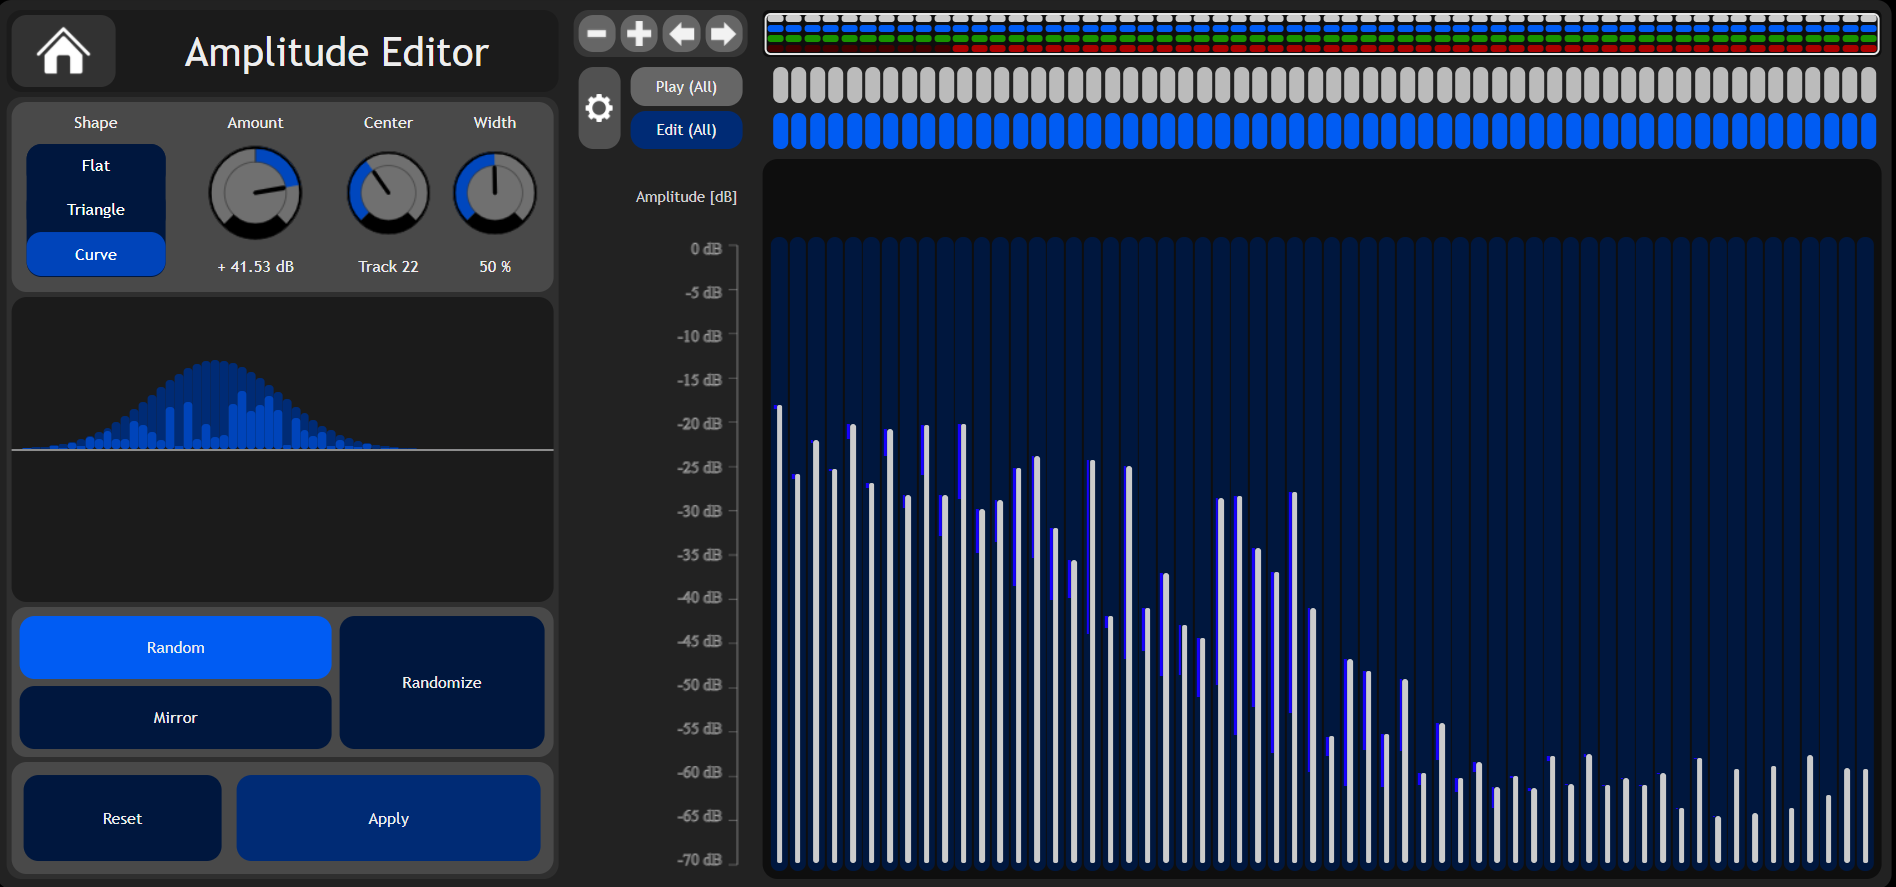
- When the Random option is turned on, every amount is scaled by a random factor in range (0, 1)
- The Mirror option enables negative factors, in range (-1, 1). You can change all the random factors by clicking on Randomize
- After clicking on Apply, changes are saves and you can do other editing
- Click on Reset to set all amplitudes to default
This has the exact same structure as the amplitude editor. Here, instead, you can change the frequencies.
The Chroma editor allows to change amplitudes and frequencies in a particular way.
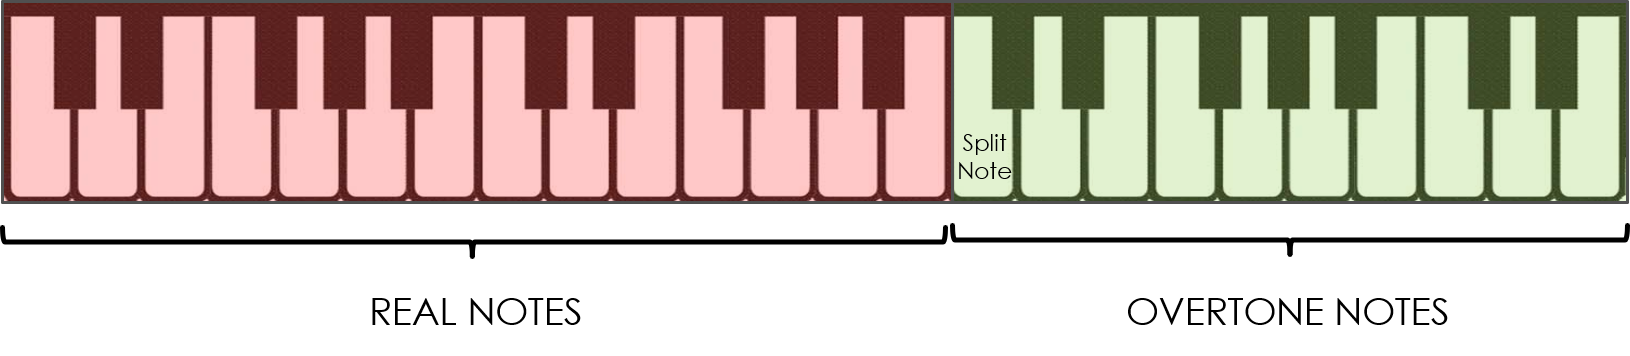
On a MIDI keyboard, you should play both keys below and above a split note (a specific note that you can change in the settings). The keys below the split note are the real notes you are playing, while keys above the split note (we will call them overtone notes) change the overtones' amplitude and frequency of the real notes.
For each overtone (track) of the real note, it is computed the interval (in cents) from its frequency to the closest overtone note frequency.
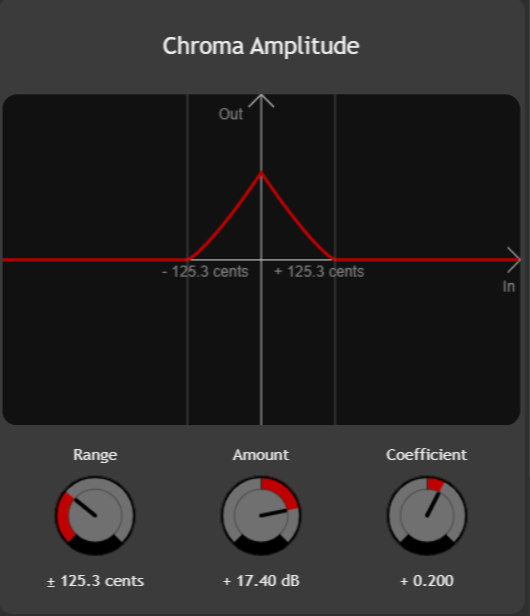
Example: you play a note on the keyboard and track 20 turns out to have frequency 886Hz, which is slightly higher than an A note on the scale. At the same time, you play a G on the overtone notes. So, the closest G to 886Hz is about 784Hz. The interval between the two, in this case, would be around 211 cents. This value is the input of Chroma editors (on the x axis in both graphs).
On the PC keyboard, real notes are in the lower half of the keyboard (from Z to M), while overtone notes are in the upper part (from Q to P).
-
The y axis of the graph represents the amount in dB to add or subtract from the current amplitude
-
The maximum amplitude can be set using the Amount knob: positive amount values enhance frequencies closer to the overtone notes, while negative values attenuate them
-
Use the Range knob to expand or shrink the maximum interval (in cents) in which to act
-
The Coefficient knob changes the shape of the function
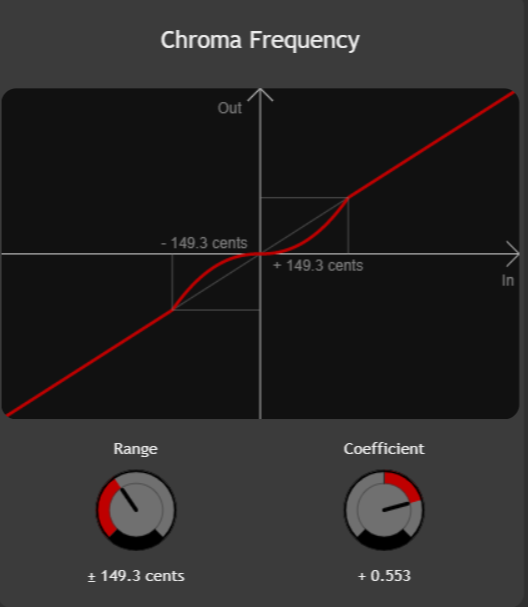
- Here, the y axis represents the new (modified) frequency of a track
- The Range knob, as before, expands or shrinks the maximum interval
- Coefficient knob changes the shape of the function. Positive coefficient values make the frequencies approach the overtone notes, negative ones do the opposite, making the interval larger.
Note: the computation of frequency happens before the amplitude, so, the input of Chroma amplitude is the output of Chroma frequency. In other words, we first compute the new frequency, then we use it to compute the new amplitude.
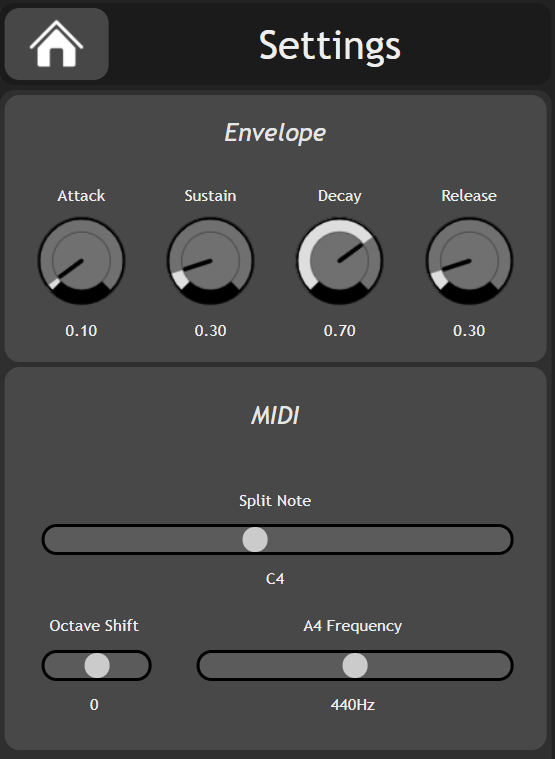
You can choose some parameters for sound output
-
ADSR Envelope (Attack, decay, sustain and release)
-
Split note (where to split the keyboard between real notes and overtone notes)
-
Octave shift (shift by octaves the sound output)
-
A4 frequency (default: 440 Hz)