


Using ROS, image processing, motion-planning, and trajectory solving, we built a system which takes an image with camera and transforms it into trajectories which allow the Sawyer robot to draw it on a surface after calibration and localization are performed.
The demo program has three stages in series:
-
Take a photo using the USB camera and process the image. Transfer the image to 2D drawing trajectory.
-
Drive the robot to perceive all the four AR tags at a high position and then come closer to see each of them through the hand camera. Localize the target drawing surface through the location of the tags.
-
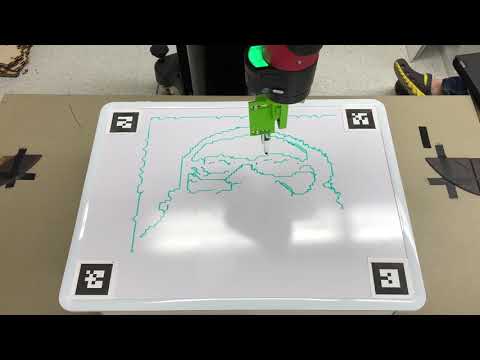
Drawing the edgemap of the face on the board.
This goal of this project is to take a photo of a person and draw his face with a marker using Sawyer robot.
-
The initial image is taken from a USB camera. Then, we apply the Haar Cascade Classifiers in OpenCV to detect and crop the face image. After resizing the face image, the Canny edge detector is used to extract the edgemap of the face which is then passed to trajectory planning. The image is transformed with CV Bridge between ROS and OpenCV.
-
The location of the drawing surface is detected using AR tags with the hand camera of Sawyer. Through localizing the AR tags at the four corners, the position, orientation and size of the white board are determined.
-
Due to the bad quality of the Sawyer hand camera, the AR tags cannot be accurately localized from a long distance. Thus, the robot hand has to move closely to each of the four AR tags and record the positions separately.
-
The coordinates of the Sawyer tf tree and AR tags, as well as the image of the Sawyer hand camera are visualized in rviz.
-
We apply a Depth-First Search together with eage following algorithm to transfer a edgemap into a series of Cartesian points. Using DFS enables us to achieve consistent line-following while simultaneously minimizing the number of times we need to lift the end-effector.
-
The break points between each edge segment are represented by (-1,-1)
-
IK solver: We use the function "IKinSpace" in "modern_robotics" library to solve any inverse kinematics during drawing step. The Jacobian matrix and home configuration are derived from the specification of the Sawyer robot. (http://mfg.rethinkrobotics.com/intera/Sawyer_Hardware)
-
The first point's initial guess is choosed to be close to the AR tag at left-top corner of the drawing board. Then, the joint angles of the last point are taken as the initial guess for the follwing trajectory points. Taking the advantage of the trajectory generated by Deep First Search (DFS), every point in the trajectory is close to the last point and the next point.
-
We’re using JTAS control mode: position_w_id, by which we can send the velocity and acceleration between two waypoints to JTAS.
It launches the USB camera driver, AR tag package "ar_track_alvar", Joint Trajectory Action Server (JTAS), Rviz with configuration file and all the following nodes.
To run the package, type the following code into Terminal:
roslaunch me495_vision final.launch
This node controls the overall pipelines of the program. It sends commands to the other nodes and listens the results back from them. The three stages in demo program that mentioned before are achieved by this node.
This node controls the content of the Sawyer head display. It listens to the image taken by the USB camera and processed by facial_recognition.py and projects them into the display with the proper size and color.
This node conducts all the image processing. It takes in the raw image from USB camera, then resize it and apply the Canny edge detector to obtain the edgemap. Then call the DFS function in edgesToPath.py to transfer the binary image into 2D trajectory points. Finally send the list of points to the drawing.py node.
This node is the implementation of DFS and edge following algorithm. It is called and used in facial_recognition.py.
This node control the Sawyer when localizing the AR tags on the drawing surface. It first lifts up the robot hand camera to look at all four AR tags at the same time. Then, it drives the camera to each of the tags.
It uses the function "IKinSpace" in "modern_robotics" library to solve IK and then applies the function "move_to_joint_positions" in JTAS to drive the robot. The initial guesses are set to be somewhere close and at the center of the four AR tags.
At each step, the IK solution is validated. If the solution exceeds the joint limit, a warning will pop up and the robot will be shut down.
This node continuesly communicates with perception.py, from which it gets all the target locations of the AR tags.
This node continuesly communicates to the manipulation.py. Every time the robot reached the target position, this node will begin to read and record the AR tag positions.
It calculates the location of the AR tags thourgh taking the averages of ten readings to achive robustness. The center position, size and orientation can also be calculated form the four tags used.
This node listens to the drawing surface location and trajectory points produced by perception.py and facial_recognition.py. When the sawyer’s end_effector locates at 0.2m above the target position, start_pub publishes “All Set” to commander and start to draw after receiving the “Start Drawing” message.
The functions are explained as follow:
-
get_parameters_for_IK: Store the unchanged IK parameters.
-
view_trajectory: move sawyer from the position after camera calibration to the view position.
-
view_target_trajectory: move sawyer from the view position to the 0.2m above target position.
-
plot_face_trajectory: function to draw. Basic idea of this method is getting a list of waypoints as input in which there is (-1,-1) denoting breakpoint between two line. Moving sawyer to left top of the board, from there solving IK point by point, let the previous solution as next point’s initial guess, check whether solution violates limits of joints, then adding each solution (thetalist0) to line_traj. When encounter with breakpoint, lift up marker.
The important parameters are as follow:
-
z_touch, z_hang are set properly to make sure the marker do not press tightly and lift a little bit to save time.
-
n_sec, z_sec_for_hang are seperately for tuning drawing speed and lift/drop speed. If setting n_sec too small, there is high probability it will exceeds the threshold of joint limit.
The Python class provided by JTAS. It must be called everytime a trajectory is upload to the action server of Sawyer.
-
'/me495/command' (type: String): Publish the starting commands to each node by control.py.
-
'/me495/result' (type: String): Publish the signals of completion from each node to control.py.
-
'/me495/raw_image' (type: Image): Publish the processed images taken by the USB camera to the display.py.
-
'/me495/location' (type: Point): Publish the drawing board locations calculated by perception.py to drawing.py.
-
'/me495/trajectory' (type: Int8MultiArray): Publish the list of trajectory points generated by DFS in edgesToPath.py to drawing.py.
-
'/me495/current_position' (type: Point): Publish the commands by manipulation.py to order the perception.py to start perceiving.
-
'/me495/target_position': (type: Point): Publish the AR tag locations generated by perception.py to manipulation.py.
-
'/ar_pose_marker': Publish the id, position, and orientations of the AR tags.
-
'/camera_driver/image_raw': Publish the image stream from the USB camera.
-
'robot/head_display': Take the images to show on the head display.
-
images Images to show on the Sawyer head display for fun and demo drawings of this project in the demo folder.
-
rviz Rviz configuration file.
-
facial_detection The pre-trained haar-like facial features in OpenCV.