
📍 Nmap
📍 T-Shark
📍 NetCat
📍 Wireshark
📍 TCP-Dump
📍 Hping
📍 Rust Scan
📍 Mass Scan
📍 Zen Map
📍 SMB Client
📍 Enum4Linux
📍 SNMP Walk
📍 MACOF
📍 DNS Spoof
📍 Ettercap
📍 Metasploit
📍 Nessus
📍 Hydra
📍 Medusa
📍 Aircrack-NG
Nmap is a network scanning tool used for discovering devices, open ports, services, and sometimes even the operating system on a computer network. It's commonly used by network administrators and security professionals for various network-related tasks, including security assessments and system monitoring.
Most Linux distributions include Nmap in their official repositories. You can install it using your distribution's package manager. For example, on Debian or Ubuntu, you can run:
sudo apt-get update
sudo apt-get install nmap
Check Version:
nmap --version
OR
nmap -V
nmap -sn <target>nmap -sS <target>nmap -sT <target>nmap -sV <target>nmap -O <target>nmap -sC <target>nmap -A <target>nmap -sU <target>nmap <start_ip>-<end_ip>
nmap 192.168.1.1-254nmap -oN <output_file> <target>Tshark is a command-line network protocol analyzer, also known as a packet sniffer. It allows you to capture and analyze network traffic in real-time. It's similar to Wireshark but operates entirely from the command line. Tshark is a powerful tool for network troubleshooting, security analysis, and protocol debugging.
Installing Tshark on Linux Operating System:
sudo apt install tsharkCheck version:
tshark --version 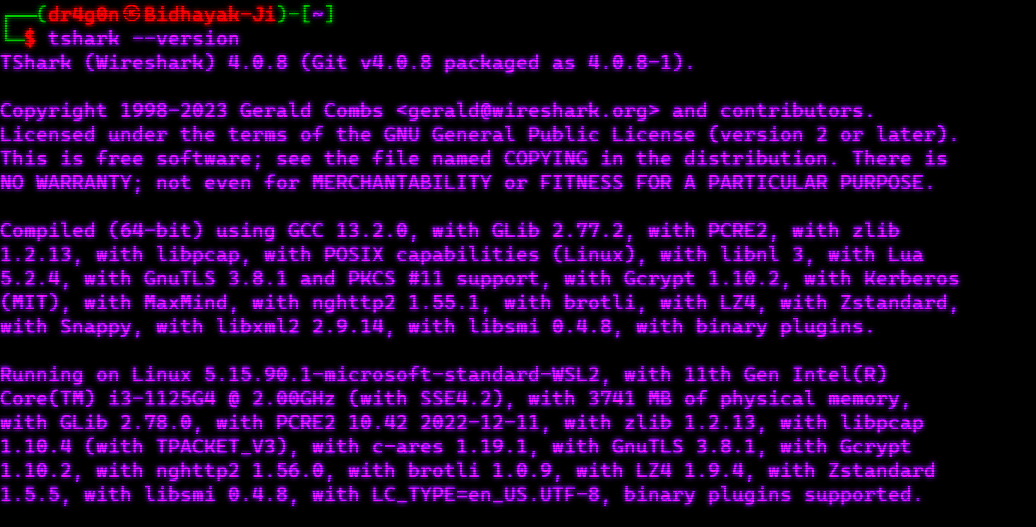
Capture packets on a specific network interface:
tshark -i <interface>tshark -i <interface> -w <output_file>tshark -r <input_file>Apply display filters to narrow down packet analysis:
tshark -i <interface> -Y "http"Generate statistics for a capture file:
tshark -r <input_file> -qz io,stat,0,<column_name>

tshark -r <input_file> -qz io,stat,0,ipNetcat, often referred to as "nc," is a versatile command-line networking utility on Linux and other Unix-like systems. It serves multiple purposes, including:
-
Network Connection: Netcat can establish, listen for, and manage network connections, making it useful for various network tasks.
-
Port Scanning: It can be used for basic port scanning to check which ports are open on a target system.
-
File Transfer: Netcat can transmit data between systems, making it handy for file transfer or as a makeshift chat client.
-
Remote Shell Access: It can create reverse or bind shell connections, enabling remote command execution.
-
Proxying: Netcat can act as a network proxy, redirecting traffic between different systems.
Netcat's simplicity and versatility make it a valuable tool for network troubleshooting, testing, and exploitation, but it should be used responsibly and only in authorized and ethical contexts.
Download Link 🔗
Installing NetCat on Linux Operating System:
sudo apt install netcatnc -l -p <port>
nc -l -p 1234
nc -u -l -p <port>
nc -u -l -p 1234
Reverse TCP Connection
nc -v <target> <port>
nc -v example.com 12345Send a File
nc -w 3 example.com 12345 < file.txtReceive a File
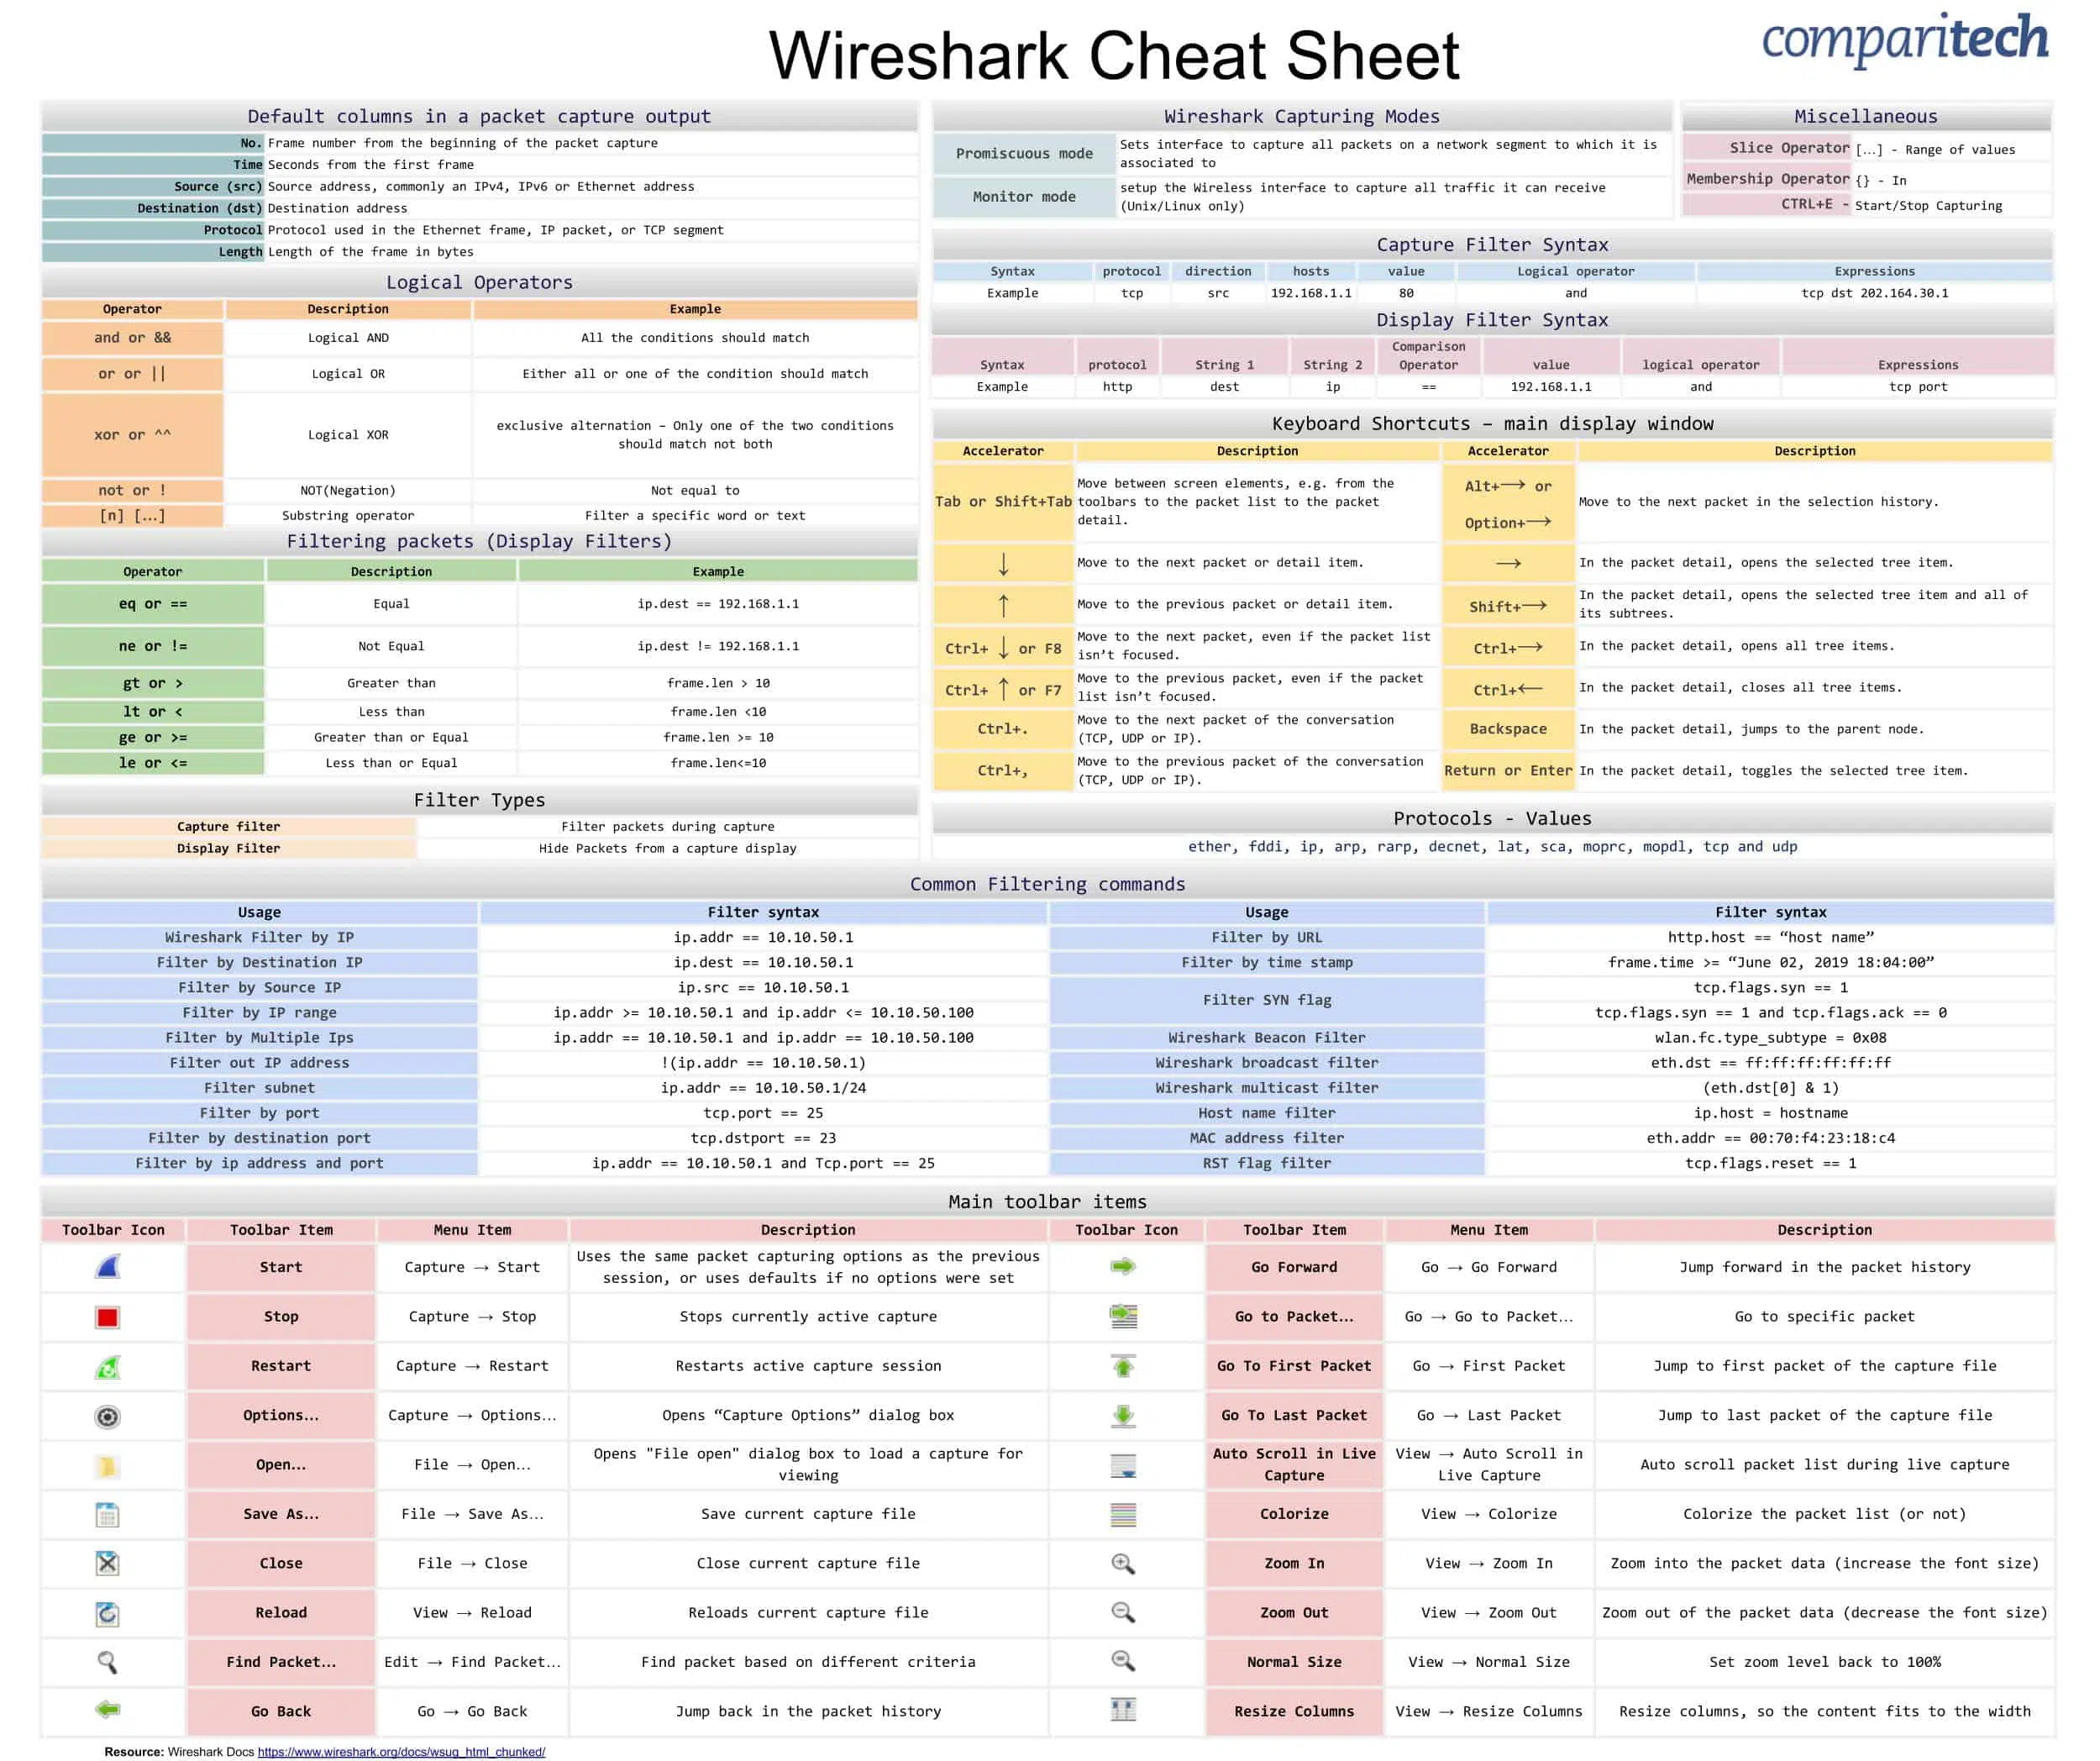
nc -l -p 12345 > received_file.txtWireshark is a powerful open-source network packet analyzer that allows you to capture, inspect, and analyze network traffic in real-time. It provides detailed information about network protocols, helping you troubleshoot network issues, monitor network activity, and perform security analysis.
You can install Wireshark on various operating systems:
-
Linux: Use your distribution's package manager, such as
aptoryum. For example:sudo apt-get update sudo apt-get install wireshark
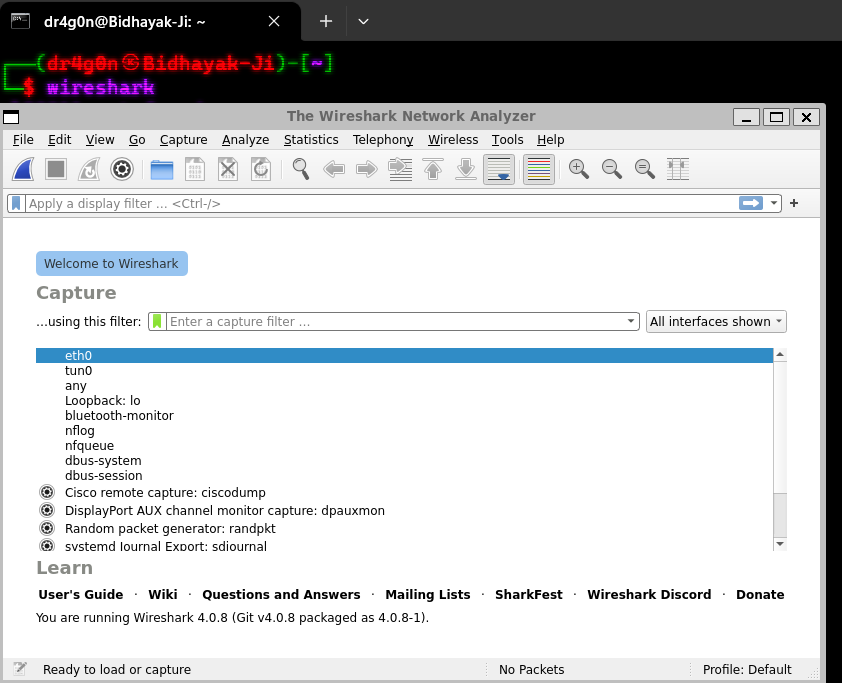
👉 Start Wireshark: Open Wireshark from your applications menu or by running the following command in your terminal:
```shell
wireshark
```
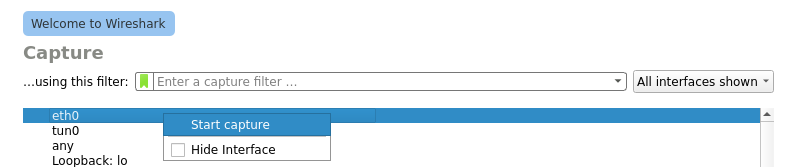
👉 Select Network Interface: After launching Wireshark, you'll be prompted to select a network interface to capture traffic from. Choose the appropriate interface for your analysis.
👉 Capture Packets: Once you've selected the network interface, click the "Start" button in the Wireshark interface to begin capturing packets. Wireshark will start capturing and displaying network traffic in real-time.
👉 Stop Capture: To stop the capture, simply click the "Stop" button in the Wireshark interface. This will halt the packet capture process.
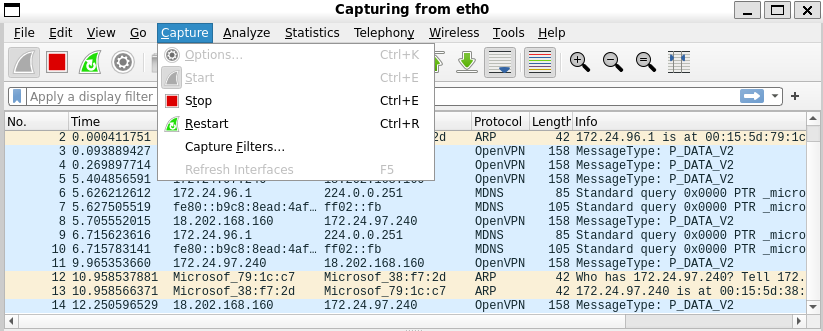
👉 Analyze Packets: Wireshark will display captured packets in its main window. You can analyze these packets by inspecting the details, applying filters to narrow down the displayed packets, and using various tools and features provided by Wireshark for in-depth analysis.
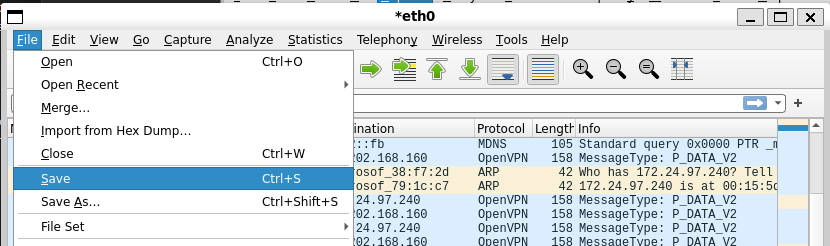
👉 Save Capture: To save your captured traffic for further analysis or sharing, go to the "File" menu in Wireshark and select "Save As." Choose a file format and provide a filename to save your capture data.
Source:- comparitech
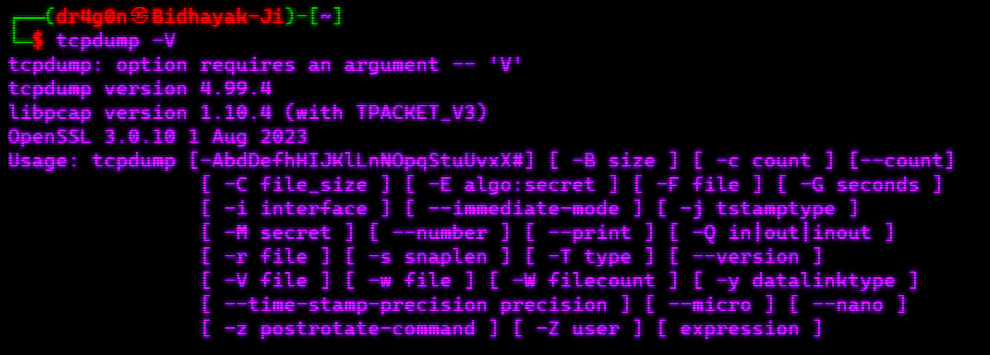
Tcpdump is a powerful command-line packet analyzer available on various Unix-like operating systems, including Linux. It allows you to capture and analyze network traffic in real-time or from a previously captured file. tcpdump is a valuable tool for network troubleshooting, monitoring, and security analysis. Here are some common uses and commands for tcpdump
-
Capture Packets in Real-Time:
sudo tcpdump -i <interface>Replace
<interface>with the network interface you want to capture packets from (e.g., eth0, wlan0). -
Capture Packets to a File:
sudo tcpdump -i <interface> -w <output_file>This command captures packets from the specified interface and saves them to the specified output file for later analysis.
-
Display Captured Packets Verbosely:
sudo tcpdump -i <interface> -vThis option provides more detailed information about captured packets, including the packet header.
-
Filter Packets by Protocol:
sudo tcpdump -i <interface> icmpReplace
icmpwith the protocol you want to filter. You can use protocols liketcp,udp,http, orssh. -
Capture Packets with a Specific Port:
sudo tcpdump -i <interface> port <port_number>Replace
<port_number>with the specific port you want to capture packets for. -
Capture Packets with Source/Destination IP:
sudo tcpdump -i <interface> src <source_ip>
sudo tcpdump -i <interface> dst <destination_ip>
Use these commands to filter packets based on their source or destination IP address.
-
Display Hexadecimal and ASCII Dump:
sudo tcpdump -i <interface> -XXThis option displays both the hexadecimal and ASCII representation of packet data.
-
Read Packets from a Capture File:
tcpdump -r <input_file>This allows you to analyze previously captured packets from a file.
-
Limit the Number of Packets to Capture:
sudo tcpdump -i <interface> -c <count>Replace
<count>with the number of packets you want to capture beforetcpdumpexits. -
Save Captured Packets as a PCAP File:
sudo tcpdump -i <interface> -w <output_file>.pcapThis command saves the captured packets in the PCAP (Packet Capture) format, which is widely supported by network analysis tools.
Hping is a powerful and flexible network scanning and testing tool for analyzing and manipulating network protocols. It is designed to provide network professionals, system administrators, and security experts with a versatile set of tools for network exploration, packet crafting, and network testing.
-
Active Scanning: Conduct active network scanning to discover hosts, services, and open ports on a network.
-
Packet Crafting: Create and send custom packets with specific characteristics, making it useful for crafting custom network traffic.
-
Advanced Ping: Perform advanced ping operations such as TCP, UDP, and ICMP ping with various options and modes.
-
Traceroute: Visualize the network path taken by packets from source to destination.
-
Firewall Testing: Test firewall rules and configurations by sending different types of packets to target systems.
-
Fragmentation and MTU Discovery: Examine fragmentation and Maximum Transmission Unit (MTU) issues on a network.
sudo apt install hping31. TCP Ping:
hping3 -c 1 -V -S -p 80 <target_host>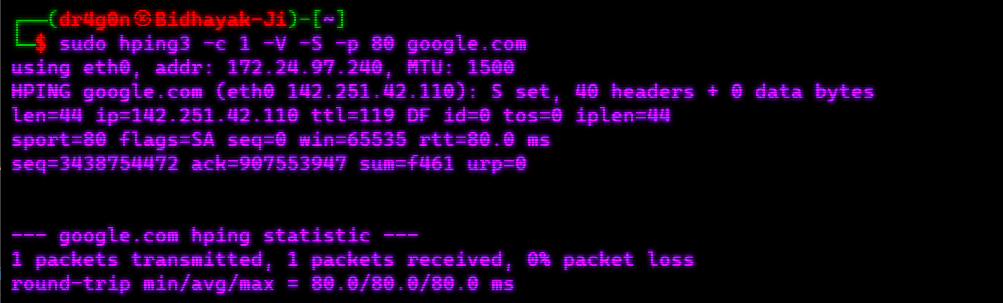
2. UDP Ping:
hping3 -c 1 -V -2 -p 53 <target_host>3. ICMP Ping:
hping3 -c 1 -V -1 <target_host>4. Traceroute:
hping3 --traceroute <target_host>5. SYN Scan:
hping3 -S -p 80 <target_host>6. Simple DOS attack:
hping3 -S --flood -V -p 80 <target_host>RustScan is a lightning-fast, highly configurable port scanner written in Rust. It is designed to be efficient and easy to use, making it an ideal choice for network professionals, penetration testers, and security enthusiasts who need to quickly discover open ports on target hosts.
-
Speed and Efficiency: RustScan is built for speed, allowing you to scan ports quickly, making it suitable for both large and small networks.
-
Configurability: Customize your scans with a wide range of options, including port ranges, rate limiting, and output formats.
-
Banner Grabbing: RustScan can retrieve banners from open ports, providing additional information about the services running on the target.
-
IPv6 Support: Scan both IPv4 and IPv6 addresses seamlessly.
-
Concurrency: Utilize the power of Rust's async I/O to scan multiple hosts or ports simultaneously.
Install RustScan using Cargo:
cargo install rustscan1. Scan a Single Host:
Scan a single host (e.g., example.com) for common ports (1-65535):
rustscan -a google.com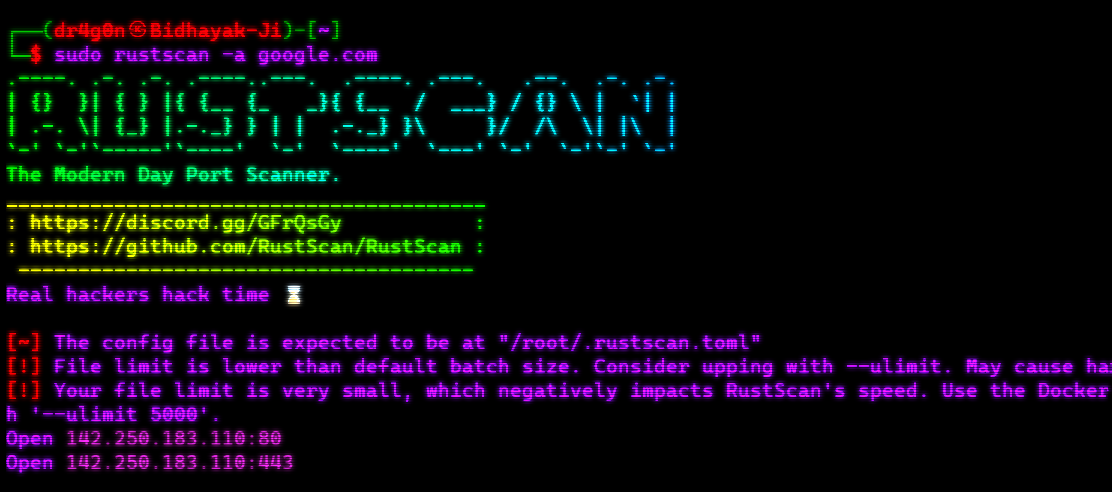
2. Scan a Host Range:
Scan a range of IP addresses (e.g., 192.168.1.1-10) for common ports:
rustscan 192.168.1.1-103. Scan Specific Ports:
Scan a host (e.g., example.com) for specific ports (e.g., 80, 443, 22):
rustscan example.com -p 80,443,224. Scan Using Custom Output Format:
Scan a host (e.g., example.com) and save the results in JSON format:
rustscan example.com -- -oJ output.json5. Enable Banner Grabbing:
Scan a host (e.g., example.com) and retrieve banners from open ports:
rustscan example.com -bMasscan is a high-speed, high-performance mass IP port scanner designed for large-scale network scanning operations. It's a powerful tool that allows network professionals, security analysts, and researchers to quickly discover open ports on large IP ranges and hosts.
-
Speed and Efficiency: Masscan is optimized for speed and can scan large networks in a short amount of time.
-
Customizable Scanning: Configure the scanner to scan specific IP ranges, ports, and scan rates to suit your needs.
-
Banner Grabbing: Retrieve banners from open ports to identify the services running on target hosts.
-
IPv4 and IPv6 Support: Masscan supports both IPv4 and IPv6 addresses, making it versatile for different network environments.
-
Flexible Output: Generate output in various formats, including XML and JSON, for easy integration with other tools and reporting.
sudo apt-get install masscan1. Basic Scan:
To perform a basic scan of a range of IP addresses, use the following command:
masscan -p <port_range> <target>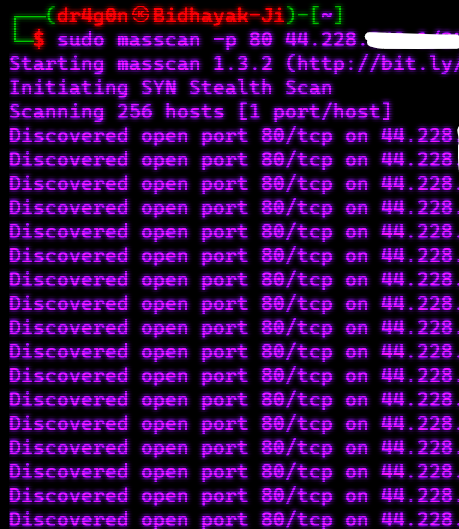
2. Banner Grabbing:
Masscan can also perform banner grabbing to identify services running on open ports. Use the -b option for banner grabbing:
masscan -p <port_range> --banner <target>3. Output to a File: Save the scan results to a file (e.g., results.txt) using the -oL option:
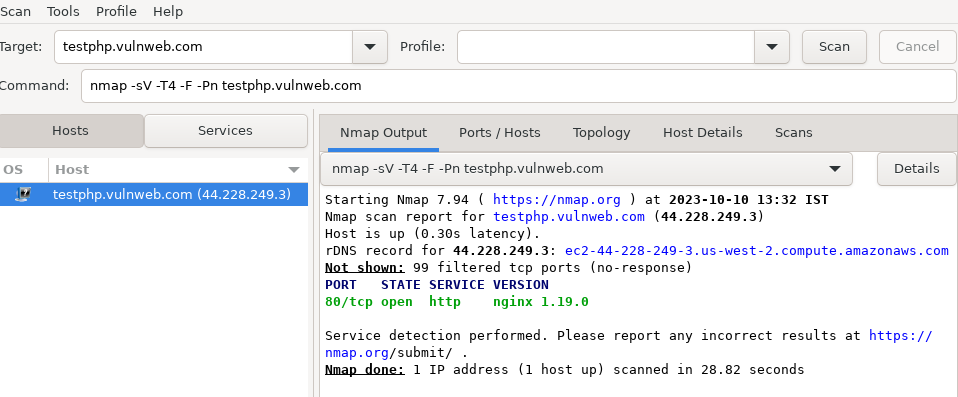
masscan -p <port_range> <target> -oL results.txtZenmap is a graphical user interface (GUI) for Nmap, the renowned open-source network scanning tool. It provides an intuitive and user-friendly interface to interact with Nmap's robust scanning and auditing capabilities. Zenmap is suitable for both beginners and experienced network professionals.
-
User-Friendly Interface: Zenmap's GUI simplifies the process of configuring and launching Nmap scans, making it accessible to users of all skill levels.
-
Network Discovery: Discover hosts, services, and open ports on local and remote networks.
-
Security Auditing: Perform vulnerability assessment and security auditing by identifying open ports, services, and potential vulnerabilities.
-
Profile Management: Save and load scan profiles for efficient scanning of frequently visited networks.
-
Interactive Results: View and analyze scan results interactively with detailed information about discovered hosts and services.
Linux (Debian/Ubuntu):
wget https://nmap.org/dist/zenmap-7.94-1.noarch.rpmsudo apt install aliensudo alien --to-deb zenmap-7.94-1.noarch.rpmsudo chmod 777 zenmap_7.91-2_all.deb && sudo apt install ./zenmap_7.91-2_all.debsudo zenmap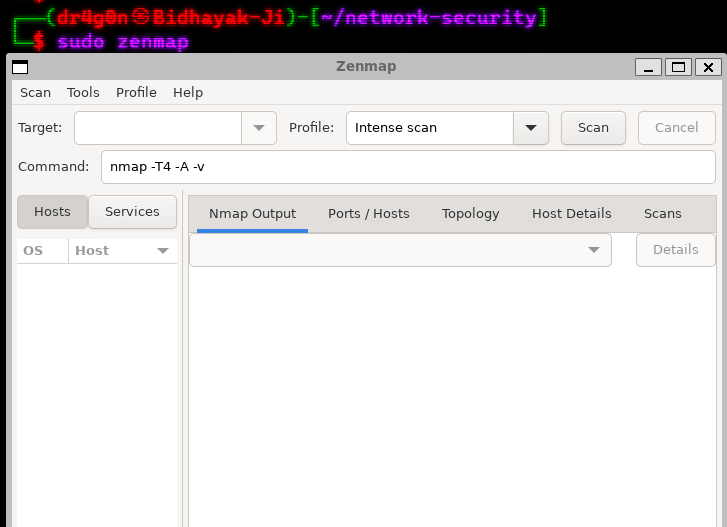
👉 Launch Zenmap from your applications menu or command line.
👉 Use the GUI to configure your scan options, such as the target hosts, scan profile, and scan type.
👉 Click the "Scan" button to start the scan.
👉 Review and analyze the scan results using Zenmap's user-friendly interface.
SMBclient is a command-line utility that provides a means to access and interact with resources shared using the Server Message Block (SMB) or Common Internet File System (CIFS) protocol. It is a versatile tool for network enumeration, file sharing, and interaction with Windows-based network resources.
-
Access Windows Shares: Connect to and access shared folders, printers, and resources on Windows-based machines.
-
File Transfer: Upload and download files and directories between your local system and remote SMB/CIFS shares.
-
Authentication: Authenticate to remote SMB/CIFS servers with various authentication methods, including username/password and anonymous access.
-
Directory Listing: List the contents of remote directories and shares to gather information about available resources.
-
Interactive Mode: Use an interactive shell to navigate and interact with remote SMB/CIFS shares.
sudo apt install smbclient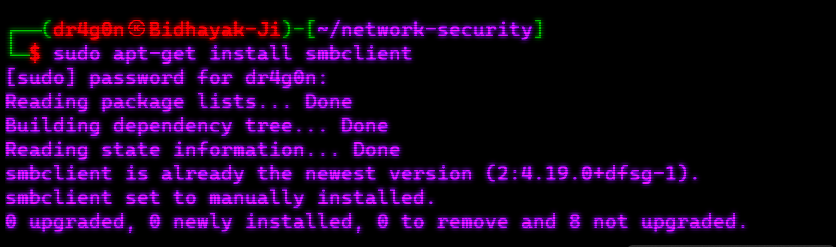
To connect to a remote SMB/CIFS share, use the following command:
smbclient //server/share -U usernameReplace server with the target server's hostname or IP address, share with the name of the shared resource, and username with the appropriate credentials.
Once connected, you can list the contents of a remote directory as follows:
smb:> dirDownload a file from the remote share to your local system:
smb:> get filenameUpload a file from your local system to the remote share:
smb:> put localfileEnter interactive mode to navigate and interact with the remote share:
smb:> interactiveEnum4linux is a command-line tool designed for SMB enumeration on Windows-based networks. It is a valuable asset for penetration testers and network administrators, providing the ability to extract valuable information from Windows systems, such as user and group lists, share information, and more.
-
User Enumeration: Enumerate Windows users and their details, including usernames, full names, and SID values.
-
Group Enumeration: Gather information about Windows groups, including group names and associated SIDs.
-
Share Enumeration: Discover shared resources on remote Windows systems, including share names and descriptions.
-
Password Policy Enumeration: Retrieve password policy information, including password complexity requirements and lockout policies.
-
SNMP Information: Retrieve SNMP information, including community strings, from Windows hosts.
To perform a basic enumeration of a target Windows system, use the following command:
enum4linux -a <target>Replace with the IP address or hostname of the target Windows system.
Enumerate Windows users on a target system:
enum4linux -u <target>Enumerate Windows groups on a target system:
enum4linux -g <target>Enumerate shared resources on a target system:
enum4linux -s <target>SNMPwalk is a command-line utility used for querying devices and network equipment that support the Simple Network Management Protocol (SNMP). It enables network administrators, security professionals, and system engineers to gather valuable information from SNMP-enabled devices, such as routers, switches, printers, and servers.
-
SNMP Queries: Perform SNMP queries to retrieve information from network devices, including system information, interfaces, CPU and memory usage, and more.
-
OID Tree Exploration: Explore the SNMP OID (Object Identifier) tree structure to discover available data points and metrics on SNMP-enabled devices.
-
Community String Authentication: Authenticate to SNMP-enabled devices using SNMP community strings, providing access to different levels of information.
-
MIB Support: Use Management Information Base (MIB) files to translate numeric OIDs into human-readable labels for easier interpretation.
To perform a basic SNMPwalk on a target device, use the following command:
snmpwalk -v <version> -c <community_string> <target>version: SNMP version (e.g., 1, 2c, 3).
community_string: SNMP community string (e.g., public, private).
target IP address or hostname of the SNMP-enabled device.
macof is a command-line tool designed to flood a network with fake MAC addresses. This technique is commonly used in network penetration testing and security assessment to disrupt network operations, overwhelm switches, and potentially trigger security mechanisms that detect and respond to suspicious traffic.
-
MAC Flooding: Generates and sends a large number of random MAC addresses to flood a network segment.
-
Switch Testing: Tests the behavior of switches in response to MAC address flooding, including MAC address table saturation.
-
Penetration Testing: Used by penetration testers to evaluate the security of network infrastructure and identify vulnerabilities related to MAC address handling.
-
Security Awareness: Raises awareness about the potential risks associated with MAC address flooding and helps network administrators implement appropriate security measures.
sudo apt-get install dsniffTo perform MAC address flooding on a network segment, use the following command:
sudo macof -i <interface> -d <destination> -n <times>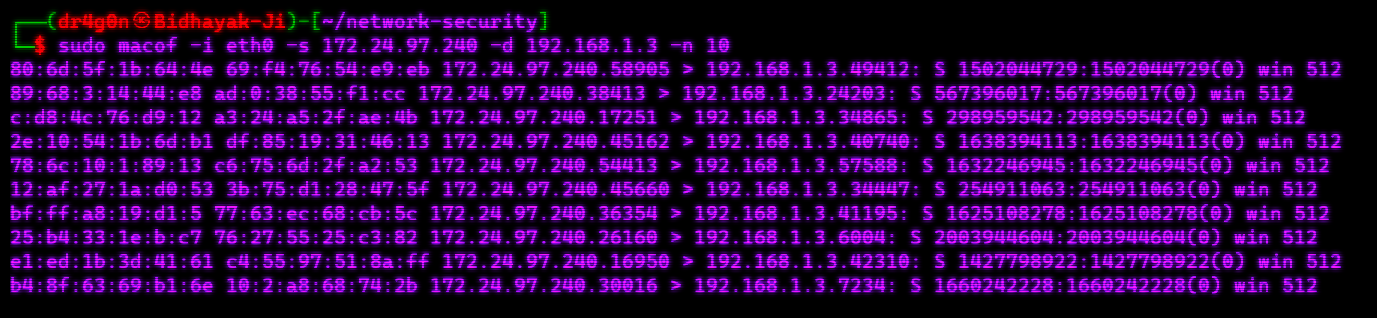
dnsspoof is a command-line tool that enables DNS spoofing attacks on a network. It allows network professionals, security analysts, and penetration testers to manipulate DNS (Domain Name System) responses, redirecting DNS queries to malicious or alternative servers. DNS spoofing can be used for various purposes, including phishing, traffic interception, and network reconnaissance.
-
DNS Spoofing: Intercept DNS requests and provide malicious or alternative DNS responses.
-
Phishing Attacks: Redirect users to fake websites to steal sensitive information, such as login credentials.
-
Traffic Analysis: Capture DNS queries and responses for analysis or interception.
-
Network Reconnaissance: Manipulate DNS responses to gather information about network infrastructure.
To perform DNS spoofing on a network, use the following command:
dnsspoof -i <interface> -f <hosts_file>interface: Specify the network interface to listen for DNS requests and send spoofed responses.
hosts_file: Provide a file with DNS spoofing rules to define target domains and their corresponding IP addresses.
Here's an example of a hosts_file you could create:
www.google.com 192.168.1.100
mail.google.com 192.168.1.101
This rule means that when a device on the network queries for www.google.com, dnsspoof will respond with the IP address 192.168.1.100.
-
Identify the network interface you want to listen on. You can use the ifconfig or ip addr command to list available network interfaces.
-
Create a hosts_file containing the DNS spoofing rules.
-
Run dnsspoof with the chosen network interface and the path to the hosts_file:
sudo dnsspoof -i eth0 -f /etc/hosts
Ettercap is a powerful and feature-rich network sniffing and man-in-the-middle (MITM) attack tool used for network analysis, traffic interception, and security assessment. It allows network professionals, penetration testers, and security analysts to capture and analyze network traffic, perform MITM attacks, and conduct various network security tests.
-
Packet Capture: Capture network packets to analyze traffic passing through a network interface.
-
MITM Attacks: Intercept and manipulate network traffic between two parties, potentially revealing sensitive information.
-
Protocol Analysis: Analyze various network protocols to understand communication.
-
Traffic Redirection: Redirect network traffic to another host for inspection or manipulation.
-
SSL/TLS Decryption: Decrypt SSL/TLS-encrypted traffic for analysis and inspection.
sudo apt-get install ettercap-graphicalTo start using Ettercap in text mode, run:
sudo ettercap -G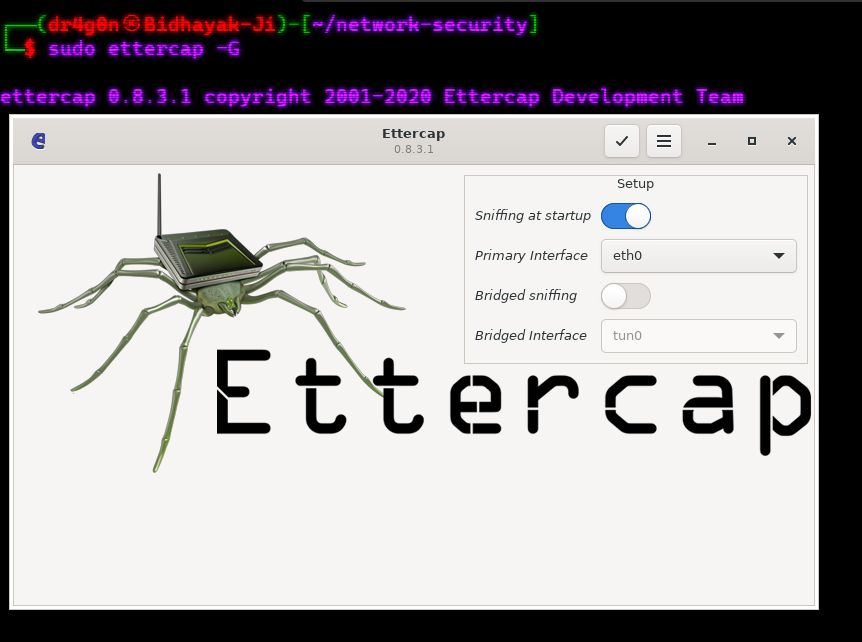
Once the Ettercap GUI is launched, you'll have access to a graphical interface that makes it easier to perform network analysis and man-in-the-middle attacks.
- In the GUI, you'll see a list of available network interfaces. Select the network interface you want to use for network analysis and click "OK."
-
After selecting the network interface, you can choose your targets. Click "Hosts" in the menu, and then select "Scan for hosts" to scan the network for available hosts.
-
Once hosts are discovered, you can select one or more hosts as your targets by clicking on them.
- Click "Mitm" in the menu to access man-in-the-middle attack options. Here, you can choose various attack methods, such as ARP poisoning or DNS spoofing, to intercept traffic between hosts.
- Click "Start" in the menu to begin the selected attack. Ettercap will start intercepting and analyzing network traffic between the specified hosts.
- The Ettercap GUI provides real-time packet analysis. You can view captured packets, including their source and destination addresses, protocols, and contents.
- Ettercap supports plugins and filters that can be accessed through the GUI. These can help you customize and extend the tool's functionality.
- If you're intercepting SSL/TLS-encrypted traffic, you can configure SSL dissection options in the GUI to decrypt and analyze the encrypted data.
- When you're done with your analysis or MITM attack, click "Stop" in the menu to halt the attack and close Ettercap gracefully.
Metasploit Framework is a widely-used open-source penetration testing and exploitation tool that enables security professionals, ethical hackers, and penetration testers to assess and exploit vulnerabilities in systems, applications, and networks. It offers a comprehensive suite of tools for reconnaissance, exploitation, post-exploitation, and reporting.
-
Exploit Modules: Access a vast repository of exploit modules targeting known vulnerabilities in various systems and software.
-
Payloads: Generate and deliver malicious payloads to compromised systems for post-exploitation activities.
-
Post-Exploitation Modules: Execute post-exploitation activities, such as privilege escalation, lateral movement, and data exfiltration.
-
Integration: Integrate with other security tools and frameworks for seamless workflow.
-
Reporting: Generate detailed reports to document findings and vulnerabilities.
Metasploit console provides a command-line interface for accessing various modules and features.
To start using Metasploit, launch the interactive console by running:
msfconsole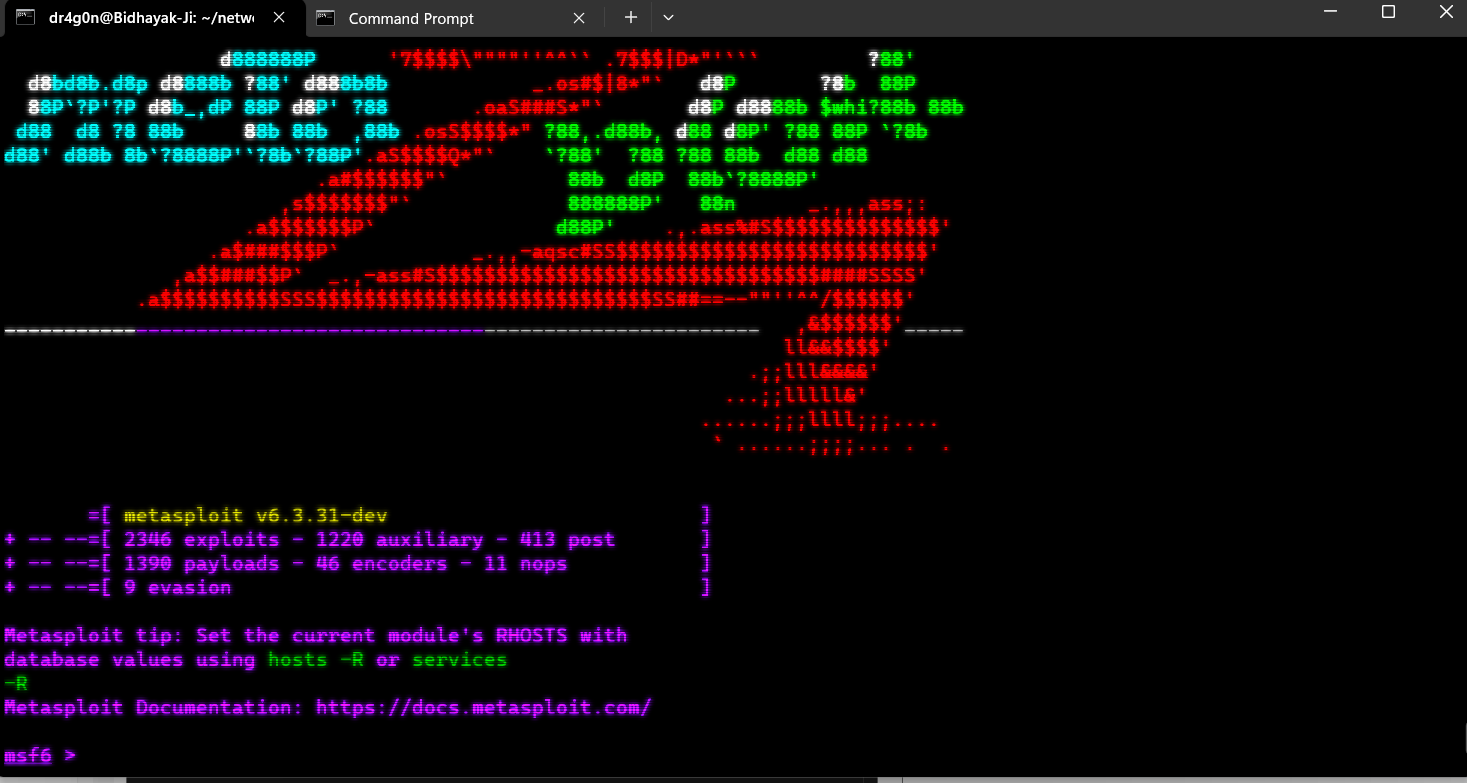
In Metasploit, you can perform port scanning using the auxiliary/scanner/portscan/tcp module. This module allows you to scan a range of IP addresses and ports to identify open ports and potential targets.
Here's the basic command to perform a TCP port scan using Metasploit:
use auxiliary/scanner/portscan/tcp
set RHOSTS 192.168.1.1-192.168.1.254
set PORTS 80,443,8080
set THREADS 10
set TIMEOUT 500
set VERBOSE true
set STOP_ON_SUCCESS true
run
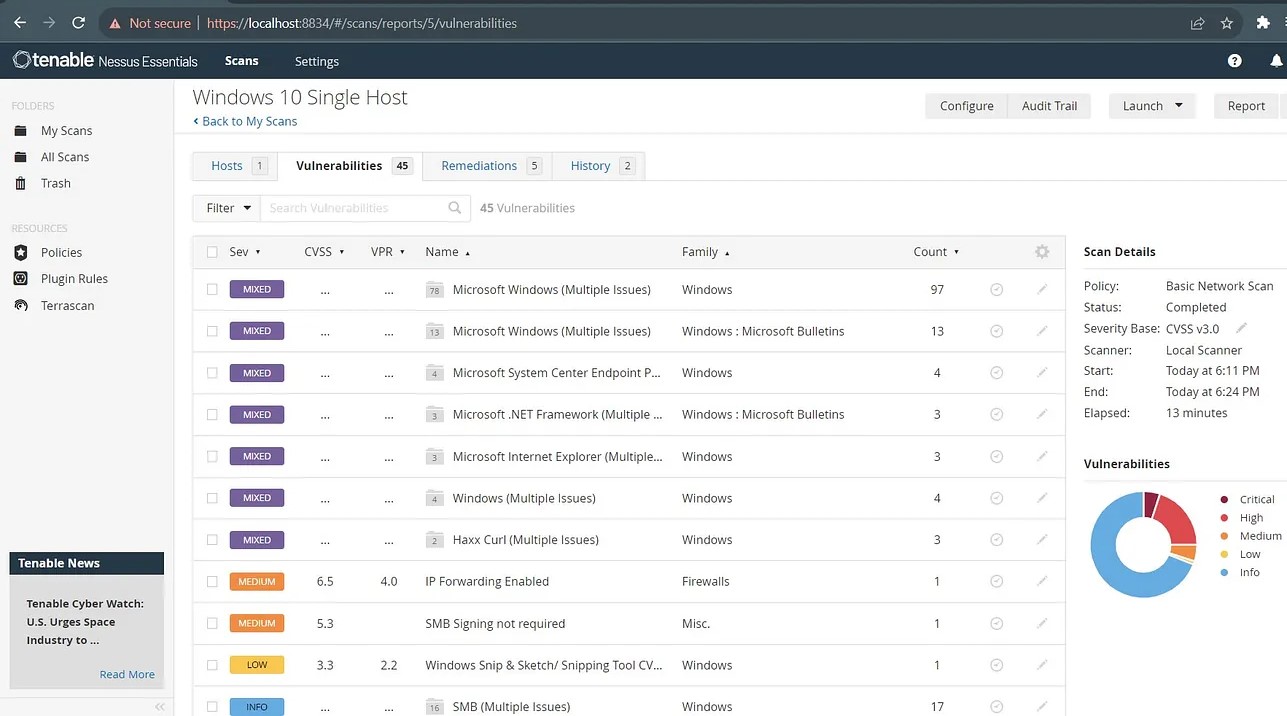
Nessus is a widely-used and powerful vulnerability scanning and assessment tool designed to help organizations identify, assess, and remediate security vulnerabilities in their IT infrastructure. Trusted by security professionals, IT teams, and compliance auditors, Nessus provides a comprehensive solution for improving cybersecurity posture.
-
Vulnerability Scanning: Automatically scans networks, systems, applications, and devices for known vulnerabilities and misconfigurations.
-
Plugin Architecture: Offers a vast library of security plugins for detecting vulnerabilities and compliance issues.
-
Compliance Auditing: Assists in compliance checks against industry standards and regulatory frameworks, such as PCI DSS, CIS, and more.
-
Customization: Allows users to create custom policies, scan templates, and configuration profiles to suit specific requirements.
-
Detailed Reporting: Generates comprehensive reports with detailed information on vulnerabilities, severity levels, and recommended remediation steps.
-
Scalability: Scales to handle large and complex environments, making it suitable for enterprises and organizations of all sizes.
-
Integration: Supports integration with other security tools and frameworks through APIs, making it a valuable part of a broader security ecosystem.
To start using Nessus, follow these basic steps:
-
Installation: Refer to the installation section to install Nessus on your system.
-
Configuration: Set up Nessus by configuring scan policies, targets, and credentials for scanning.
-
Scanning: Initiate vulnerability scans against defined targets and policies.
-
Analysis: Review scan results to identify vulnerabilities, prioritize them, and assess their impact.
-
Reporting: Generate detailed reports with findings, recommendations, and compliance checks.
-
Remediation: Take action to address identified vulnerabilities and compliance issues.
For advanced options and customization, please refer to the Nessus documentation or resources.
- Nessus is available for Windows, Linux, and macOS.
-
Download the Nessus installer from the official Tenable website.
-
Follow the installation instructions for your specific operating system.
-
Launch Nessus and access it through a web browser.
-
Activate Nessus by providing the activation code or using a trial license.
It seems like you're describing a scenario where you want to perform a basic vulnerability scan using a tool like Nessus on a virtual machine (VM) with a known IP address. Here's a step-by-step guide based on your description:
Assumptions:
- You have already installed Nessus on your host computer.
- You have identified the IP address of your target VM.
-
Open your web browser and navigate to the Nessus web interface. This is typically accessible at
https://localhost:8834or using the IP address and port of your Nessus server. -
Log in with your Nessus credentials.
-
In the Nessus web interface, click on "Scans" in the left navigation panel.
-
Click the "New Scan" button to create a new scan.
-
General Settings:
- Give the scan a descriptive name.
- Optionally, provide a description.
-
Scan Template or Policy:
- Choose a scan template or policy that aligns with your scanning needs. You can create custom policies if necessary.
-
Targets:
- In the "Targets" section, input the IP address of your target VM. You can specify a single IP address, a range of IP addresses, or even a subnet, depending on your requirements.
-
Schedule:
- Configure the scan schedule if needed. For a one-time scan, you can leave this section as is.
-
Notifications:
- Configure email notifications if you want to receive alerts when the scan completes or when vulnerabilities are found.
-
Advanced:
- You can configure advanced scan settings and options here, such as port scanning preferences and credential settings if the VM requires authentication for scanning.
- After configuring the scan settings, click the "Save" button to save the scan configuration.
-
In the list of scans, find the scan you just configured and click on it to select it.
-
Click the "Launch" button to start the scan.
-
Nessus will begin scanning the target VM. You can monitor the progress of the scan within the Nessus web interface.
-
Once the scan is complete, you can review the results, including identified vulnerabilities, in the Nessus web interface.
- Based on the scan results, prioritize and address vulnerabilities on your VM. Implement security patches, reconfigure settings, or take other actions as needed to enhance the security of the VM.
Hydra, also known as THC-Hydra, is a versatile and powerful password cracking tool used by security professionals, penetration testers, and ethical hackers to test and assess the security of authentication systems. It is designed to perform brute-force and dictionary attacks against various network protocols and services.
-
Protocol Support: Hydra supports a wide range of network protocols and services, including SSH, FTP, HTTP, RDP, Telnet, SMB, and many more.
-
Flexible Attack Modes: Offers multiple attack modes, including brute-force, dictionary-based, and hybrid attacks, making it adaptable to different scenarios.
-
Multi-Threaded: Utilizes multi-threading and parallelism to improve cracking speed and efficiency.
-
Customizable: Allows users to create custom wordlists and rules for password generation.
-
Session Resumption: Supports the resumption of interrupted attack sessions, saving time and resources.
-
Logging and Reporting: Provides detailed logs and reports of cracking attempts and results.
-
Community Contributions: Hydra benefits from a vibrant community of users and contributors, constantly expanding its capabilities and supported services.
- Hydra is available for various Linux distributions and platforms.
sudo apt install hydra To start using Hydra, follow these basic steps:
-
Installation: Refer to the installation section to install Hydra on your system.
-
Choose a Target Protocol: Identify the network protocol or service you want to target (e.g., SSH, FTP, HTTP).
-
Configure the Attack: Specify the target host, port, and attack parameters. You can customize attack mode, wordlists, and other options.
-
Start the Attack: Launch the attack using the specified options and watch Hydra attempt to crack passwords.
-
Review Results: Analyze the results to identify successfully cracked passwords and access accounts.
-
Remediation: Based on the results, take action to strengthen password security, such as implementing stronger password policies.
For advanced options and customization, please refer to the Hydra documentation or resources.
hydra -l username -p password ftp://target-ip hydra -L user.txt -P pass.txt 192.168.29.229 ssh -t 5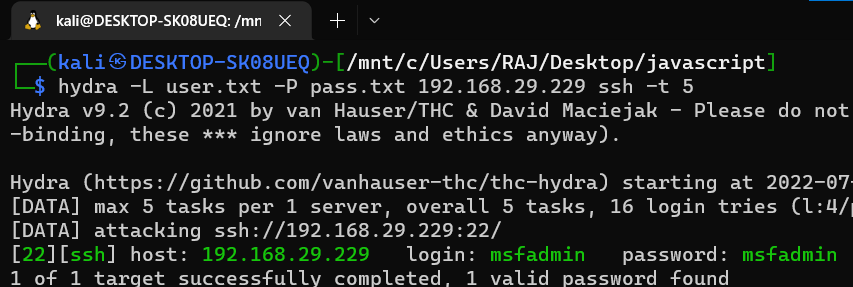
Medusa is a powerful and versatile network password cracking tool used by cybersecurity professionals, penetration testers, and ethical hackers to assess the security of network services and authentication mechanisms. It is designed to perform brute-force and dictionary attacks against various network protocols and services.
-
Protocol Support: Medusa supports a wide range of network protocols and services, including SSH, FTP, Telnet, HTTP, RDP, VNC, and more.
-
Flexible Attack Modes: Offers multiple attack modes, including brute-force, dictionary-based, and hybrid attacks, allowing for adaptation to different scenarios.
-
Parallelism: Utilizes parallelism and concurrency to improve cracking speed and efficiency.
-
Customizable: Allows users to create custom wordlists and rules for password generation.
-
Session Resumption: Supports the resumption of interrupted attack sessions, saving time and resources.
-
Logging and Reporting: Provides detailed logs and reports of cracking attempts and results.
-
Community-Driven: Medusa benefits from an active community of users and contributors, constantly enhancing its capabilities and expanding its supported services.
sudo apt install medusaTo start using Medusa, follow these basic steps:
-
Installation: Refer to the installation section to install Medusa on your system.
-
Choose a Target Protocol: Identify the network protocol or service you want to target (e.g., SSH, FTP, HTTP).
-
Configure the Attack: Specify the target host, port, and attack parameters. Customize attack mode, wordlists, and other options as needed.
-
Start the Attack: Launch the attack using the specified options and observe Medusa's attempts to crack passwords.
-
Review Results: Analyze the results to identify successfully cracked passwords and compromised accounts.
-
Remediation: Based on the results, take action to strengthen password security, such as implementing stronger password policies.
For advanced options and customization, please refer to the Medusa documentation or resources.
medusa -h target_ip -u username -P passwords.txt -M ssh
This command attempts to brute-force SSH access to the target IP using the specified username and a list of passwords from the passwords.txt file.
medusa -h target_ip -U usernames.txt -P passwords.txt -M ftp -T 5This command performs a dictionary attack against an FTP server running on the target IP. It uses a list of usernames from usernames.txt and a list of passwords from passwords.txt. The -T option specifies a maximum of 5 login attempts per second.
medusa -h target_ip -u admin -P passwords.txt -M http -m DIR:/admin -T 10This command attempts to brute-force HTTP authentication for the /admin directory on the target IP. It uses the username admin and a list of passwords from passwords.txt. The -m option specifies the directory to target, and the -T option sets a maximum of 10 login attempts per second.
Aircrack-ng is a comprehensive and versatile Wi-Fi network security toolkit designed for assessing and improving the security of wireless networks. It includes a collection of tools for capturing, analyzing, and cracking Wi-Fi network encryption keys. Aircrack-ng is widely used by security professionals, penetration testers, and ethical hackers.
-
Wi-Fi Security Assessment: Aircrack-ng provides tools for auditing the security of Wi-Fi networks, including WEP, WPA, and WPA2 networks.
-
Packet Capture: Capture Wi-Fi packets from wireless interfaces to analyze network traffic and identify vulnerabilities.
-
Cracking Tools: Aircrack-ng includes tools for cracking encryption keys, such as WEP keys (Wired Equivalent Privacy) and WPA/WPA2 pre-shared keys, through various attack methods.
-
Deauthentication Attack: Perform deauthentication attacks to disconnect clients from a Wi-Fi network, facilitating the capture of handshake packets.
-
Extensive Hardware Support: Aircrack-ng supports a wide range of Wi-Fi adapters and chipsets for packet capture and injection.
-
Cross-Platform: Available for Linux, macOS, Windows, and other platforms, making it accessible to a broad audience.
-
Community-Driven: Aircrack-ng is actively maintained and benefits from contributions from the Wi-Fi security community.
- Aircrack-ng is available for various operating systems, including Linux, macOS, and Windows.
-
Download the Aircrack-ng package from the official Aircrack-ng website.
-
Follow the installation instructions provided for your specific operating system.
-
Once installed, you can run Aircrack-ng tools from the command line.
To start using Aircrack-ng, follow these basic steps:
-
Installation: Refer to the installation section to install Aircrack-ng on your system.
-
Capture Packets: Use tools like
airodump-ngto capture Wi-Fi packets from wireless interfaces. Identify target networks and clients. -
Deauthentication Attack: Optionally, perform a deauthentication attack (
aireplay-ng) to capture the WPA/WPA2 handshake between a client and an access point. -
Crack Encryption Key: Use tools like
aircrack-ngto attempt to crack the captured encryption key. Provide the captured packets and dictionary or brute-force options. -
Analyze Results: Review the results to determine if the encryption key was successfully cracked.
-
Security Recommendations: Based on the results, provide recommendations for improving network security, such as using stronger encryption protocols and complex passwords.
For advanced options and customization, please refer to the Aircrack-ng documentation or resources.
