This repository contains material related to Udacity's Deep Reinforcement Learning Nanodegree program.
The tutorials lead you through implementing various algorithms in reinforcement learning. All of the code is in PyTorch (v0.4) and Python 3.
- Dynamic Programming: Implement Dynamic Programming algorithms such as Policy Evaluation, Policy Improvement, Policy Iteration, and Value Iteration.
- Monte Carlo: Implement Monte Carlo methods for prediction and control.
- Temporal-Difference: Implement Temporal-Difference methods such as Sarsa, Q-Learning, and Expected Sarsa.
- Discretization: Learn how to discretize continuous state spaces, and solve the Mountain Car environment.
- Tile Coding: Implement a method for discretizing continuous state spaces that enables better generalization.
- Deep Q-Network: Explore how to use a Deep Q-Network (DQN) to navigate a space vehicle without crashing.
- Robotics: Use a C++ API to train reinforcement learning agents from virtual robotic simulation in 3D. (External link)
- Hill Climbing: Use hill climbing with adaptive noise scaling to balance a pole on a moving cart.
- Cross-Entropy Method: Use the cross-entropy method to train a car to navigate a steep hill.
- REINFORCE: Learn how to use Monte Carlo Policy Gradients to solve a classic control task.
- Proximal Policy Optimization: Explore how to use Proximal Policy Optimization (PPO) to solve a classic reinforcement learning task. (Coming soon!)
- Deep Deterministic Policy Gradients: Explore how to use Deep Deterministic Policy Gradients (DDPG) with OpenAI Gym environments.
- Pendulum: Use OpenAI Gym's Pendulum environment.
- BipedalWalker: Use OpenAI Gym's BipedalWalker environment.
- Finance: Train an agent to discover optimal trading strategies.
The labs and projects can be found below. All of the projects use rich simulation environments from Unity ML-Agents. In the Deep Reinforcement Learning Nanodegree program, you will receive a review of your project. These reviews are meant to give you personalized feedback and to tell you what can be improved in your code.
- The Taxi Problem: In this lab, you will train a taxi to pick up and drop off passengers.
- Navigation: In the first project, you will train an agent to collect yellow bananas while avoiding blue bananas.
- Continuous Control: In the second project, you will train an robotic arm to reach target locations.
- Collaboration and Competition: In the third project, you will train a pair of agents to play tennis!
- Cheatsheet: You are encouraged to use this PDF file to guide your study of reinforcement learning.
Acrobot-v1with Tile Coding and Q-LearningCartpole-v0with Hill Climbing | solved in 13 episodesCartpole-v0with REINFORCE | solved in 691 episodesMountainCarContinuous-v0with Cross-Entropy Method | solved in 47 iterationsMountainCar-v0with Uniform-Grid Discretization and Q-Learning | solved in <50000 episodesPendulum-v0with Deep Deterministic Policy Gradients (DDPG)
BipedalWalker-v2with Deep Deterministic Policy Gradients (DDPG)CarRacing-v0with Deep Q-Networks (DQN) | Coming soon!LunarLander-v2with Deep Q-Networks (DQN) | solved in 1504 episodes
FrozenLake-v0with Dynamic ProgrammingBlackjack-v0with Monte Carlo MethodsCliffWalking-v0with Temporal-Difference Methods
To set up your python environment to run the code in this repository, follow the instructions below.
-
Install Conda via Command Line Anaconda is a distribution of Python that aims to simplify package management and deployment. The main use for Anaconda in this repository would be the creation of an isolated environment to install your deep learning packages and dependencies into.
-
Create (and activate) a new environment with Python 3.6.
- Linux or Mac:
conda create --name drlnd python=3.6
source activate drlnd   # or drlnd_gpu
- Windows:
conda create --name drlnd python=3.6 activate drlnd # or drlnd_gpu -
Follow the instructions in this repository to perform a minimal install of OpenAI gym.
-
If you would like to run your projects with CUDA GPU, you can install relevant CUDA & pytorch packages via the instructions here. You can verify if CUDA is used by PyTorch by running
torch.cuda.is_available()in your python script. -
Clone the repository (if you haven't already!), and navigate to the
python/folder. Then, install several dependencies.
git clone https://github.com/udacity/deep-reinforcement-learning.git
cd deep-reinforcement-learning/python

# NOTE: You may need to comment out pytorch version 0.4.0 in requirements.txt, and manually install latest pytorch using pip install torch to prevent weird installation errors (Manually installing 0.4.0 may causes jupyter notebook hanging error).
# NOTE: This will install the GPU-related dependencies. Please refer to base Udacity repo for CPU version.
pip install .
pip install torch==1.9.0+cu111 torchvision==0.10.0+cu111 torchaudio==0.9.0 -f https://download.pytorch.org/whl/torch_stable.html
pip install tensorboard==2.8.0 		# For tensorboard visualization
pip install tensorflow # Optional- Create an IPython kernel for the
drlndenvironment.
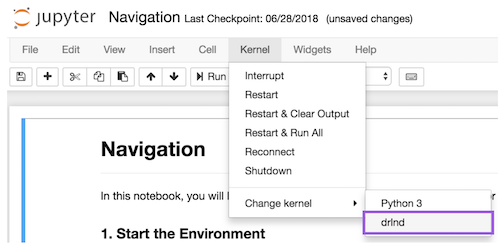
python -m ipykernel install --user --name drlnd --display-name "drlnd"- Before running code in a notebook, change the kernel to match the
drlndenvironment by using the drop-downKernelmenu.
NOTE: You may notice that code cells may not execute as expected (E.g. Hangs for no reason). Please check python/requirements.txt to ensure that the appropriate tensorflow & pytorch packages are installed.
NOTE: Alternatively, you may initialize your conda environment from the .yml files if it suits your hardware:
cd drl_algorithms_collection
conda env create -f drlnd_gpu_env.ymlCome learn with us in the Deep Reinforcement Learning Nanodegree program at Udacity!


