Based on: https://nginx.org/en/docs/
So far, we've seen how to deploy a simple web applications using Flask, but to be honest, by means of scalability, performance and security - the Flask app is very poor.
Nginx is powerful web server that can act as an intermediary between your Flask application and end-users. It is responsible for many aspects that every modern HTTP servers should take into account, aspects that our Flask app can not provide, or such that we don't want to deal with in our Python code.
Here is a short list of what Nginx can do for you:
- Static content
- Scale (multiprocess)
- Rate limit
- Cache
- TLS termination
- Load balancing
- Security
- Multiple web applications
- Authentication
Note
Throughout the tutorial you should work on Ubuntu public EC2 instance in AWS.
Follow the official installation guideline for Ubuntu:
sudo apt update
sudo apt install curl gnupg2 ca-certificates lsb-release ubuntu-keyring
curl https://nginx.org/keys/nginx_signing.key | gpg --dearmor \
    | sudo tee /usr/share/keyrings/nginx-archive-keyring.gpg >/dev/null
echo "deb [signed-by=/usr/share/keyrings/nginx-archive-keyring.gpg] \
http://nginx.org/packages/ubuntu `lsb_release -cs` nginx" \
    | sudo tee /etc/apt/sources.list.d/nginx.list
echo -e "Package: *\nPin: origin nginx.org\nPin: release o=nginx\nPin-Priority: 900\n" \
    | sudo tee /etc/apt/preferences.d/99nginx
sudo apt update
sudo apt install nginx
Start the service by:
sudo systemctl start nginxMake sure the Nginx service is up and running:
$ sudo systemctl status nginx
● nginx.service - nginx - high performance web server
     Loaded: loaded (/lib/systemd/system/nginx.service; enabled; vendor preset: enabled)
     Active: active (running) since Thu 2023-04-27 06:58:53 UTC; 3s ago
       Docs: https://nginx.org/en/docs/
    Process: 12326 ExecStart=/usr/sbin/nginx -c /etc/nginx/nginx.conf (code=exited, status=0/SUCCESS)
   Main PID: 12327 (nginx)
      Tasks: 3 (limit: 1111)
     Memory: 3.9M
        CPU: 11ms
     CGroup: /system.slice/nginx.service
             ├─12327 "nginx: master process /usr/sbin/nginx -c /etc/nginx/nginx.conf"
             ├─12328 "nginx: worker process" "" "" "" "" "" "" "" "" "" "" "" "" "" "" "" "" "" "" ""
             └─12329 "nginx: worker process" "" "" "" "" "" "" "" "" "" "" "" "" "" "" "" "" "" "" ""
The above output discovers that Nginx is operating in the so-called master-workers architecture.
Nginx has one master process and several worker processes.
The main purpose of the master process is to read and evaluate configuration, and maintain worker processes. Worker processes do actual processing of requests, which are efficiently distributed among worker processes. The number of worker processes is defined in the configuration file and may be fixed, or automatically adjusted to the number of available CPU cores.
By default, the configuration file is named nginx.conf and placed in the directory /etc/nginx.
Changes made in the configuration file will not be applied until the command to reload configuration is sent to nginx or it is restarted. To reload configuration, execute:
sudo systemctl reload nginxOnce the master process receives the signal to reload configuration, it checks the syntax validity of the new configuration file and tries to apply the configuration provided in it. If this is a success, the master process starts new worker processes and sends messages to old worker processes, requesting them to shut down. Old worker processes, receiving a command to shut down, stop accepting new connections and continue to service current requests until all such requests are serviced. After that, the old worker processes exit.
Let's take a look on the main configuration file of Nginx:
$ cat /etc/nginx/nginx.conf
user  nginx;
worker_processes  auto;

error_log  /var/log/nginx/error.log notice;
pid        /var/run/nginx.pid;

events {
    worker_connections  1024;
}

http {
    include       /etc/nginx/mime.types;
    default_type  application/octet-stream;

    log_format  main  '$remote_addr - $remote_user [$time_local] "$request" '
                      '$status $body_bytes_sent "$http_referer" '
                      '"$http_user_agent" "$http_x_forwarded_for"';

    access_log  /var/log/nginx/access.log  main;

    sendfile        on;
    #tcp_nopush     on;

    keepalive_timeout  65;

    #gzip  on;

    include /etc/nginx/conf.d/*.conf;
}
Every entry the nginx.conf file is called a Directive. There are simple directives, such user and pid, and block directives, such as http {...}.
Block directives contain other directives within them, which are applied only in the context of the parent directive (e.g. the keepalive_timeout within the http directive applies only to the http context.).
Directives placed in the configuration file outside of any contexts are considered to be in the main context.
Here are a few interesting directives explained:
- The
eventsdirective specifies settings for the nginx event loop (the core engine of Nginx), which handles client connections. Theworker_connectionsdirective specifies the maximum number of client connections that a worker process can handle simultaneously. - The
httpdirective contains configuration settings for the HTTP server. - The
sendfiledirective enables or disables serving static files - The
include /etc/nginx/conf.d/*.conf;directive includes any.conffiles in the/etc/nginx/conf.d/directory. This is typically used to include additional configuration files that define virtual hosts or other server settings.
Now let's take a look on /etc/nginx/conf.d/default.conf:
$ cat /etc/nginx/conf.d/default.conf
server {
    listen       80;
    server_name  localhost;

    #access_log  /var/log/nginx/host.access.log  main;

    location / {
        root   /usr/share/nginx/html;
        index  index.html index.htm;
    }

    #error_page  404              /404.html;

    # redirect server error pages to the static page /50x.html
    #
    error_page   500 502 503 504  /50x.html;
    location = /50x.html {
        root   /usr/share/nginx/html;
    }

    # proxy the PHP scripts to Apache listening on 127.0.0.1:80
    #
    #location ~ \.php$ {
    #    proxy_pass   http://127.0.0.1;
    #}

    # pass the PHP scripts to FastCGI server listening on 127.0.0.1:9000
    #
    #location ~ \.php$ {
    #    root           html;
    #    fastcgi_pass   127.0.0.1:9000;
    #    fastcgi_index  index.php;
    #    fastcgi_param  SCRIPT_FILENAME  /scripts$fastcgi_script_name;
    #    include        fastcgi_params;
    #}

    # deny access to .htaccess files, if Apache's document root
    # concurs with nginx's one
    #
    #location ~ /\.ht {
    #    deny  all;
    #}
}
The server directive in Nginx is a fundamental configuration block used to define settings for virtual hosts.
Each server block specifies how Nginx should handle requests for a specific domain or IP address, allowing you to host multiple websites on a single Nginx instance.
As can be seen, the server block is configured to listen on port 80.
Let's try it by visiting:
http://<your-instance-ip>
The "Welcome to nginx!" page should be served by default.
Note
Your machine should accept incoming traffic on port 80.
How does it work?
The location block sets configuration depending on a request URI.
In out case, the location / block defines that every request URI that matches the / prefix, will be served according to the definitions of this block -
all content is being served from /usr/share/nginx/html, and if otherwise not specified, the default served pages are index.html or index.htm.
If there are several matching location blocks nginx selects the one with the longest prefix.
A forward proxy (or just "proxy") is a server that sits between a client and a server and forwards requests from the client to the server on behalf of the client. The client is aware of the proxy and sends its requests to the proxy, which then makes the request to the server and returns the response to the client.
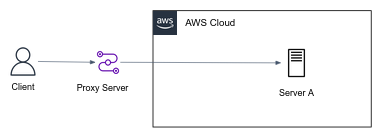
A VPN (Virtual Private Network) can be considered a type of forward proxy that encrypts and tunnels all traffic between a client and a server, allowing the client to securely access the server and bypass network restrictions.
A reverse proxy, on the other hand, sits between a client and a server and forwards requests from the client to one or more servers on behalf of the server. The client is not aware of the reverse proxy, it sends its requests to the server, and the server forwards the requests to the reverse proxy, which then forwards them to one or more backend servers.
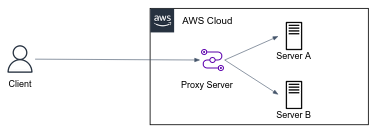
Nginx reverse proxy is a common technique used to evenly distribute traffic among multiple servers, seamlessly display content from various websites, or transfer requests for processing to backend application (E.g. our Flask app) through non-HTTP protocols.
We would like to serve the NetflixMovieCatalog app behind an Nginx reverse proxy.
Note
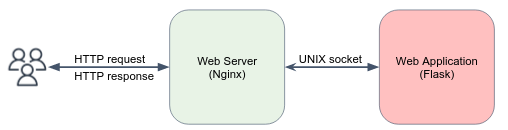
The terms Web Application and Web Server may confuse at first glance.
Nginx is a web server, by means that it is a general engine that serves HTTP requests and responses, for any application, regardless the content and that is being served, and the programing language. A web application, on the other hand, is responsible for the business logic and functionality, such as API logic implementation, form submission, data processing, and dynamic HTML rendering.
Using web servers, web developers should not bother themselves with the overhead of handling security aspects, scalability, request rate limit, etc... they can focus of the app logic itself, save time and effort.
Let's serve the Flask web-app behind the Nginx webserver.
-
If haven't done yet, copy or clone the content of NetflixMovieCatalog into the Nginx machine, create Python virtual environment (venv) and install dependencies:
python3 -m venv .venv source ./.venv/bin/activate pip install -r requirements.txt -
Change the default configurations on your Nginx. Override the
location /directive in/etc/nginx/conf.d/default.confby the following:
location / {
     proxy_pass http://127.0.0.1:8080;
}
- Reload the Nginx server by
sudo systemctl reload nginx. - Visit the app in
http://<instance-public-ip>.
Note
In case something does not work as expected, you may try to find out the reason in access.log and error.log files in the directory /var/log/nginx.
-
Create 2
*.nanoUbuntu EC2 instance and deploy the NetflixMovieCatalog app within them. -
Review the upstream directive docs, and configure your Nginx server to be functioning as a Load Balancer which routes the traffic among your 2 instances. Both the Nginx, and the 2 other instance should reside on the same network, and the communication has to be done using the instance's private IP.
You can utilize the below conf snippet:
# default.conf upstream backend { server <private-ip-1>:8080; server <private-ip-2>:8080; server { ... location / { proxy_pass http://backend; } ... -
Make sure the traffic is distributed over the two backends (almost) evenly.
An important web server task is serving out files (such as images or static HTML pages, images and media files).
Let's say we are Netflix, and we want to serve the poster image of movies to our website visitors.
- Create a dir under
/usr/share/nginx/poster, download and extract some images for example:cd /usr/share/nginx/poster wget https://exit-zero-academy.github.io/DevOpsTheHardWayAssets/netflix_movies_poster_img/images.tar.gz tar -xzvf images.tar.gz - Under
/etc/nginx/conf.d/default.conf, add anotherlocationdirective that will be responsible for images serving, as follows:
location /poster/ {
    root   /usr/share/nginx;
 }
- To apply the new configurations:
sudo systemctl reload nginx. - Try to serve some image by visit
http://<nginx-instance-ip>/poster/<some-image-path> - Try to serve some image that doesn't exist. What happened?
Remember our promise that Nginx can do a lot for you? Let's see some examples...
Serve your Nginx server over HTTPS, and create another server which listens to HTTP (port 80) and redirect all traffic to the HTTPS server.