Friendly disclaimer: This project is under active development; we cannot promise that everything will work 100%. We encourage you to try it out! Feedback and pull requests are welcome :)
The Openframe controller is the software that runs on the frame itself (i.e. the RPi), acting as a process manager for starting, stopping, and transitioning between artworks. It communicates with an Openframe API Server server via a REST API, and connects to a global event system allowing for realtime updates. The idea is to work towards a system which supports the basic goals of Openframe, guided by a handful of pilot use cases.
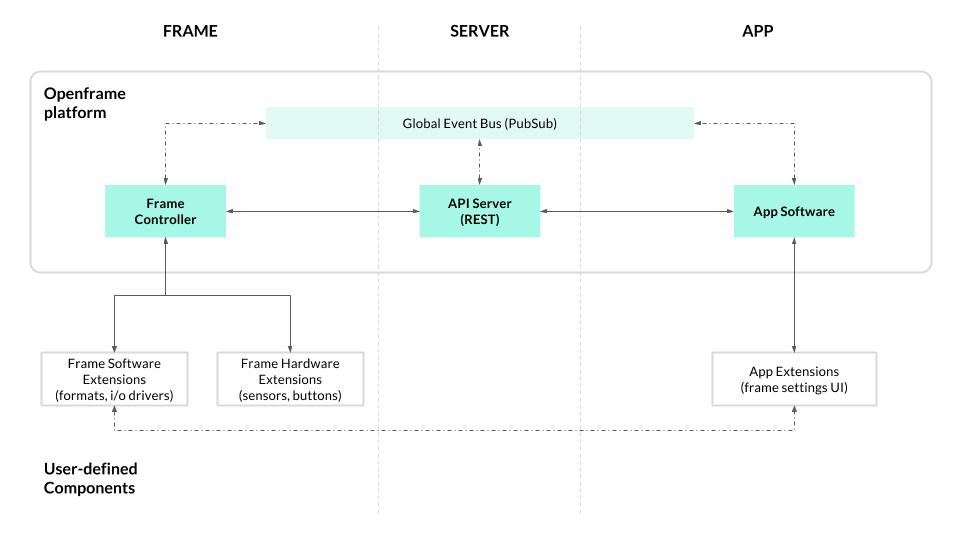
The block diagram below represents a proposed architecture for the Openframe platform. It will continue to evolve as development on the project progresses.
controller.js- manages the actions around controlling the frame (changing artwork, updating settings, etc.)process-manager.js- manages starting and stopping processes for displaying artworksextensions-manager.js- manages installing and initializing extensions (aka plugins)frame.js- a wrapper for the Frame model, which gets persisted touser.js- a wrapper for the User modelpubsub.js- creates and manages connection to global event systemrest.js- creates and manages connection to REST API via Swagger.jsdownloader.js- utility for downloading filesconfig.js- configuration options
FYI: Pardon the lack of detail and documentation. We'll be updating frequently over the coming weeks / months!
If you're just trying to get a frame up and running on a Raspberry Pi, please check out the Openframe User Guide.
If you're interested in hacking on Openframe, feel free to fork/clone this repo. Run npm install to install the deps, then start up the openframe software:
$ npm start
Upon startup, the application will prompt you for your Openframe username and password, and a name for this frame. You can run this on a mac or linux machine (windows untested), though various artwork format extensions are likely to be developed with a specific target platform in mind.
For DEBUG output, set the DEBUG env var:
$ DEBUG=* npm startWhen you run npm install, the install.sh script will be executed. This script creates a hidden directory, .openframe, in your user home folder (/home/{username}/.openframe), and copies the default .ofrcconfiguration file there. The .ofrc file contains the server settings — by default this will point to the hosted API server at openframe.io, but if you're running a local server for development or are hosting your own API server you can update the settings in .ofrc accordingly.
After starting the application and answering the prompts, two additional files are created in the .openframe dir, frame.json which stores the frame state, and user.json which stores user data.
Extensions are npm packages which add functionality to the frame, either by adding support for a new artwork format (i.e. media type) or by adding other functionality.
For more info on extensions, see the Openframe-Extension repo.
