Quiet Velvet is a custom taskbar built using Zebar. ⬇️ Join the community ⬇️

If you need assistance, please send me a message on Discord. My ID is 0h37.

IMPORTANT: This project will only work with this Zebar version and above : 2.6.1
Navigate to your ~/.glzr/zebar/ directory and clone this repository:
git clone https://github.com/LeoBessin/quiet-velvet
Navigate to the repository and install the dependencies:
-
cd ./quiet-velvet/ -
npm install -
Create a
config.jsfile in the./src/folder. You can configure it later using the configuration section.
Build the project using the following command:
npm run build
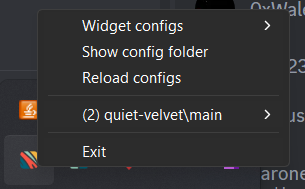
After completing these steps, you need to reload Zebar's configuration.
You should see quiet-velvet/main in the Widget configurations!
You need to create a config.js file in the quiet-velvet/src/ directory.
Enter the following key/value pairs in the file.
These keys are not required for the build, so you can leave them as shown in the example.
Instructions for obtaining the Spotify tokens are provided in the Spotify section.
export default {
    explorerPath: '<YOUR-EXPLORER-PATH>',
    powershellPath: '<YOUR-POWERSHELL-PATH>'
}Note: Every time you want to apply your changes, you need to run
npm run buildat the root of the config folder then reload zebar.
You can customize the style by modifying the following values in the styles.css file:
- Main color:
--main-color - Font color:
--font-color - Background color:
--background-color
If you use GlazeWM, you can rename your workspaces in the ~/.glzr/glazewm/config.yaml file:
workspaces:
  - name: "1"
    display_name: "[discord-logo] Other"
    ...
  - name: '2'
    display_name: "[code-logo] Work"
    ...
  - name: '3'
    display_name: "[search-logo] Search"
    ...
...
Visit the Nerd Fonts Cheat Sheet, search for the desired icon, hover over it,
and click the Icon text to copy it to your clipboard. Then, replace [xxx-logo] with the copied icon.
![]()
Currently, Quiet Velvet includes four widgets.

This widget displays your currently playing media.
On hover, you will have access to previous, play/pause, and skip song controls.
On Wheel up/down, it will change your audio volume.
There are some issues when using the bar play/pause button; it may not always display the correct state. Additionally, the volume control might feel a bit laggy.

This widget allows you to quickly search for any information on Google.
When the Enter key is pressed, it will focus on the GlazeWM workspace 3 and open your explorer.
To use this widget, you only need to set the explorerPath value in src/config.js.
You can modify or remove the workspace focus in the onSubmit function of the src/components/GoogleSearch.jsx file.
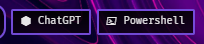
This widget allows you to execute shortcuts, such as opening an application or a website.
On click, it will execute the specified shortcut.
To create a shorcut follow this example :
<Shortcut commandRunner={output.glazewm.runCommand}
          commands={[
              'focus --workspace 2',
              `shell-exec ${config.powershellPath}`
          ]}
          iconClass="nf-cod-terminal_powershell" name="Powershell"
/>
You can add a key/value pair in the src/config.js file and use it here, as shown with the powershellPath.
To change the icon, choose one from Nerd Fonts Cheat Sheet and paste the class in the iconClass property.

This widget allows you to toggle the visibility of all your widgets and saves your preferences in local storage.
To add another widget, follow this example:
function App() {
    const [showXWidget, setShowXWidget] = useState(true);
    const [showYWidget, setShowYWidget] = useState(true);
    ...
    return (
        <>
            ...
            {showXWidget ? <XWidget/> : null}
            ...
            {showYWidget ? <YWidget/> : null}
            ...
            {<Settings widgetObj={[
                { name: 'XWidget', changeState: setShowXWidget },
                { name: 'YWidget', changeState: setShowYWidget }
            ]}/>}
            ...
        </>
    )
}
Click on the gear icon to change the state of the widget.
- Open the task manager by clicking on the memory or CPU icon.
- Change the date format by hovering over it.